How to Use Batería 303035: Examples, Pinouts, and Specs
Introduction
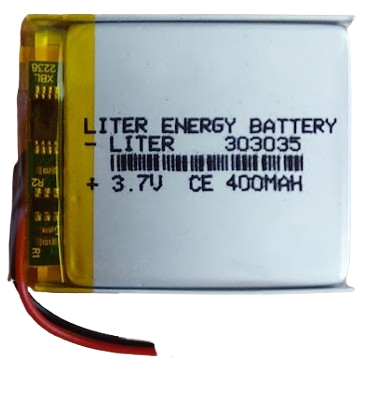
The Batería 303035 is a compact lithium polymer (Li-Po) battery designed for use in portable electronic devices. With a nominal voltage of 3.7V and a lightweight, small form factor, it is ideal for applications where space and weight are critical. This battery is commonly found in devices such as wearable electronics, small IoT gadgets, and handheld tools.
Explore Projects Built with Batería 303035


Explore Projects Built with Batería 303035
Common Applications
- Wearable devices (e.g., fitness trackers, smartwatches)
- Internet of Things (IoT) devices
- Portable sensors
- Small handheld tools and gadgets
- Backup power for embedded systems
Technical Specifications
The following table outlines the key technical specifications of the Batería 303035:
| Parameter | Value |
|---|---|
| Nominal Voltage | 3.7V |
| Capacity | 300mAh |
| Maximum Charging Voltage | 4.2V |
| Discharge Cutoff Voltage | 3.0V |
| Maximum Discharge Current | 1C (300mA) |
| Standard Charge Current | 0.5C (150mA) |
| Dimensions (L x W x H) | 30mm x 30mm x 3.5mm |
| Weight | ~6 grams |
| Chemistry | Lithium Polymer (Li-Po) |
| Connector Type | JST 2-pin (commonly used) |
Pin Configuration
The Batería 303035 typically comes with a 2-pin JST connector. The pin configuration is as follows:
| Pin | Description | Wire Color |
|---|---|---|
| 1 | Positive Terminal (+) | Red |
| 2 | Negative Terminal (-) | Black |
Usage Instructions
How to Use the Batería 303035 in a Circuit
- Connection: Connect the battery to your circuit using the JST 2-pin connector. Ensure the polarity matches the circuit's power input (red wire to positive, black wire to negative).
- Charging: Use a dedicated Li-Po battery charger with a constant current/constant voltage (CC/CV) charging profile. The charging voltage must not exceed 4.2V.
- Discharging: Ensure the load does not draw more than the maximum discharge current (300mA). Use a protection circuit module (PCM) if necessary to prevent over-discharge.
- Protection: Many Batería 303035 models include built-in protection circuits to prevent overcharging, over-discharging, and short circuits. Verify this feature before use.
Important Considerations
- Avoid Overcharging: Never charge the battery above 4.2V, as this can damage the cell or cause safety hazards.
- Prevent Over-Discharge: Do not allow the voltage to drop below 3.0V, as this can permanently damage the battery.
- Temperature Range: Operate the battery within the recommended temperature range (typically 0°C to 45°C for charging and -20°C to 60°C for discharging).
- Storage: Store the battery at approximately 50% charge in a cool, dry place if not in use for extended periods.
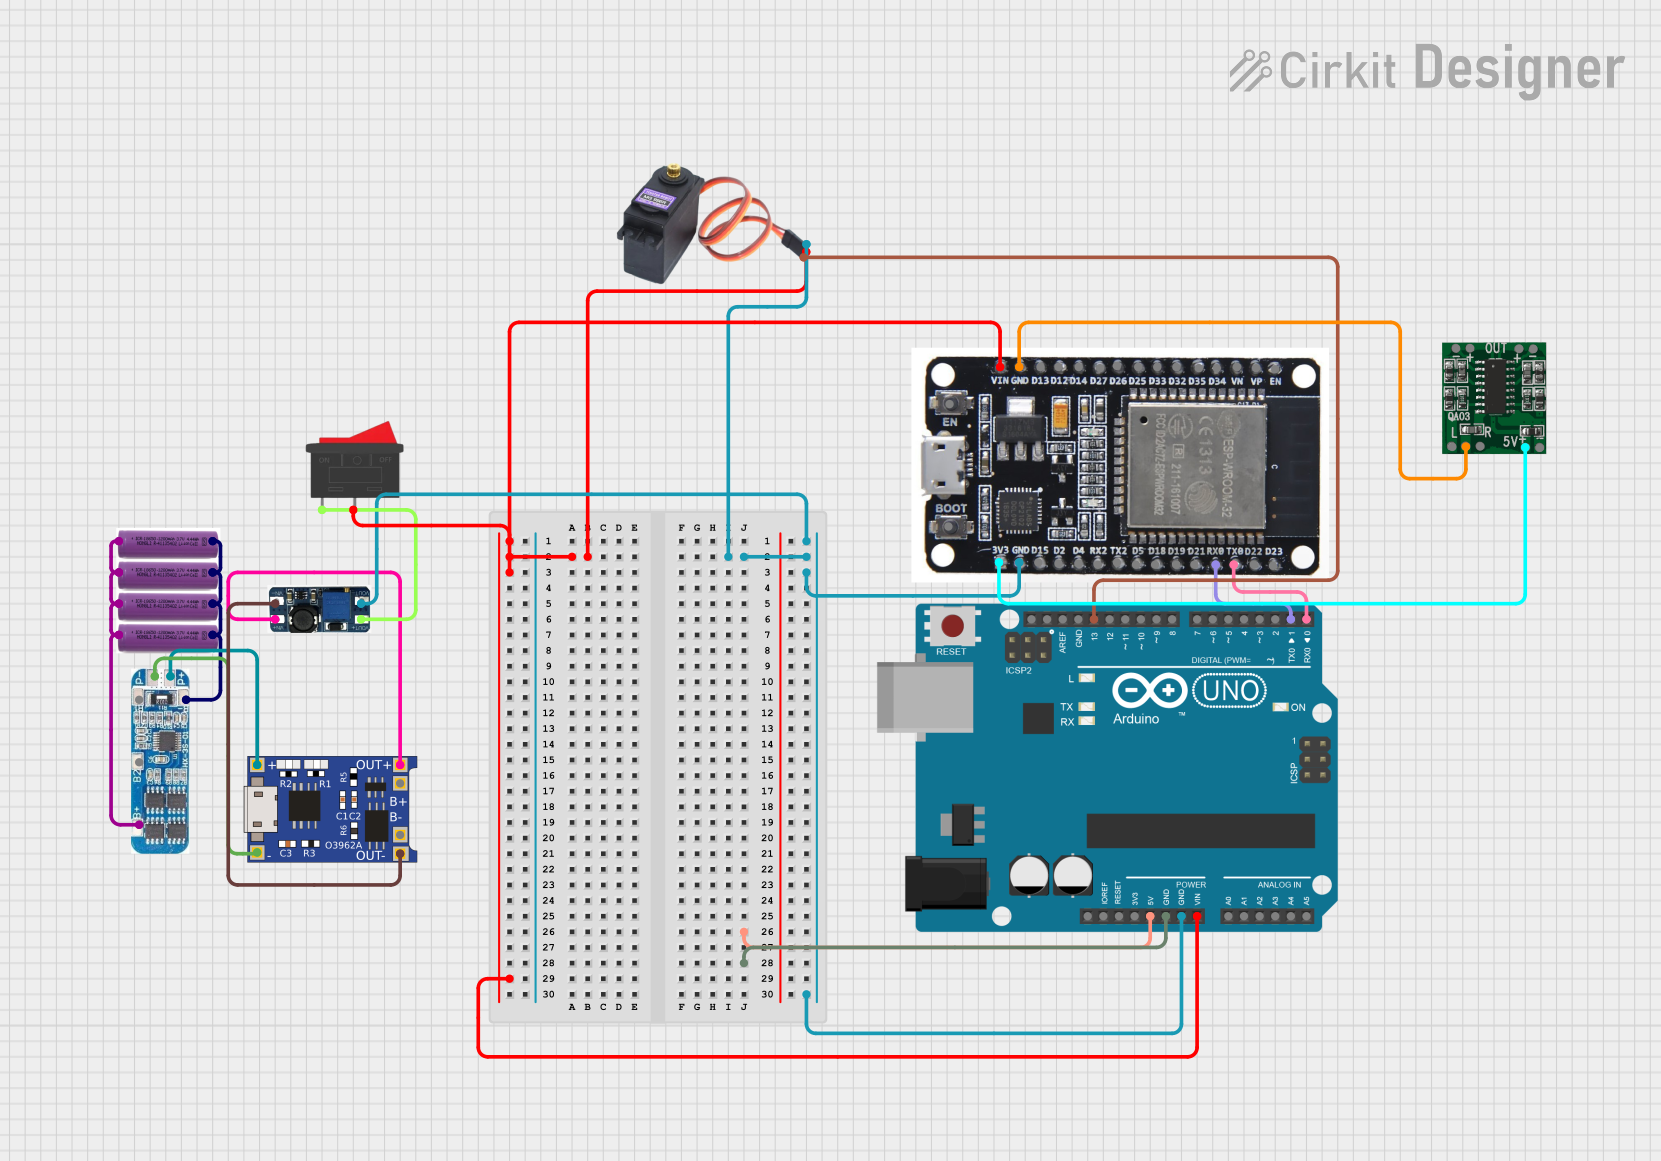
Example: Using the Batería 303035 with an Arduino UNO
The Batería 303035 can power an Arduino UNO through its VIN pin. Below is an example of how to connect and monitor the battery voltage using an analog pin:
Circuit Connection
- Connect the red wire of the battery to the VIN pin of the Arduino.
- Connect the black wire of the battery to the GND pin of the Arduino.
- Use a voltage divider circuit to step down the battery voltage to a safe level (below 5V) for the Arduino's analog input.
Sample Code
// Example code to monitor the Batería 303035 voltage using Arduino UNO
// Ensure a voltage divider is used to step down the battery voltage to <5V

const int batteryPin = A0; // Analog pin connected to the voltage divider
const float voltageDividerRatio = 2.0; // Adjust based on your resistor values
const float referenceVoltage = 5.0; // Arduino UNO's reference voltage

void setup() {
  Serial.begin(9600); // Initialize serial communication
}

void loop() {
  int rawValue = analogRead(batteryPin); // Read the analog value
  float batteryVoltage = (rawValue / 1023.0) * referenceVoltage * voltageDividerRatio;

  // Print the battery voltage to the Serial Monitor
  Serial.print("Battery Voltage: ");
  Serial.print(batteryVoltage);
  Serial.println(" V");

  delay(1000); // Wait for 1 second before the next reading
}
Notes:
- Adjust the
voltageDividerRatioin the code based on the resistor values used in your voltage divider circuit. - Ensure the battery voltage does not exceed the Arduino's input voltage limits.
Troubleshooting and FAQs
Common Issues
Battery Not Charging
- Cause: Faulty charger or incorrect charging voltage.
- Solution: Verify the charger is functioning correctly and outputs a constant 4.2V.
Battery Drains Quickly
- Cause: Excessive load or degraded battery capacity.
- Solution: Check the load current and ensure it does not exceed 300mA. Replace the battery if it is old or damaged.
Battery Overheats During Use
- Cause: Overcurrent or short circuit.
- Solution: Use a protection circuit module (PCM) and ensure the load is within the specified current limits.
Arduino Fails to Power On
- Cause: Insufficient voltage or incorrect connection.
- Solution: Check the battery voltage and ensure proper polarity when connecting to the Arduino.
FAQs
Can I use the Batería 303035 without a protection circuit?
- While some models include built-in protection, it is recommended to use an external protection circuit for added safety.
How long does it take to charge the battery?
- Charging at the standard rate of 0.5C (150mA) typically takes about 2-3 hours.
Can I connect multiple Batería 303035 cells in series or parallel?
- Yes, but ensure proper balancing and use a battery management system (BMS) to prevent overcharging or over-discharging.
What is the expected lifespan of the battery?
- The Batería 303035 typically lasts for 300-500 charge cycles, depending on usage and care.
By following the guidelines and best practices outlined in this documentation, you can safely and effectively use the Batería 303035 in your projects.