How to Use MP3 Player Shield: Examples, Pinouts, and Specs
Introduction
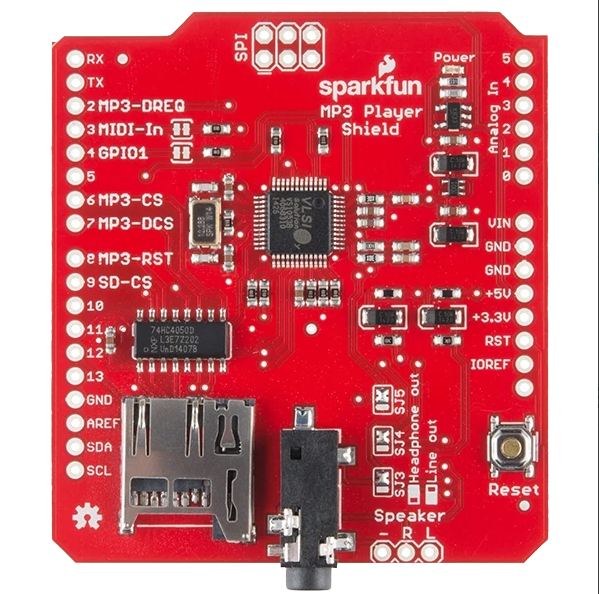
The SparkFun MP3 Player Shield is an add-on board designed to enable microcontrollers, such as the Arduino UNO, to play MP3 audio files. This shield integrates a VS1053B MP3 codec chip, which handles MP3 decoding, and includes a digital-to-analog converter (DAC) for high-quality audio output. It also features a microSD card slot for storing audio files and a 3.5mm audio jack for easy connection to speakers or headphones.
This shield is ideal for projects involving sound and music, such as interactive art installations, audio guides, or custom music players. Its compact design and ease of use make it a popular choice for hobbyists and professionals alike.
Explore Projects Built with MP3 Player Shield


Explore Projects Built with MP3 Player Shield
Technical Specifications
Key Technical Details
- MP3 Codec Chip: VS1053B
- Audio Output: Stereo via 3.5mm headphone jack
- MicroSD Card Slot: Supports FAT16/FAT32 file systems
- Power Supply Voltage: 3.3V or 5V (via Arduino)
- Current Consumption: ~100mA (varies with playback)
- Supported Audio Formats: MP3, AAC, WMA, MIDI, WAV, Ogg Vorbis
- Control Interface: SPI (Serial Peripheral Interface)
- Dimensions: 68.6mm x 53.3mm (compatible with Arduino UNO form factor)
Pin Configuration and Descriptions
The MP3 Player Shield connects to an Arduino UNO or similar microcontroller via its headers. Below is the pin configuration:
| Pin | Function | Description |
|---|---|---|
| D2 | DREQ (Data Request) | Indicates when the VS1053B is ready to receive more data. |
| D3 | XDCS (Data Chip Select) | Selects the data interface for the VS1053B. |
| D4 | SDCS (SD Card Chip Select) | Selects the microSD card interface. |
| D5 | RESET | Resets the VS1053B chip. |
| D6 | GPIO1 | General-purpose I/O pin (optional use). |
| D7 | GPIO2 | General-purpose I/O pin (optional use). |
| D10 | CS (Chip Select) | Selects the VS1053B control interface. |
| D11 | MOSI (Master Out Slave In) | SPI data line for sending data to the shield. |
| D12 | MISO (Master In Slave Out) | SPI data line for receiving data from the shield. |
| D13 | SCK (Serial Clock) | SPI clock line for synchronizing data transfer. |
| GND | Ground | Common ground connection. |
| VIN | Power Input | Supplies power to the shield (via Arduino). |
Usage Instructions
How to Use the MP3 Player Shield in a Circuit
- Attach the Shield: Plug the MP3 Player Shield onto an Arduino UNO or compatible microcontroller.
- Prepare the microSD Card:
- Format the card to FAT16 or FAT32.
- Copy MP3 or other supported audio files to the card.
- Connect Audio Output:
- Plug headphones or speakers into the 3.5mm audio jack.
- Install Required Libraries:
- Download and install the
SFEMP3Shieldlibrary from the Arduino Library Manager.
- Download and install the
- Upload Example Code:
- Use the example code provided below to test the shield.
Example Code for Arduino UNO
#include <SPI.h>
#include <SdFat.h>
#include <SFEMP3Shield.h>

// Create instances for SD card and MP3 player
SdFat sd;
SFEMP3Shield MP3player;

void setup() {
  Serial.begin(9600); // Initialize serial communication for debugging

  // Initialize the SD card
  if (!sd.begin(SD_SEL, SPI_HALF_SPEED)) {
    Serial.println("SD card initialization failed!");
    return;
  }
  Serial.println("SD card initialized.");

  // Initialize the MP3 player
  if (MP3player.begin() != 0) {
    Serial.println("MP3 player initialization failed!");
    return;
  }
  Serial.println("MP3 player initialized.");

  // Set volume (range: 0 to 255, where 0 is max volume)
  MP3player.setVolume(20, 20);

  // Start playing an MP3 file
  if (MP3player.playMP3("track001.mp3") != 0) {
    Serial.println("Error playing MP3 file!");
  } else {
    Serial.println("Playing MP3 file...");
  }
}

void loop() {
  // Continuously check for playback status
  if (!MP3player.isPlaying()) {
    Serial.println("Playback finished.");
    while (1); // Stop the program
  }
}
Important Considerations and Best Practices
- Ensure the microSD card is properly formatted and contains supported audio files.
- Use a regulated power supply to avoid damaging the shield or Arduino.
- Avoid connecting high-power speakers directly to the audio jack; use an amplifier if needed.
- Keep SPI connections short to minimize noise and ensure reliable communication.
Troubleshooting and FAQs
Common Issues and Solutions
SD Card Not Detected:
- Ensure the card is formatted to FAT16 or FAT32.
- Check the SD card slot for proper insertion.
- Verify the
SDCSpin connection.
No Audio Output:
- Confirm that the audio file format is supported.
- Check the volume settings in the code.
- Ensure headphones or speakers are properly connected.
MP3 Player Initialization Fails:
- Verify the shield is securely attached to the Arduino.
- Check the SPI connections and ensure no pins are loose.
Playback Stops Unexpectedly:
- Ensure the microSD card is not corrupted.
- Check for power supply stability.
FAQs
Can I use this shield with other microcontrollers? Yes, the shield can work with any microcontroller that supports SPI communication, but you may need to modify the code and connections.
What is the maximum size of the microSD card supported? The shield supports microSD cards up to 32GB formatted in FAT16 or FAT32.
Can I play audio formats other than MP3? Yes, the VS1053B chip supports AAC, WMA, MIDI, WAV, and Ogg Vorbis in addition to MP3.
How do I adjust the volume? Use the
setVolume(left, right)function in the code, whereleftandrightare values between 0 (max volume) and 255 (mute).