Cirkit Designer Logo
Cirkit Designer
Your all-in-one circuit design IDE
Home / 
Component Documentation

How to Use Adafruit SHT31-D: Examples, Pinouts, and Specs

Image of Adafruit SHT31-D
Cirkit Designer LogoDesign with Adafruit SHT31-D in Cirkit Designer

Introduction

The Adafruit SHT31-D is a precision sensor for measuring temperature and humidity. Based on the Sensirion SHT31-D sensor, this breakout board is designed for easy integration into a wide range of applications, including weather stations, environmental monitoring, home automation, and HVAC systems. Its high accuracy, fast response time, and low power consumption make it an excellent choice for both hobbyists and professionals.

Explore Projects Built with Adafruit SHT31-D

Use Cirkit Designer to design, explore, and prototype these projects online. Some projects support real-time simulation. Click "Open Project" to start designing instantly!
Arduino Nano-Controlled LED Display with RTC and Humidity Sensing
Image of Alarm Clock: A project utilizing Adafruit SHT31-D in a practical application
This circuit features a Nano 3.0 ATmega328P microcontroller connected to an LED dot display, a real-time clock (RTC DS3231), and a humidity and temperature sensor (SHT21). The microcontroller communicates with the RTC and SHT21 via I2C (using A4 and A5 as SDA and SCL lines, respectively), and it controls the LED display through SPI-like signals (using D10, D11, and D12 for DIN, CS, and CLK). The circuit is designed to display time and environmental data on the LED display, with all components sharing a common power supply and ground.
Cirkit Designer LogoOpen Project in Cirkit Designer
Arduino Nano-Based Air Quality Monitor with OLED Display and Alert Buzzer
Image of Luftkvalitetsmätare: A project utilizing Adafruit SHT31-D in a practical application
This circuit features an Arduino Nano microcontroller interfaced with an Adafruit SGP30 air quality sensor, an Adafruit SHTC3 temperature and humidity sensor, and a 0.96" OLED display for real-time environmental monitoring. The sensors communicate with the Arduino via I2C, with the SGP30 and SHTC3 sensors providing air quality readings (CO2 and TVOC) and temperature/humidity data, respectively, which are then displayed on the OLED. Additionally, a buzzer is connected to the Arduino and is programmed to activate when CO2 levels exceed a certain threshold, serving as an alert system.
Cirkit Designer LogoOpen Project in Cirkit Designer
Arduino Nano Weather Station with Ethernet Connectivity
Image of Nano_Sht31_W5500: A project utilizing Adafruit SHT31-D in a practical application
This circuit features an Arduino Nano microcontroller interfaced with an Ethernet W5500 module for network connectivity and an SHT31 sensor for temperature and humidity measurements. The Arduino Nano communicates with the Ethernet module via SPI and reads data from the SHT31 sensor using I2C, enabling remote monitoring of environmental conditions.
Cirkit Designer LogoOpen Project in Cirkit Designer
ESP32-Based Weather Station with OLED Display and RTC
Image of Weather Station: A project utilizing Adafruit SHT31-D in a practical application
This circuit uses an ESP32 microcontroller to read temperature and humidity data from a DHT11 sensor, analog data from a rain sensor, and timestamps from an RTC DS3231. The collected data is then displayed on a 1.3" OLED screen.
Cirkit Designer LogoOpen Project in Cirkit Designer

Explore Projects Built with Adafruit SHT31-D

Use Cirkit Designer to design, explore, and prototype these projects online. Some projects support real-time simulation. Click "Open Project" to start designing instantly!
Image of Alarm Clock: A project utilizing Adafruit SHT31-D in a practical application
Arduino Nano-Controlled LED Display with RTC and Humidity Sensing
This circuit features a Nano 3.0 ATmega328P microcontroller connected to an LED dot display, a real-time clock (RTC DS3231), and a humidity and temperature sensor (SHT21). The microcontroller communicates with the RTC and SHT21 via I2C (using A4 and A5 as SDA and SCL lines, respectively), and it controls the LED display through SPI-like signals (using D10, D11, and D12 for DIN, CS, and CLK). The circuit is designed to display time and environmental data on the LED display, with all components sharing a common power supply and ground.
Cirkit Designer LogoOpen Project in Cirkit Designer
Image of Luftkvalitetsmätare: A project utilizing Adafruit SHT31-D in a practical application
Arduino Nano-Based Air Quality Monitor with OLED Display and Alert Buzzer
This circuit features an Arduino Nano microcontroller interfaced with an Adafruit SGP30 air quality sensor, an Adafruit SHTC3 temperature and humidity sensor, and a 0.96" OLED display for real-time environmental monitoring. The sensors communicate with the Arduino via I2C, with the SGP30 and SHTC3 sensors providing air quality readings (CO2 and TVOC) and temperature/humidity data, respectively, which are then displayed on the OLED. Additionally, a buzzer is connected to the Arduino and is programmed to activate when CO2 levels exceed a certain threshold, serving as an alert system.
Cirkit Designer LogoOpen Project in Cirkit Designer
Image of Nano_Sht31_W5500: A project utilizing Adafruit SHT31-D in a practical application
Arduino Nano Weather Station with Ethernet Connectivity
This circuit features an Arduino Nano microcontroller interfaced with an Ethernet W5500 module for network connectivity and an SHT31 sensor for temperature and humidity measurements. The Arduino Nano communicates with the Ethernet module via SPI and reads data from the SHT31 sensor using I2C, enabling remote monitoring of environmental conditions.
Cirkit Designer LogoOpen Project in Cirkit Designer
Image of Weather Station: A project utilizing Adafruit SHT31-D in a practical application
ESP32-Based Weather Station with OLED Display and RTC
This circuit uses an ESP32 microcontroller to read temperature and humidity data from a DHT11 sensor, analog data from a rain sensor, and timestamps from an RTC DS3231. The collected data is then displayed on a 1.3" OLED screen.
Cirkit Designer LogoOpen Project in Cirkit Designer

Technical Specifications

Key Technical Details

  • Temperature Range: -40°C to 125°C
  • Humidity Range: 0 to 100% RH
  • Temperature Accuracy: ±0.3°C
  • Humidity Accuracy: ±2% RH
  • Voltage Range: 2.4V to 5.5V
  • Interface: I2C
  • I2C Address: 0x44 (default), 0x45 (alternative)

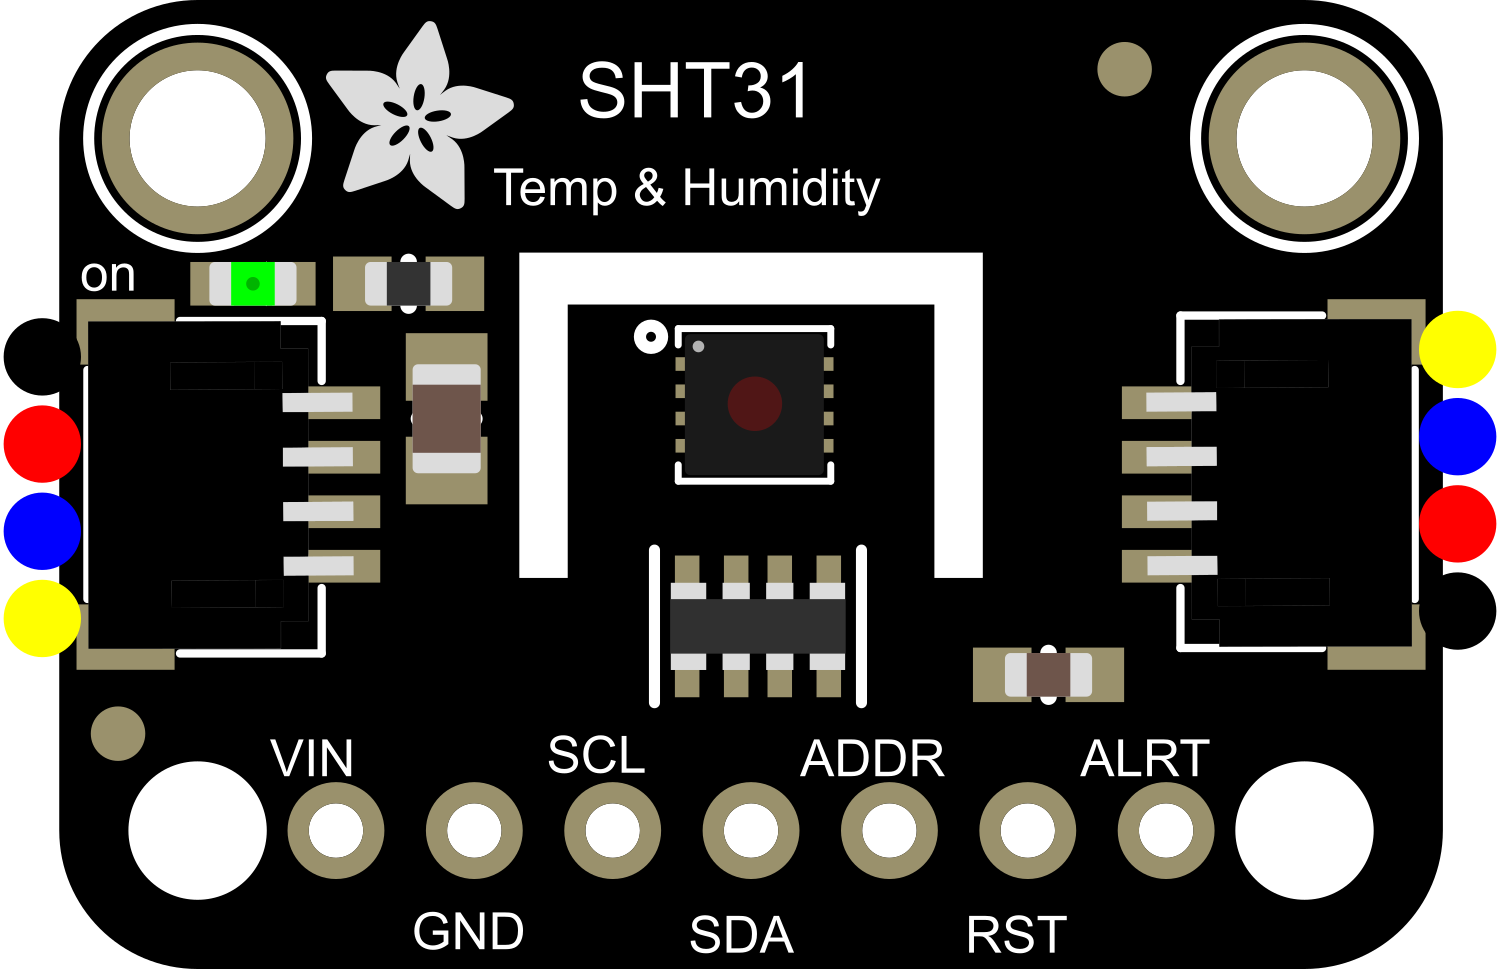
Pin Configuration and Descriptions

Pin Number Name Description
1 VDD Power supply (2.4V to 5.5V)
2 GND Ground
3 SCL I2C Clock
4 SDA I2C Data
5 ADR Address selection pin
6 ALR Alert pin (active low)
7 NC Not connected
8 NC Not connected

Usage Instructions

Integration into a Circuit

  1. Connect the VDD pin to a 2.4V to 5.5V power supply.
  2. Connect the GND pin to the ground of your power supply.
  3. Connect the SCL and SDA pins to the I2C clock and data lines, respectively.
  4. If you need to change the I2C address, connect the ADR pin to VDD or GND.
  5. The ALR pin can be used for external alerts and should be connected if this feature is required.

Best Practices

  • Use pull-up resistors on the I2C lines (typically 4.7kΩ to 10kΩ).
  • Keep the sensor away from direct sunlight and heat sources to prevent inaccurate readings.
  • Ensure that the sensor is not exposed to condensing moisture.
  • For stable readings, allow the sensor to acclimatize to the environment before taking measurements.

Example Code for Arduino UNO

#include <Wire.h>
#include "Adafruit_SHT31.h"

Adafruit_SHT31 sht31 = Adafruit_SHT31();

void setup() {
  Serial.begin(9600);
  if (!sht31.begin(0x44)) {   // Set to 0x45 for the alternative I2C address
    Serial.println("Couldn't find SHT31");
    while (1) delay(1);
  }
}

void loop() {
  float t = sht31.readTemperature();
  float h = sht31.readHumidity();

  if (!isnan(t)) {  // Check if 't' is not a NaN value
    Serial.print("Temp *C = "); Serial.println(t);
  } else { 
    Serial.println("Failed to read temperature");
  }

  if (!isnan(h)) {  // Check if 'h' is not a NaN value
    Serial.print("Hum. % = "); Serial.println(h);
  } else { 
    Serial.println("Failed to read humidity");
  }

  delay(500);
}

Troubleshooting and FAQs

Common Issues

  • Sensor not detected: Ensure that the wiring is correct and that the sensor is properly powered.
  • Inaccurate readings: Verify that the sensor is not placed near heat sources or in direct sunlight.
  • I2C communication errors: Check pull-up resistors on the I2C lines and ensure there are no shorts.

Solutions and Tips

  • If the sensor is not responding, try resetting the power supply.
  • For I2C communication issues, use a logic analyzer to check the signals on the SCL and SDA lines.
  • Ensure that the Arduino library for the SHT31-D is up to date.

FAQs

Q: Can the SHT31-D sensor be used outdoors? A: Yes, but it should be protected from direct sunlight, high humidity, and water ingress.

Q: What is the purpose of the ADR pin? A: The ADR pin allows you to change the I2C address of the sensor. This is useful if you have multiple sensors on the same I2C bus.

Q: How often should the sensor be calibrated? A: The SHT31-D is factory-calibrated. However, recalibration is recommended if the sensor is used in harsh environmental conditions over a long period.

For further assistance, consult the Adafruit SHT31-D datasheet and the Sensirion SHT31-D technical documentation.