How to Use XL7015: Examples, Pinouts, and Specs

 Design with XL7015 in Cirkit Designer
Introduction
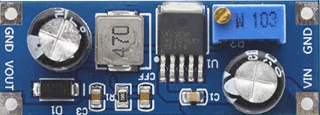
The XL7015 is a high-efficiency step-down (buck) voltage regulator designed to convert a higher input voltage into a stable, lower output voltage. It is widely used in applications requiring efficient power conversion, such as battery-powered devices, industrial equipment, LED drivers, and embedded systems. With its integrated high-performance switching circuitry, the XL7015 offers excellent thermal performance and high efficiency, making it suitable for compact and energy-sensitive designs.
Explore Projects Built with XL7015

 Open Project in Cirkit Designer
 Open Project in Cirkit Designer
 Open Project in Cirkit Designer
 Open Project in Cirkit Designer
Explore Projects Built with XL7015

 Open Project in Cirkit Designer
 Open Project in Cirkit Designer
 Open Project in Cirkit Designer
 Open Project in Cirkit Designer
Common Applications
- Battery-powered devices
- LED lighting systems
- Industrial control systems
- Embedded systems and microcontroller-based circuits
- DC-DC power supply modules
Technical Specifications
The XL7015 is a versatile component with the following key technical details:
| Parameter | Value |
|---|---|
| Input Voltage Range | 5V to 80V |
| Output Voltage Range | 1.25V to 20V |
| Maximum Output Current | 0.8A |
| Switching Frequency | 180 kHz |
| Efficiency | Up to 96% |
| Operating Temperature | -40°C to +125°C |
| Package Type | TO-220-5L |
Pin Configuration and Descriptions
The XL7015 comes in a TO-220-5L package with the following pinout:
| Pin Number | Pin Name | Description |
|---|---|---|
| 1 | VIN | Input voltage pin. Connect to the positive terminal of the input power source. |
| 2 | SW | Switching output pin. Connect to the inductor and diode in the circuit. |
| 3 | GND | Ground pin. Connect to the negative terminal of the input power source. |
| 4 | FB | Feedback pin. Used to set the output voltage via a resistor divider network. |
| 5 | EN | Enable pin. Used to enable or disable the regulator. |
Usage Instructions
How to Use the XL7015 in a Circuit
- Input Voltage: Ensure the input voltage is within the range of 5V to 80V. Exceeding this range may damage the component.
- Output Voltage Setting: Use a resistor divider network connected to the FB pin to set the desired output voltage. The output voltage can be calculated using the formula: [ V_{OUT} = V_{REF} \times \left(1 + \frac{R1}{R2}\right) ] where ( V_{REF} ) is typically 1.25V.
- Inductor Selection: Choose an inductor with a suitable current rating and low DC resistance to minimize power loss.
- Capacitors: Use input and output capacitors with appropriate voltage ratings and low ESR (Equivalent Series Resistance) for stable operation.
- Enable Pin: Connect the EN pin to VIN to enable the regulator. To disable it, connect the EN pin to GND.
Example Circuit with Arduino UNO
The XL7015 can be used to power an Arduino UNO from a higher voltage source. Below is an example circuit and Arduino code:
Circuit Connections
- Connect the VIN pin of the XL7015 to a 12V DC power source.
- Connect the GND pin of the XL7015 to the ground of the power source and Arduino.
- Set the output voltage to 5V using a resistor divider network on the FB pin.
- Connect the output of the XL7015 to the 5V pin of the Arduino UNO.
Arduino Code Example
// Example code to blink an LED using Arduino UNO powered by XL7015
// Ensure the XL7015 output is set to 5V before connecting to the Arduino

const int ledPin = 13; // Built-in LED pin on Arduino UNO

void setup() {
  pinMode(ledPin, OUTPUT); // Set LED pin as output
}

void loop() {
  digitalWrite(ledPin, HIGH); // Turn the LED on
  delay(1000);                // Wait for 1 second
  digitalWrite(ledPin, LOW);  // Turn the LED off
  delay(1000);                // Wait for 1 second
}
Important Considerations
- Thermal Management: The XL7015 can generate heat during operation. Use a heatsink or ensure proper ventilation to maintain safe operating temperatures.
- Input Voltage Ripple: Use a high-quality input capacitor to minimize voltage ripple and ensure stable operation.
- Output Voltage Accuracy: Verify the resistor values in the feedback network to ensure accurate output voltage.
Troubleshooting and FAQs
Common Issues and Solutions
No Output Voltage
- Check the input voltage to ensure it is within the specified range.
- Verify that the EN pin is connected to VIN to enable the regulator.
- Inspect the circuit for loose connections or soldering issues.
Output Voltage is Incorrect
- Recalculate the resistor values in the feedback network.
- Ensure the feedback pin (FB) is properly connected to the resistor divider.
Excessive Heat
- Verify that the input voltage and load current are within the specified limits.
- Use a heatsink or improve ventilation to dissipate heat.
High Output Ripple
- Use low-ESR capacitors on the input and output.
- Check the inductor value and ensure it is appropriate for the load.
FAQs
Q: Can the XL7015 be used with a 24V input to power a 5V device?
A: Yes, the XL7015 can step down a 24V input to 5V, provided the output current does not exceed 0.8A.
Q: What is the maximum efficiency of the XL7015?
A: The XL7015 can achieve an efficiency of up to 96%, depending on the input voltage, output voltage, and load conditions.
Q: Is the XL7015 suitable for battery-powered applications?
A: Yes, the XL7015 is highly efficient and suitable for battery-powered devices, as it minimizes power loss.
Q: Can the XL7015 operate without a heatsink?
A: For low-power applications, the XL7015 may operate without a heatsink. However, for higher loads, a heatsink is recommended to prevent overheating.