How to Use F405 mini FC: Examples, Pinouts, and Specs
Introduction
The F405 Mini FC by SpeedyBee is a compact and versatile flight controller designed specifically for drones. It features an advanced F4 processor, multiple input/output ports, and compatibility with a wide range of sensors and peripherals. This flight controller is ideal for drone enthusiasts and professionals looking for a reliable and high-performance solution for their UAVs (Unmanned Aerial Vehicles).
Explore Projects Built with F405 mini FC


Explore Projects Built with F405 mini FC
Common Applications and Use Cases
- FPV Racing Drones: Provides fast processing and low latency for high-speed drone racing.
- Aerial Photography: Supports stable flight modes for capturing smooth and high-quality footage.
- Autonomous Drones: Compatible with GPS modules and other sensors for autonomous navigation.
- Hobbyist Projects: Compact size and flexibility make it suitable for custom drone builds.
Technical Specifications
Key Technical Details
| Parameter | Specification |
|---|---|
| Processor | STM32F405 (F4 series) |
| Input Voltage Range | 2S–6S LiPo (7.4V–25.2V) |
| IMU (Inertial Measurement Unit) | MPU6000 (Gyroscope and Accelerometer) |
| UART Ports | 5 UARTs (for peripherals like GPS, telemetry, etc.) |
| ESC Signal Output | 4 PWM outputs (DShot, Multishot, Oneshot supported) |
| Flash Memory | 16MB Blackbox data logging |
| BEC Output | 5V/2A and 3.3V outputs for powering external devices |
| Dimensions | 26mm x 26mm (20x20mm mounting hole pattern, M2 screws) |
| Weight | 4.5g |
| Firmware Compatibility | Betaflight, iNav |
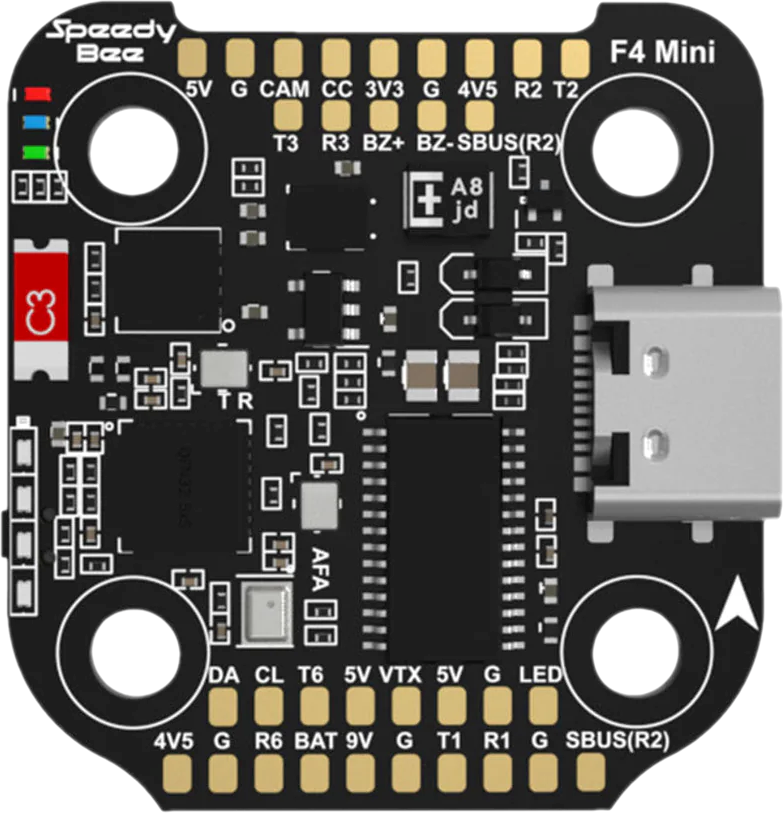
Pin Configuration and Descriptions
| Pin Name | Description |
|---|---|
| GND | Ground connection for power and signal reference. |
| VBAT | Battery voltage input (2S–6S LiPo). |
| 5V | 5V output for powering peripherals (e.g., receiver, GPS). |
| 3.3V | 3.3V output for low-power peripherals. |
| RX1–RX5 | UART receive pins for connecting peripherals like GPS, telemetry, etc. |
| TX1–TX5 | UART transmit pins for peripherals. |
| SCL/SDA | I2C interface for external sensors (e.g., barometer, magnetometer). |
| M1–M4 | Motor signal outputs for ESCs (Electronic Speed Controllers). |
| LED_STRIP | Output for programmable RGB LED strips. |
| Buzzer | Connection for an active buzzer (for alarms and notifications). |
Usage Instructions
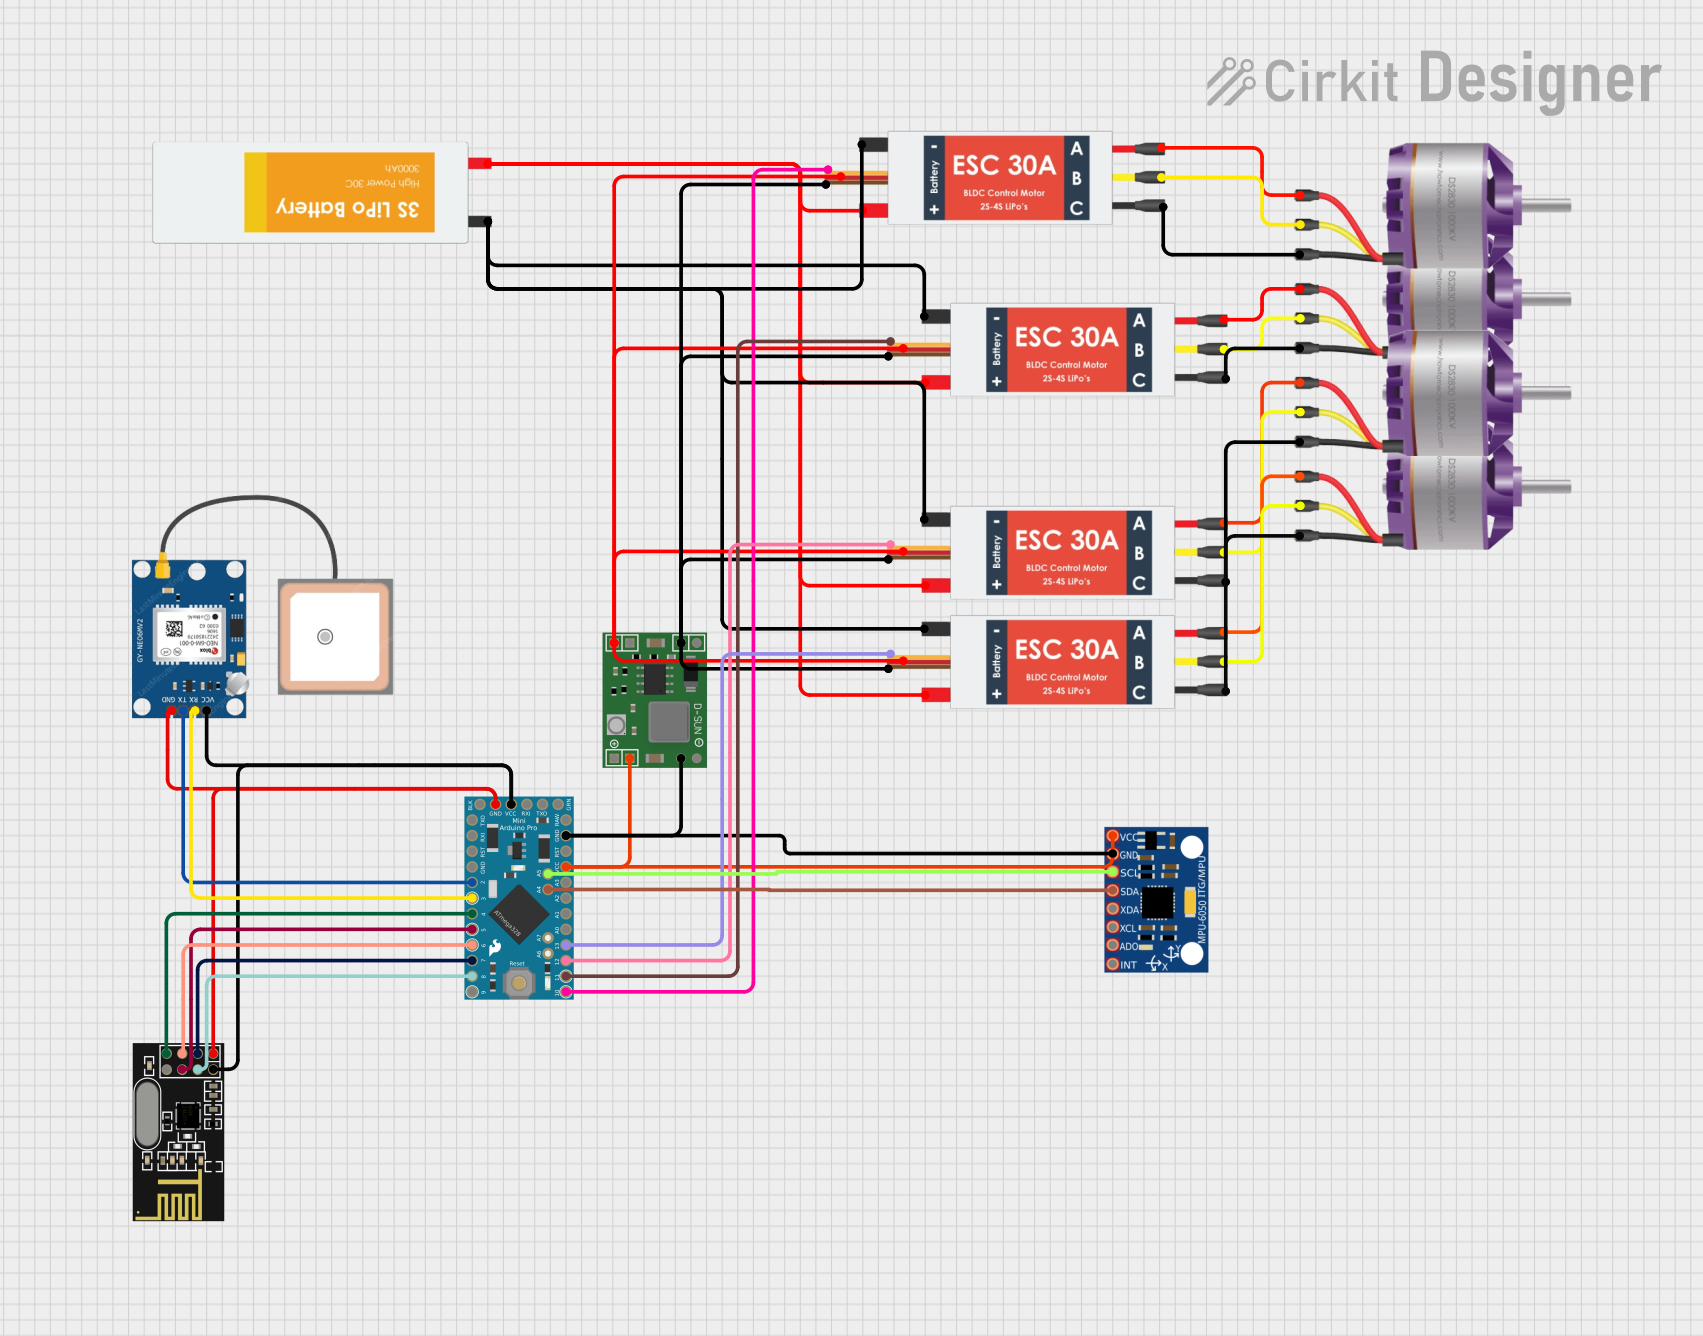
How to Use the F405 Mini FC in a Circuit
Powering the Flight Controller:
- Connect a 2S–6S LiPo battery to the VBAT pin.
- Ensure the battery voltage is within the supported range (7.4V–25.2V).
- The onboard BEC will provide 5V and 3.3V outputs for peripherals.
Connecting Peripherals:
- Use the UART ports (RX/TX) to connect devices like GPS modules, telemetry radios, or receivers.
- For I2C sensors, connect to the SCL and SDA pins.
- Attach ESC signal wires to the M1–M4 pins for motor control.
Flashing Firmware:
- Download the latest firmware (e.g., Betaflight) compatible with the F405 Mini FC.
- Use a USB cable to connect the flight controller to your computer.
- Open the Betaflight Configurator and follow the on-screen instructions to flash the firmware.
Configuring the Flight Controller:
- After flashing, configure the flight controller using Betaflight Configurator.
- Set up the receiver type, motor mapping, and flight modes as per your drone's requirements.
Calibrating Sensors:
- Perform accelerometer and gyroscope calibration in the Betaflight Configurator.
- If using a GPS module, configure the GPS settings and verify satellite lock.
Important Considerations and Best Practices
- Voltage Compatibility: Ensure the input voltage does not exceed the maximum supported range (25.2V).
- Heat Management: Avoid overheating by ensuring proper airflow around the flight controller.
- Firmware Updates: Regularly update the firmware to access new features and bug fixes.
- Wiring: Double-check all connections to avoid short circuits or incorrect wiring.
Example Code for Arduino UNO (Using UART Communication)
If you are using the F405 Mini FC with an Arduino UNO for telemetry or data logging, you can use the following example code:
#include <SoftwareSerial.h>

// Define RX and TX pins for UART communication
SoftwareSerial mySerial(10, 11); // RX = pin 10, TX = pin 11

void setup() {
  // Initialize serial communication
  Serial.begin(9600); // Default serial monitor baud rate
  mySerial.begin(115200); // Baud rate for F405 Mini FC communication

  Serial.println("Arduino is ready to communicate with F405 Mini FC.");
}

void loop() {
  // Check if data is available from the flight controller
  if (mySerial.available()) {
    String data = mySerial.readString(); // Read incoming data
    Serial.println("Data from F405 Mini FC: " + data); // Print to serial monitor
  }

  // Example: Send a test message to the flight controller
  mySerial.println("Hello, F405 Mini FC!");
  delay(1000); // Wait for 1 second
}
Troubleshooting and FAQs
Common Issues and Solutions
Flight Controller Not Powering On:
- Cause: Incorrect wiring or insufficient voltage.
- Solution: Verify the battery voltage and ensure proper connection to the VBAT pin.
No Communication with Betaflight Configurator:
- Cause: USB driver not installed or incorrect COM port selected.
- Solution: Install the correct USB driver (e.g., STM32 Virtual COM Port Driver) and select the correct COM port in Betaflight Configurator.
Motors Not Spinning:
- Cause: Incorrect motor mapping or ESC calibration.
- Solution: Verify motor mapping in Betaflight and recalibrate the ESCs.
GPS Not Working:
- Cause: Incorrect UART configuration or no satellite lock.
- Solution: Ensure the GPS module is connected to the correct UART port and configure it in Betaflight. Place the drone outdoors for better satellite reception.
LED Strip Not Lighting Up:
- Cause: Incorrect wiring or LED configuration.
- Solution: Check the connection to the LED_STRIP pin and configure the LED settings in Betaflight.
FAQs
Q: Can I use the F405 Mini FC with iNav firmware?
A: Yes, the F405 Mini FC is compatible with iNav firmware for advanced navigation features.Q: What is the maximum number of UART peripherals I can connect?
A: The F405 Mini FC supports up to 5 UART peripherals simultaneously.Q: Does the flight controller support DShot ESC protocols?
A: Yes, it supports DShot, Multishot, and Oneshot ESC protocols.Q: How do I reset the flight controller to factory settings?
A: Use the "Reset Settings" option in the Betaflight Configurator or short the bootloader pads to reflash the firmware.
This concludes the documentation for the SpeedyBee F405 Mini FC. For further assistance, refer to the official SpeedyBee support resources.