Cirkit Designer
Your all-in-one circuit design IDE
Home /
Component Documentation
How to Use Voice Recognition Sensor: Examples, Pinouts, and Specs
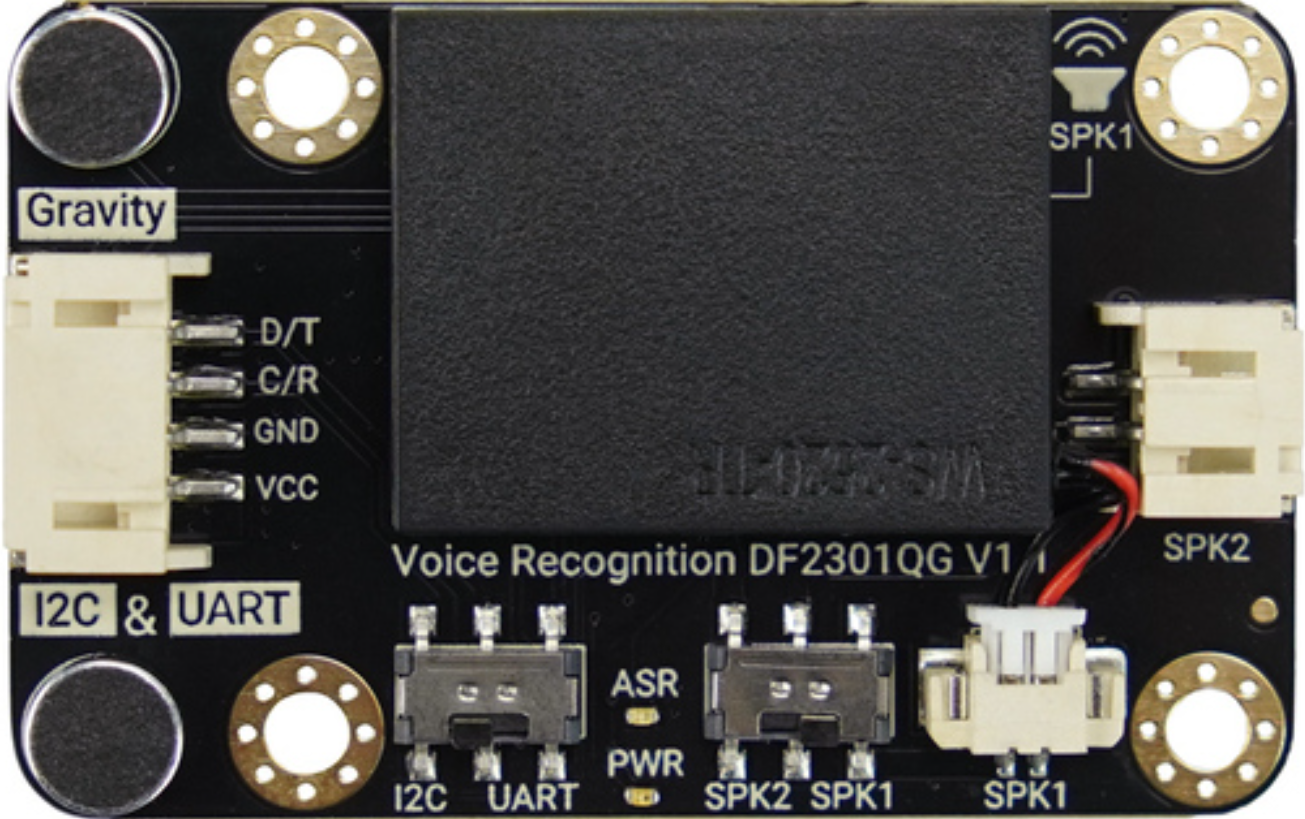
Introduction
The Voice Recognition Sensor is a device designed to detect and interpret human voice commands, enabling hands-free control of electronic systems. This component is widely used in applications such as smart home automation, robotics, voice-controlled appliances, and assistive technologies. By recognizing predefined voice commands, it allows users to interact with electronic devices in a natural and intuitive way.
Explore Projects Built with Voice Recognition Sensor
Arduino UNO Based Voice-Controlled Bluetooth Interface with OLED Display
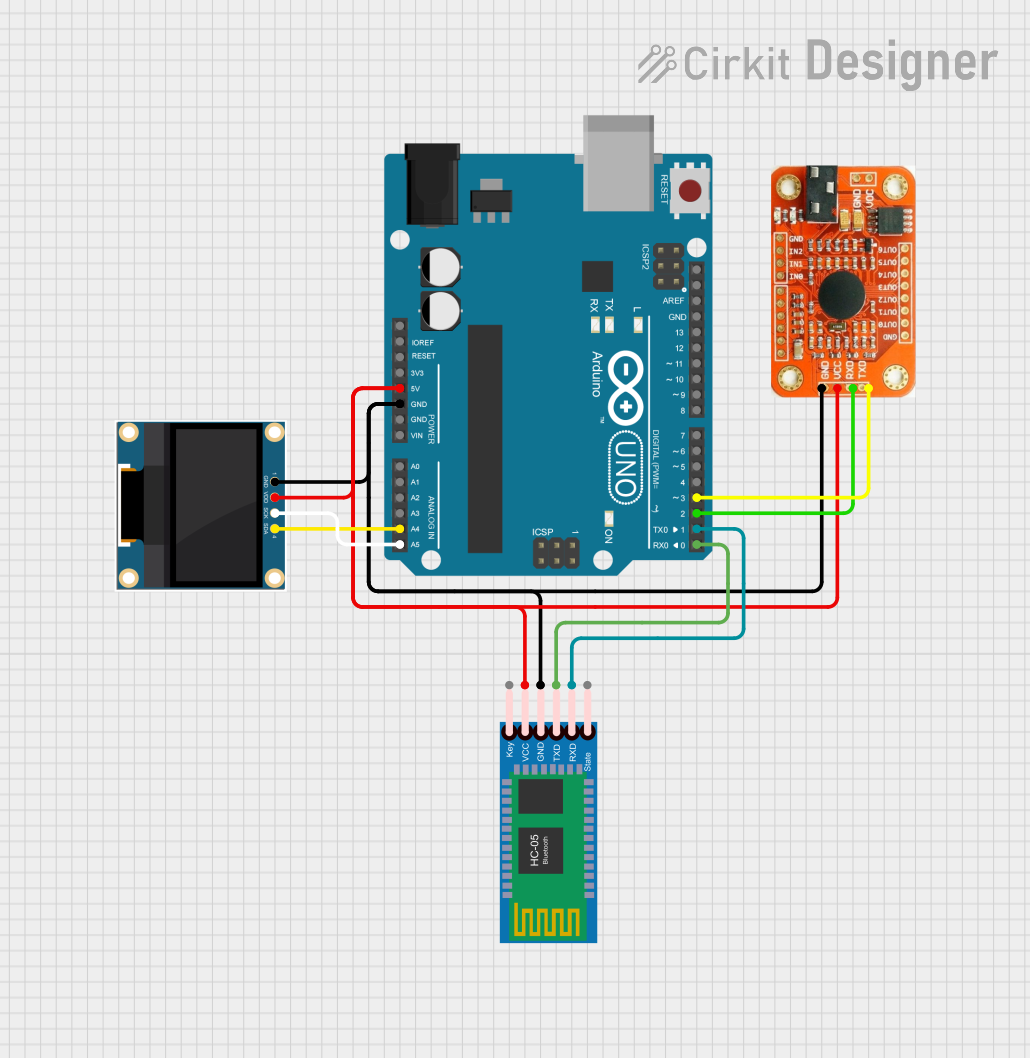
This circuit features an Arduino UNO microcontroller interfaced with a voice recognition module for audio input commands, an HC-05 Bluetooth module for wireless communication, and a 0.96" OLED display for visual output. The Arduino is programmed to handle inputs and outputs, with the voice recognition module connected to digital pins for serial communication, and the OLED display connected via I2C to the analog pins A4 (SDA) and A5 (SCL). The Bluetooth module is also connected to the Arduino's serial pins for remote data exchange.
ESP32-Based Voice Assistant with Battery-Powered Microphone and Speaker

This circuit is a voice-controlled system that uses an ESP32 microcontroller to process audio input from a microphone, send the data to a Gemini API for speech-to-text conversion, and output responses through a speaker. It includes an IR sensor for additional input, an LED for status indication, and a battery with a charging module for power management.
Arduino UNO-Based Multi-Sensor Health and Environmental Monitoring System with Bluetooth Connectivity
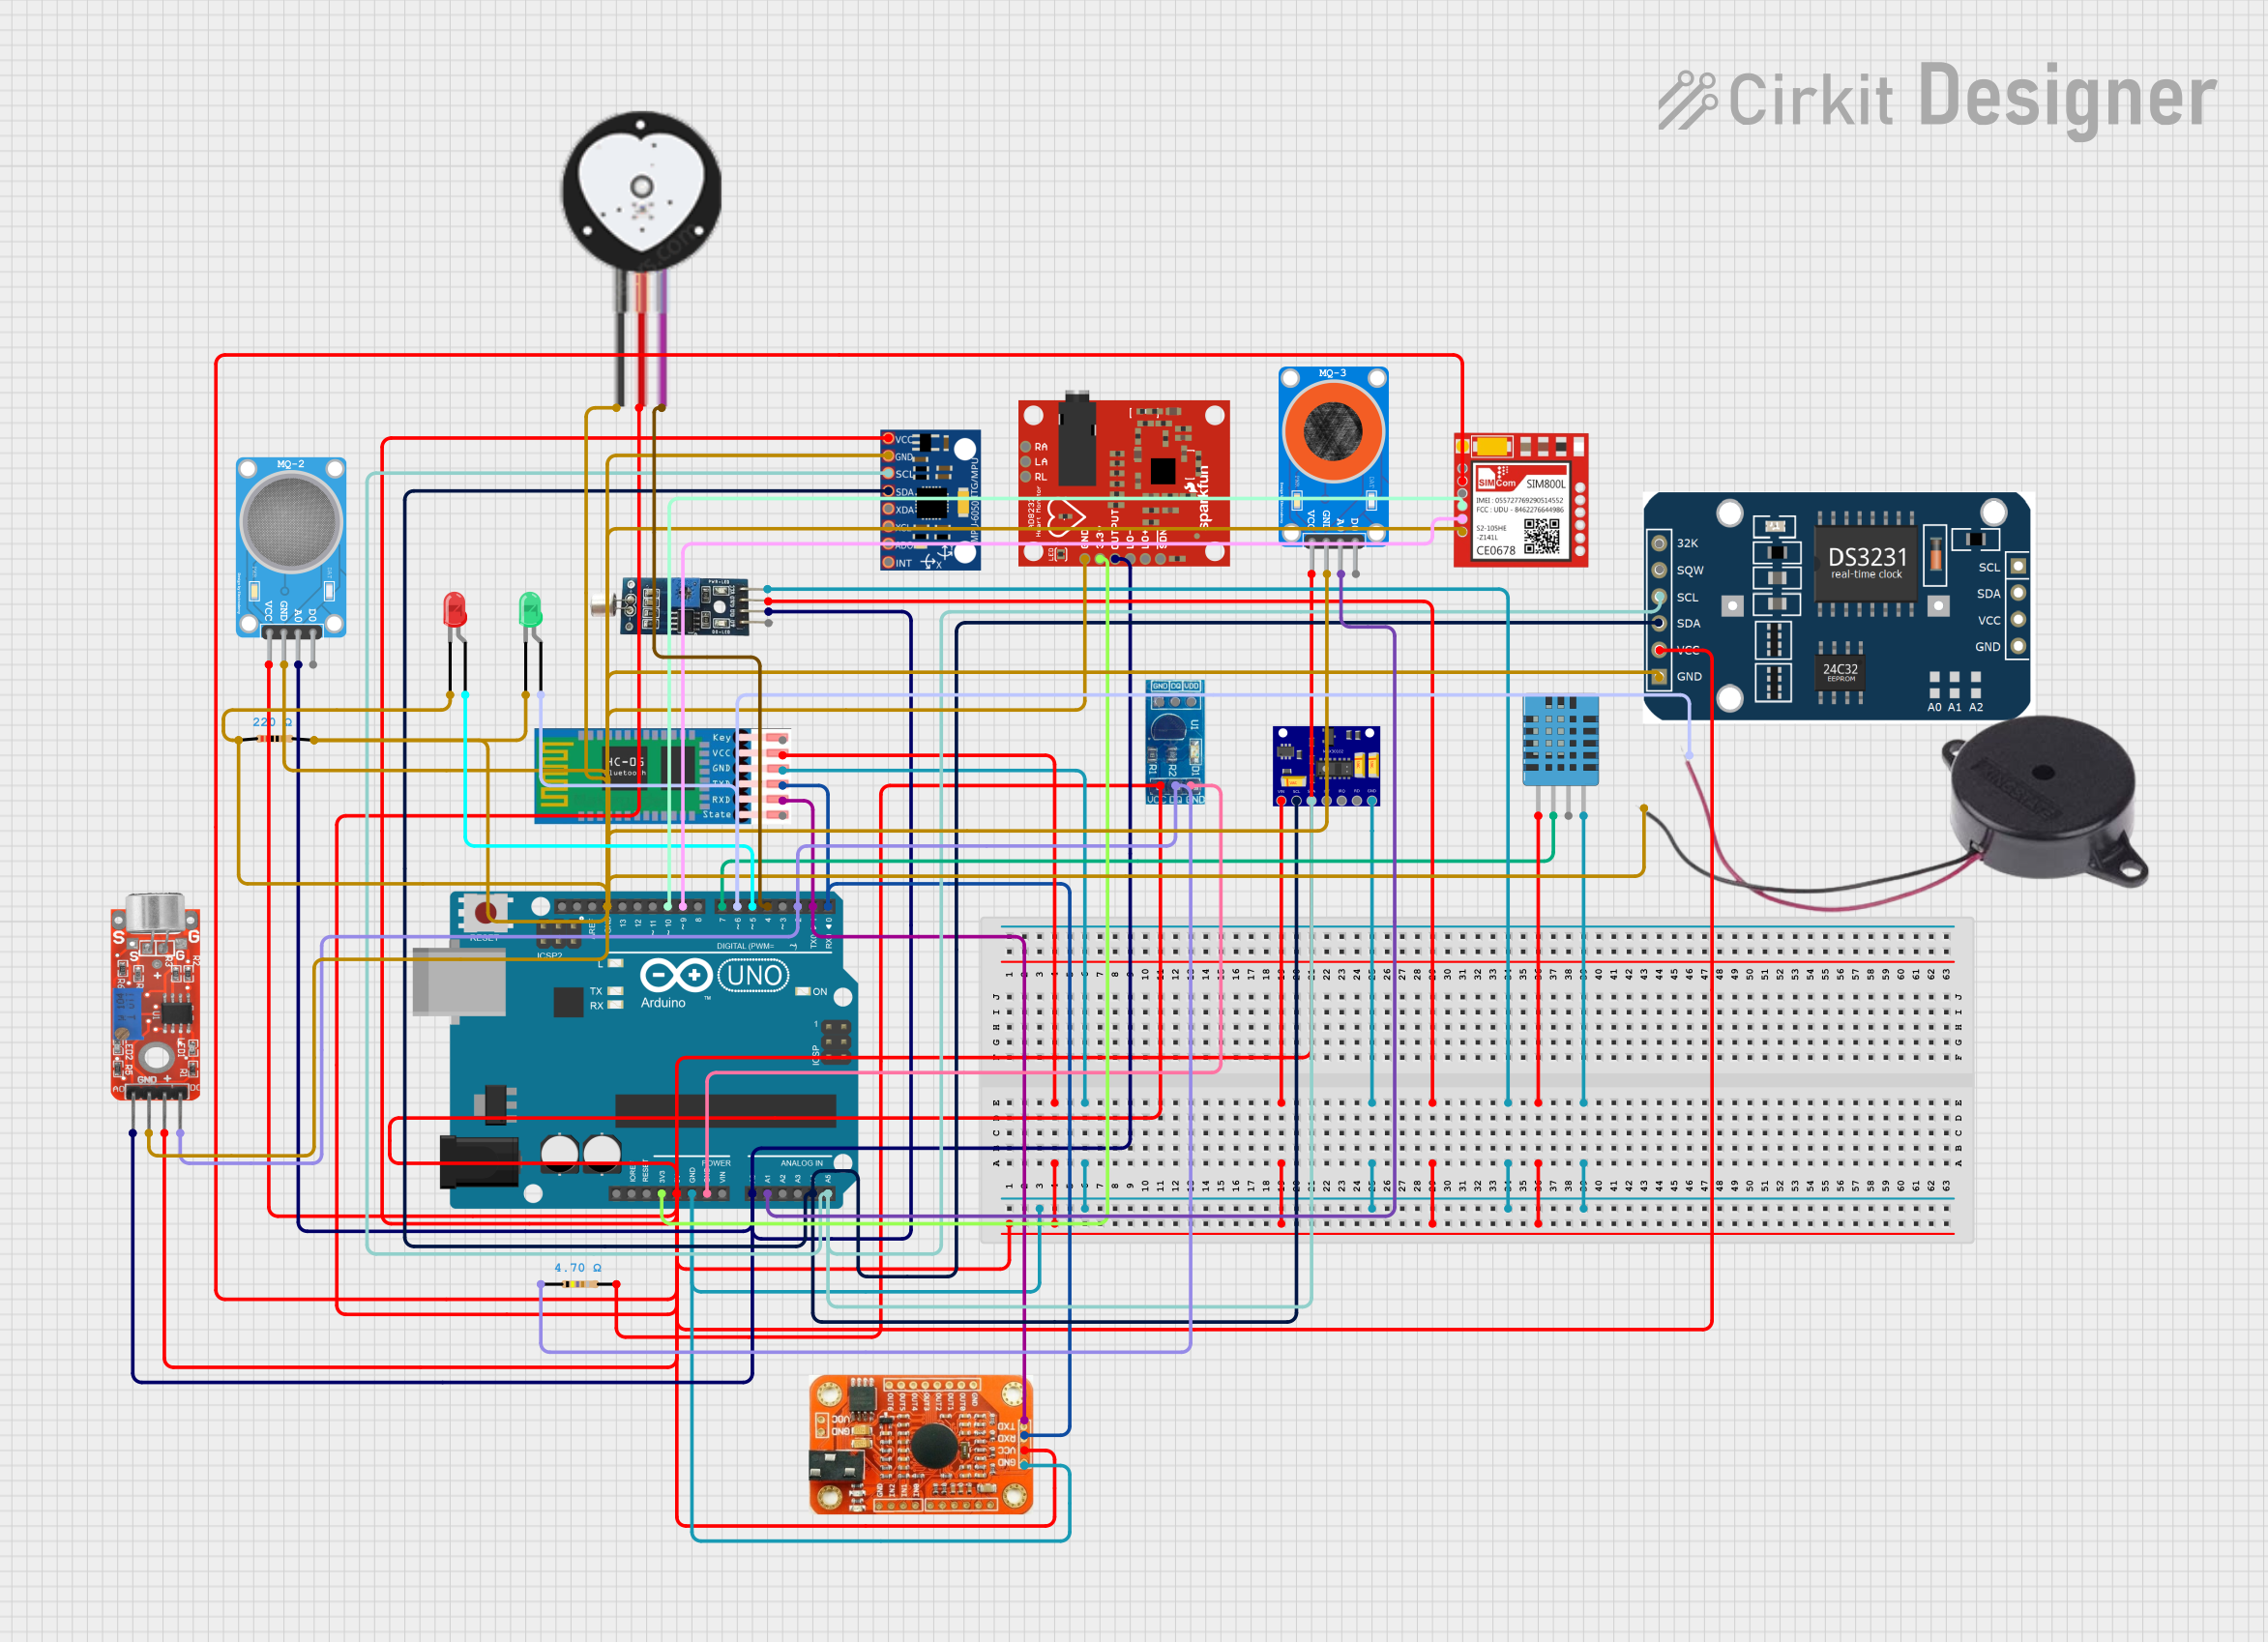
This is a multi-functional sensor and communication circuit built around an Arduino UNO. It is designed to collect environmental and health-related data, process and respond to voice commands, and communicate wirelessly. Output feedback is provided through LEDs and a buzzer.
Arduino Uno R3-Based Voice-Controlled Robot with Servo Actuation and SD Logging
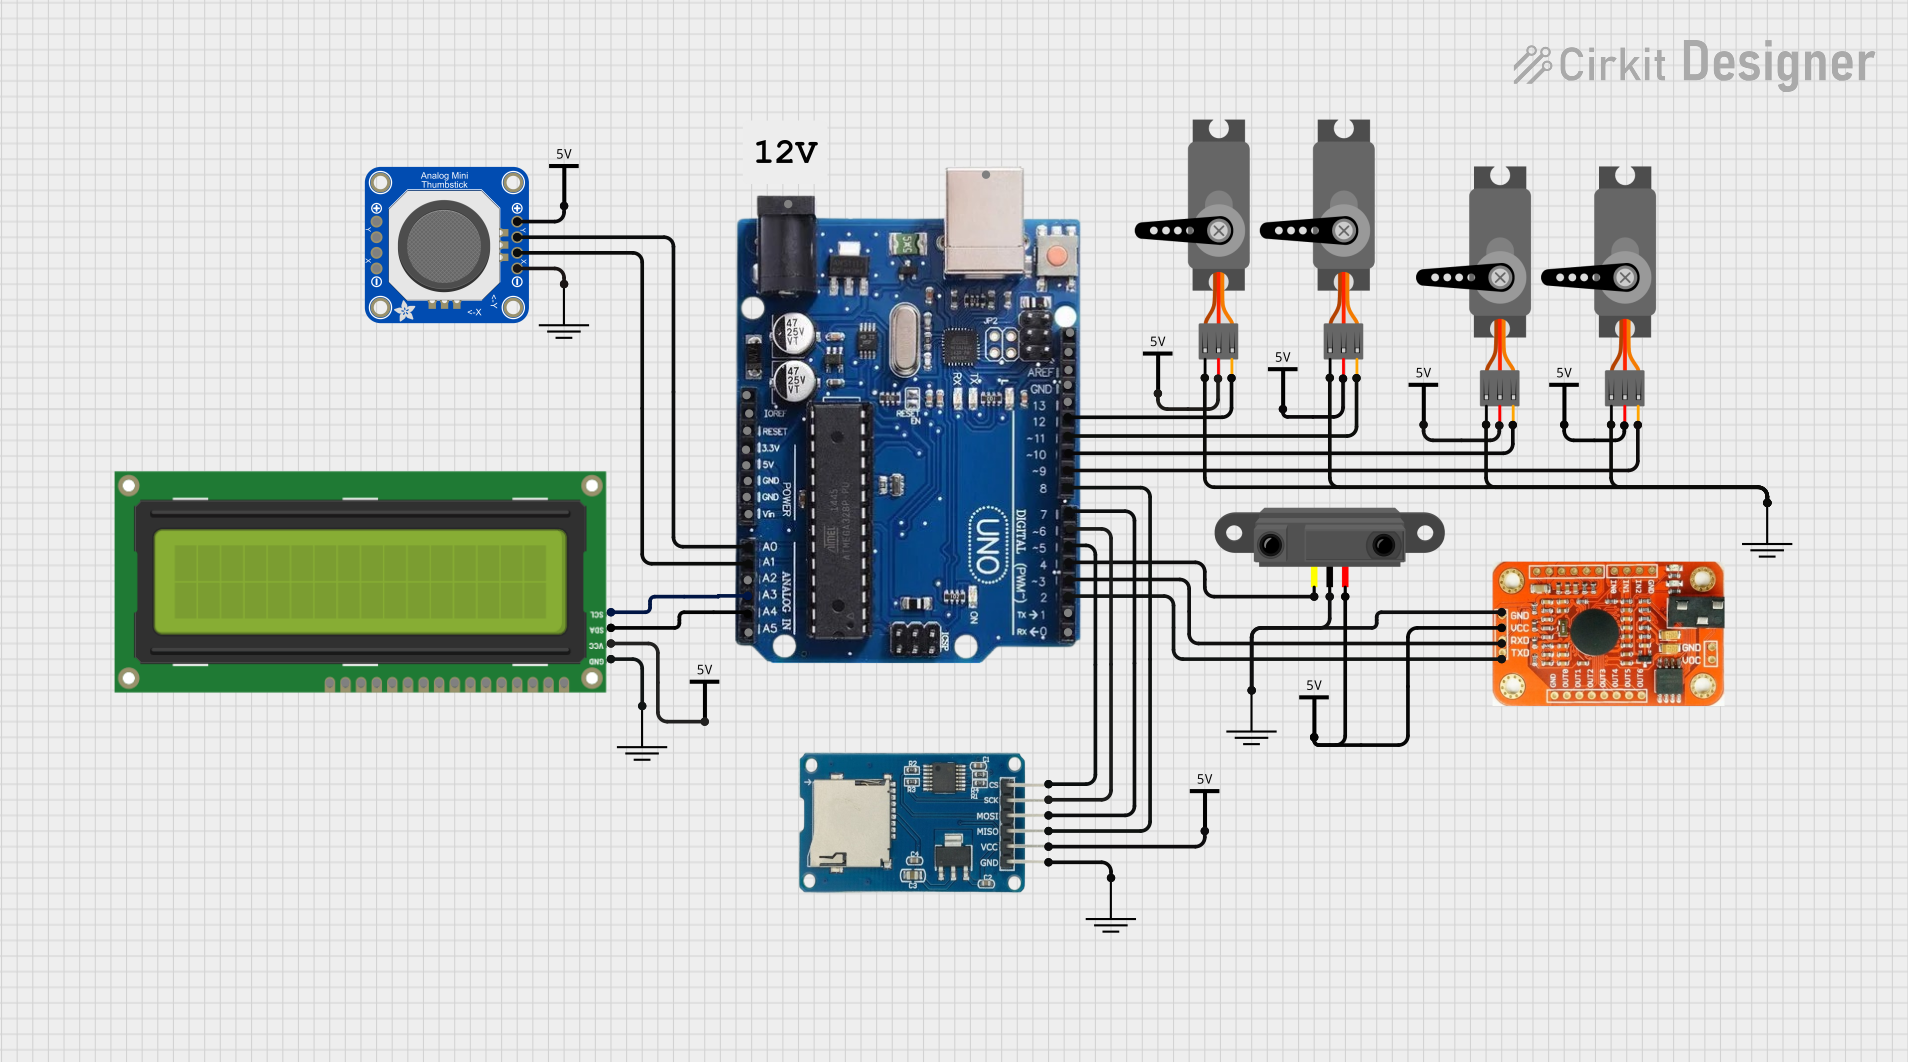
This circuit features an Arduino Uno R3 as the central microcontroller, interfaced with a variety of components. It includes a voice recognition module for audio input commands, an analog thumbstick for manual control, and multiple servos for actuation. Additionally, the circuit integrates an I2C LCD screen for display purposes, an infrared proximity sensor for distance measurement, and a micro SD card module for data storage.
Explore Projects Built with Voice Recognition Sensor
Arduino UNO Based Voice-Controlled Bluetooth Interface with OLED Display
This circuit features an Arduino UNO microcontroller interfaced with a voice recognition module for audio input commands, an HC-05 Bluetooth module for wireless communication, and a 0.96" OLED display for visual output. The Arduino is programmed to handle inputs and outputs, with the voice recognition module connected to digital pins for serial communication, and the OLED display connected via I2C to the analog pins A4 (SDA) and A5 (SCL). The Bluetooth module is also connected to the Arduino's serial pins for remote data exchange.
ESP32-Based Voice Assistant with Battery-Powered Microphone and Speaker
This circuit is a voice-controlled system that uses an ESP32 microcontroller to process audio input from a microphone, send the data to a Gemini API for speech-to-text conversion, and output responses through a speaker. It includes an IR sensor for additional input, an LED for status indication, and a battery with a charging module for power management.
Arduino UNO-Based Multi-Sensor Health and Environmental Monitoring System with Bluetooth Connectivity
This is a multi-functional sensor and communication circuit built around an Arduino UNO. It is designed to collect environmental and health-related data, process and respond to voice commands, and communicate wirelessly. Output feedback is provided through LEDs and a buzzer.
Arduino Uno R3-Based Voice-Controlled Robot with Servo Actuation and SD Logging
This circuit features an Arduino Uno R3 as the central microcontroller, interfaced with a variety of components. It includes a voice recognition module for audio input commands, an analog thumbstick for manual control, and multiple servos for actuation. Additionally, the circuit integrates an I2C LCD screen for display purposes, an infrared proximity sensor for distance measurement, and a micro SD card module for data storage.
Technical Specifications
- Operating Voltage: 3.3V to 5V
- Current Consumption: < 40mA
- Communication Interface: UART (9600 bps default)
- Recognition Capability: Up to 15 voice commands (3 groups of 5 commands each)
- Response Time: < 1 second
- Microphone Sensitivity: Adjustable
- Operating Temperature: -40°C to 85°C
- Dimensions: 30mm x 20mm x 5mm
Pin Configuration and Descriptions
| Pin Name | Pin Number | Description |
|---|---|---|
| VCC | 1 | Power supply input (3.3V to 5V) |
| GND | 2 | Ground connection |
| TX | 3 | UART Transmit pin (sends data to MCU) |
| RX | 4 | UART Receive pin (receives data from MCU) |
| MIC+ | 5 | Positive terminal for external microphone |
| MIC- | 6 | Negative terminal for external microphone |
Usage Instructions
How to Use the Component in a Circuit
- Power the Sensor: Connect the VCC pin to a 3.3V or 5V power source and the GND pin to ground.
- Connect to a Microcontroller: Use the TX and RX pins to establish UART communication with a microcontroller (e.g., Arduino UNO).
- Attach a Microphone: Connect an external microphone to the MIC+ and MIC- pins for voice input.
- Train the Sensor: Use the provided software or commands to train the sensor with specific voice commands. Typically, the sensor can store up to 15 commands divided into 3 groups.
- Integrate into Your System: Once trained, the sensor will output a unique identifier for each recognized command, which can be used to trigger specific actions in your system.
Important Considerations and Best Practices
- Noise Environment: Ensure the sensor is used in a relatively quiet environment to improve recognition accuracy.
- Microphone Placement: Position the microphone close to the user and away from noise sources.
- Power Supply: Use a stable power supply to avoid performance issues.
- Command Training: Train the sensor in the same environment where it will be used for better results.
- UART Configuration: Ensure the microcontroller's UART settings match the sensor's default baud rate (9600 bps).
Example Code for Arduino UNO
Below is an example of how to interface the Voice Recognition Sensor with an Arduino UNO:
#include <SoftwareSerial.h>

// Define RX and TX pins for the sensor
SoftwareSerial voiceSensor(10, 11); // RX = Pin 10, TX = Pin 11

void setup() {
  Serial.begin(9600); // Initialize Serial Monitor
  voiceSensor.begin(9600); // Initialize communication with the sensor

  Serial.println("Voice Recognition Sensor Initialized");
  Serial.println("Waiting for voice commands...");
}

void loop() {
  if (voiceSensor.available()) {
    int command = voiceSensor.read(); // Read the command ID from the sensor

    // Print the received command ID to the Serial Monitor
    Serial.print("Command Received: ");
    Serial.println(command);

    // Perform actions based on the command ID
    switch (command) {
      case 1:
        Serial.println("Turning on the light...");
        // Add code to turn on a light
        break;
      case 2:
        Serial.println("Turning off the light...");
        // Add code to turn off a light
        break;
      default:
        Serial.println("Unknown command");
        break;
    }
  }
}
Troubleshooting and FAQs
Common Issues Users Might Face
Sensor Not Responding:
- Ensure the power supply is stable and within the specified range (3.3V to 5V).
- Verify the UART connections (TX and RX) between the sensor and the microcontroller.
- Check that the baud rate of the microcontroller matches the sensor's default (9600 bps).
Low Recognition Accuracy:
- Train the sensor in the same environment where it will be used.
- Reduce background noise and ensure the microphone is positioned correctly.
- Speak clearly and consistently during training and usage.
No Output from the Sensor:
- Confirm that the microphone is properly connected to the MIC+ and MIC- pins.
- Check the sensor's status using the provided software or commands.
Solutions and Tips for Troubleshooting
- Recalibrate the Sensor: If recognition accuracy is poor, retrain the sensor with clear and distinct voice commands.
- Test with a Serial Monitor: Use a serial monitor to verify the data being sent and received by the sensor.
- Inspect Connections: Double-check all wiring and ensure there are no loose connections.
- Update Firmware: If available, update the sensor's firmware to the latest version for improved performance.
By following this documentation, you can effectively integrate and utilize the Voice Recognition Sensor in your projects.