How to Use ESP PROG: Examples, Pinouts, and Specs
Introduction
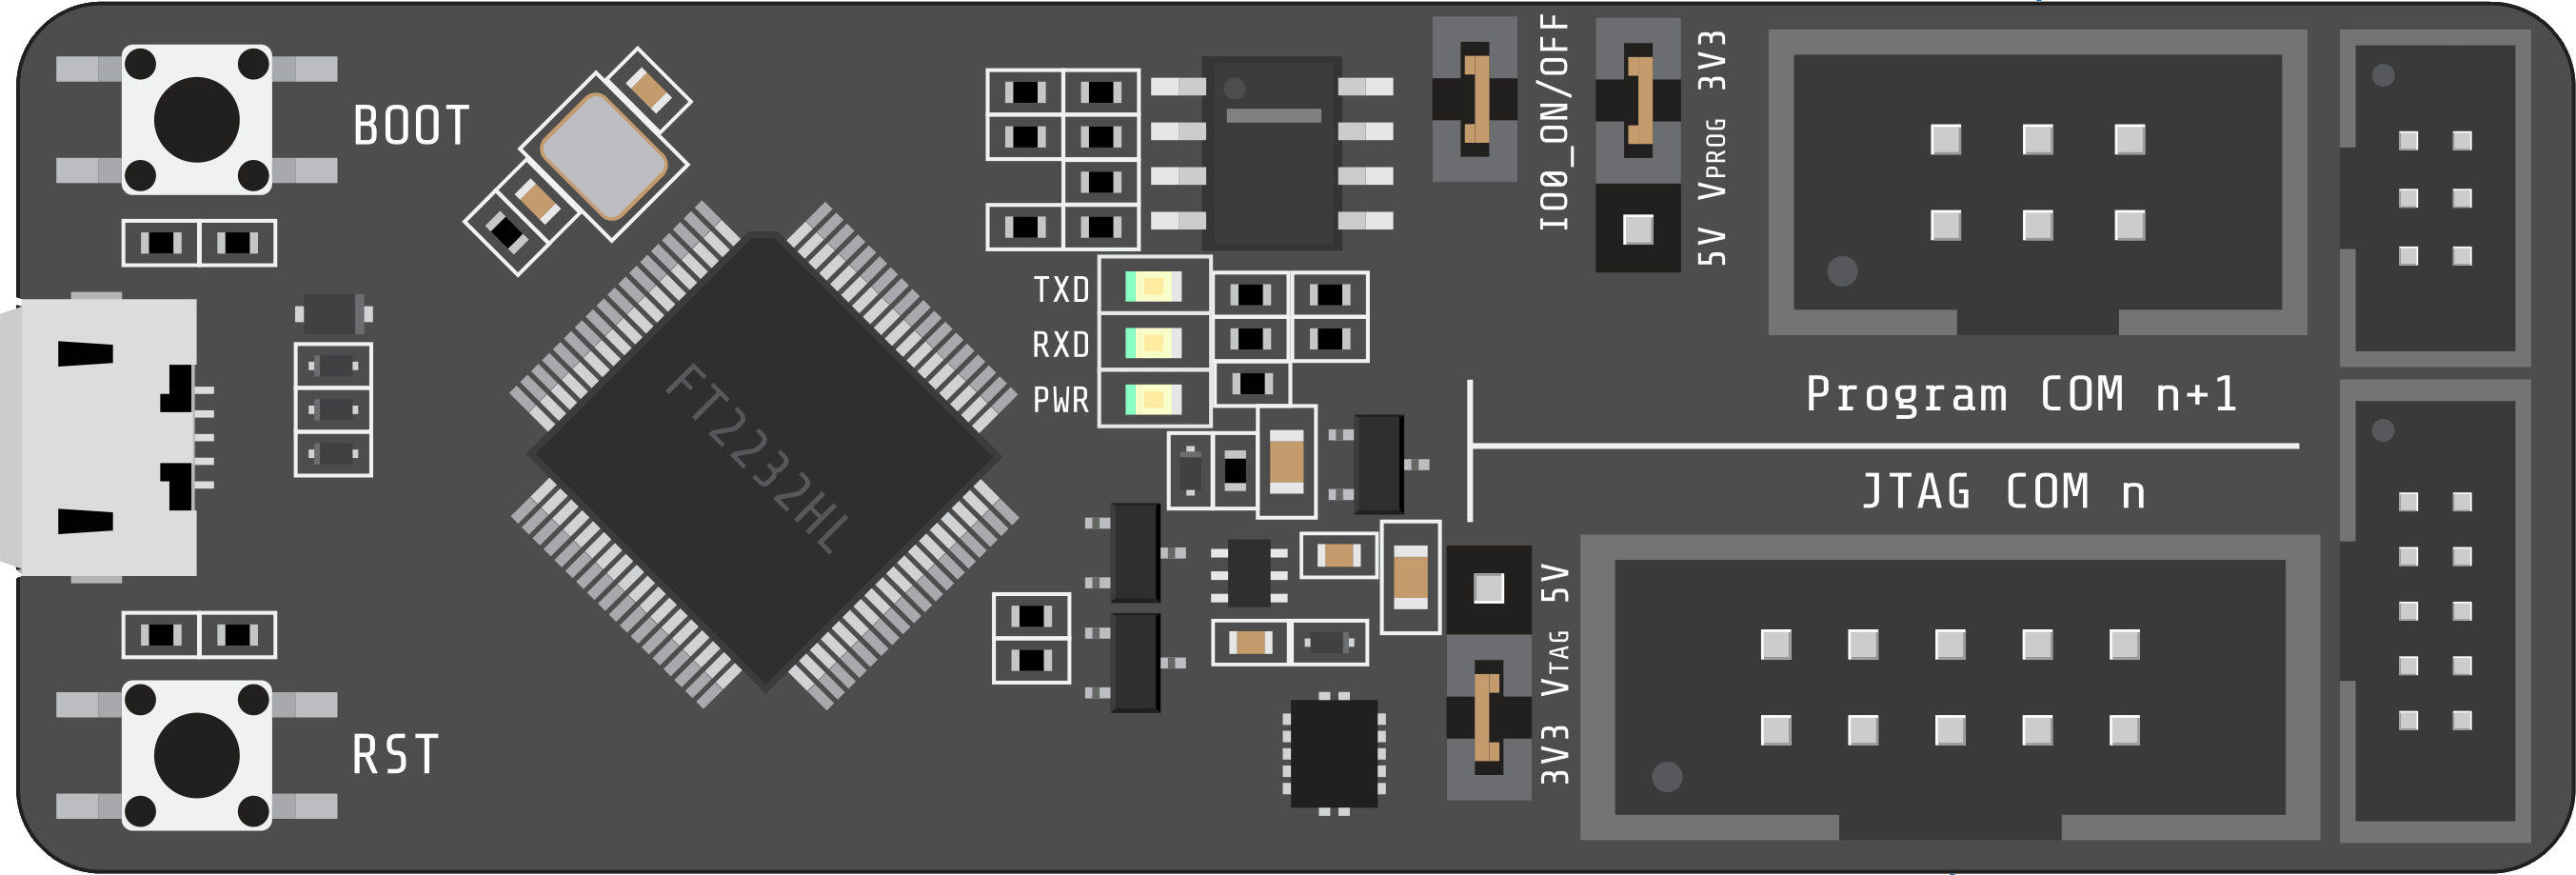
The ESP PROG is a programming and debugging tool designed by ESP for use with ESP8266 and ESP32 microcontrollers. It enables developers to upload firmware, debug applications, and monitor serial output efficiently. This versatile tool is essential for embedded systems development, offering seamless integration with popular development environments.
Explore Projects Built with ESP PROG


Explore Projects Built with ESP PROG
Common Applications and Use Cases
- Firmware uploading for ESP8266 and ESP32 microcontrollers.
- Debugging applications during development.
- Monitoring serial output for troubleshooting and performance analysis.
- Ideal for IoT projects, prototyping, and production testing.
Technical Specifications
The ESP PROG is a compact and reliable tool with the following key specifications:
| Specification | Details |
|---|---|
| Manufacturer | ESP |
| Part ID | DEBUGGER |
| Supported Microcontrollers | ESP8266, ESP32 |
| Communication Interface | USB to UART (CP2102) and JTAG |
| Power Supply | 5V via USB |
| Debugging Protocol | JTAG |
| Dimensions | 60mm x 25mm |
| Operating Temperature | -20°C to 85°C |
Pin Configuration and Descriptions
The ESP PROG features multiple pin headers for UART and JTAG connections. Below is the pin configuration:
UART Pinout
| Pin | Name | Description |
|---|---|---|
| 1 | TXD | Transmit data (to ESP microcontroller RXD) |
| 2 | RXD | Receive data (from ESP microcontroller TXD) |
| 3 | GND | Ground |
| 4 | 5V | Power supply (5V) |
JTAG Pinout
| Pin | Name | Description |
|---|---|---|
| 1 | TCK | JTAG clock signal |
| 2 | TDO | JTAG data output |
| 3 | TDI | JTAG data input |
| 4 | TMS | JTAG mode select |
| 5 | GND | Ground |
| 6 | 3.3V | Power supply (3.3V) |
Usage Instructions
How to Use the ESP PROG in a Circuit
Connect the ESP PROG to the ESP Microcontroller:
- For UART programming, connect the TXD, RXD, GND, and 5V pins to the corresponding pins on the ESP microcontroller.
- For debugging, connect the JTAG pins (TCK, TDO, TDI, TMS, GND, and 3.3V) to the ESP microcontroller's JTAG interface.
Connect the ESP PROG to Your Computer:
- Use a USB cable to connect the ESP PROG to your computer. Ensure the necessary drivers (e.g., CP2102 USB to UART driver) are installed.
Upload Firmware:
- Use development environments like Arduino IDE, PlatformIO, or ESP-IDF to upload firmware to the ESP microcontroller.
Debug Applications:
- For debugging, configure your development environment to use the JTAG interface. Ensure the correct debugging tools (e.g., OpenOCD) are installed.
Monitor Serial Output:
- Open a serial monitor (e.g., Arduino Serial Monitor or PuTTY) to view the ESP microcontroller's output.
Important Considerations and Best Practices
- Ensure the ESP PROG is connected to the correct pins on the ESP microcontroller to avoid damage.
- Use a high-quality USB cable to ensure reliable communication.
- Install the latest drivers for the CP2102 USB to UART bridge to avoid connection issues.
- When using JTAG debugging, ensure the ESP microcontroller's JTAG pins are not used for other functions in your circuit.
Example Code for Arduino IDE
Below is an example of how to use the ESP PROG with an ESP32 to upload a simple "Hello World" program:
// This example demonstrates a simple "Hello World" program for ESP32
// using the ESP PROG for programming and serial monitoring.

void setup() {
  Serial.begin(115200); // Initialize serial communication at 115200 baud
  delay(1000);          // Wait for 1 second to stabilize the connection
  Serial.println("Hello, World!"); // Print "Hello, World!" to the serial monitor
}

void loop() {
  Serial.println("ESP32 is running..."); // Print a message repeatedly
  delay(2000); // Wait for 2 seconds before printing again
}
Troubleshooting and FAQs
Common Issues and Solutions
ESP PROG Not Detected by the Computer:
- Ensure the USB cable is properly connected and supports data transfer.
- Install the CP2102 USB to UART driver from the manufacturer's website.
- Try connecting to a different USB port or using a different cable.
Unable to Upload Firmware:
- Verify the TXD and RXD connections between the ESP PROG and the ESP microcontroller.
- Ensure the ESP microcontroller is in bootloader mode (press and hold the BOOT button while resetting the device).
JTAG Debugging Not Working:
- Confirm that the JTAG pins are correctly connected to the ESP microcontroller.
- Check the development environment's JTAG configuration and ensure OpenOCD is installed.
No Serial Output in the Monitor:
- Ensure the correct baud rate is selected in the serial monitor (e.g., 115200).
- Verify the RXD and TXD connections between the ESP PROG and the ESP microcontroller.
FAQs
Q: Can the ESP PROG be used with other microcontrollers?
A: The ESP PROG is specifically designed for ESP8266 and ESP32 microcontrollers. It may not be compatible with other microcontrollers.
Q: What is the maximum baud rate supported by the ESP PROG?
A: The ESP PROG supports baud rates up to 921600 for high-speed communication.
Q: Do I need external power for the ESP microcontroller when using the ESP PROG?
A: No, the ESP PROG can power the ESP microcontroller via the 5V or 3.3V pin.
Q: Can I use the ESP PROG with the Arduino IDE?
A: Yes, the ESP PROG is fully compatible with the Arduino IDE for programming and serial monitoring.