Cirkit Designer Logo
Cirkit Designer
Your all-in-one circuit design IDE
Home / 
Component Documentation

How to Use PMS5003 Board (6-pin): Examples, Pinouts, and Specs

Image of PMS5003 Board (6-pin)
Cirkit Designer LogoDesign with PMS5003 Board (6-pin) in Cirkit Designer

Introduction

The PMS5003 Board is a sophisticated air quality sensor designed to measure the concentration of particulate matter (PM) in the air. Particulate matter refers to tiny particles suspended in the atmosphere, which can have significant health impacts when present in high concentrations. The PMS5003 is capable of detecting a range of particle sizes, making it ideal for environmental monitoring, air purification systems, and indoor air quality assessment.

Explore Projects Built with PMS5003 Board (6-pin)

Use Cirkit Designer to design, explore, and prototype these projects online. Some projects support real-time simulation. Click "Open Project" to start designing instantly!
Arduino UNO Based PM2.5 Air Quality Monitoring System
Image of Plantower PMS7003 Dust sensor: A project utilizing PMS5003 Board (6-pin) in a practical application
This circuit connects a PM2.5 Air Quality Sensor (PMS5003) to an Arduino UNO for air quality monitoring. The sensor's VCC and GND pins are powered by the Arduino's 5V and GND pins, respectively. The sensor's RX and TX pins are connected to the Arduino's digital pins D8 and D9 for serial communication, allowing the Arduino to read and process the air quality data from the sensor.
Cirkit Designer LogoOpen Project in Cirkit Designer
Battery-Powered Raspberry Pi Pico GPS Tracker with Sensor Integration
Image of Copy of CanSet v1: A project utilizing PMS5003 Board (6-pin) in a practical application
This circuit is a data acquisition and communication system powered by a LiPoly battery and managed by a Raspberry Pi Pico. It includes sensors (BMP280, MPU9250) for environmental data, a GPS module for location tracking, an SD card for data storage, and a WLR089-CanSAT for wireless communication. The TP4056 module handles battery charging, and a toggle switch controls power distribution.
Cirkit Designer LogoOpen Project in Cirkit Designer
ESP32-Based Battery-Powered Multi-Sensor System
Image of Dive sense: A project utilizing PMS5003 Board (6-pin) in a practical application
This circuit consists of a TP4056 module connected to a 3.7V LiPo battery, providing a charging interface for the battery. The TP4056 manages the charging process by connecting its B+ and B- pins to the battery's positive and ground terminals, respectively.
Cirkit Designer LogoOpen Project in Cirkit Designer
Solar-Powered Environmental Monitoring Station with ESP32 and Gas Sensors
Image of AIR QUALITY MONITORING: A project utilizing PMS5003 Board (6-pin) in a practical application
This circuit is designed to monitor various gas levels and air quality using a set of sensors (MQ-136, MQ-6, MQ-137, MQ-7, and PMS5003) interfaced with an ESP32 microcontroller. The ESP32 collects sensor data and can control a relay module potentially for activating systems like fans or alarms based on the sensor readings. Additional components include a DHT22 for temperature and humidity readings, a power supply with a step-down converter, and safety features like resettable fuses and an LVD (Low Voltage Disconnect) to protect the battery and circuit.
Cirkit Designer LogoOpen Project in Cirkit Designer

Explore Projects Built with PMS5003 Board (6-pin)

Use Cirkit Designer to design, explore, and prototype these projects online. Some projects support real-time simulation. Click "Open Project" to start designing instantly!
Image of Plantower PMS7003 Dust sensor: A project utilizing PMS5003 Board (6-pin) in a practical application
Arduino UNO Based PM2.5 Air Quality Monitoring System
This circuit connects a PM2.5 Air Quality Sensor (PMS5003) to an Arduino UNO for air quality monitoring. The sensor's VCC and GND pins are powered by the Arduino's 5V and GND pins, respectively. The sensor's RX and TX pins are connected to the Arduino's digital pins D8 and D9 for serial communication, allowing the Arduino to read and process the air quality data from the sensor.
Cirkit Designer LogoOpen Project in Cirkit Designer
Image of Copy of CanSet v1: A project utilizing PMS5003 Board (6-pin) in a practical application
Battery-Powered Raspberry Pi Pico GPS Tracker with Sensor Integration
This circuit is a data acquisition and communication system powered by a LiPoly battery and managed by a Raspberry Pi Pico. It includes sensors (BMP280, MPU9250) for environmental data, a GPS module for location tracking, an SD card for data storage, and a WLR089-CanSAT for wireless communication. The TP4056 module handles battery charging, and a toggle switch controls power distribution.
Cirkit Designer LogoOpen Project in Cirkit Designer
Image of Dive sense: A project utilizing PMS5003 Board (6-pin) in a practical application
ESP32-Based Battery-Powered Multi-Sensor System
This circuit consists of a TP4056 module connected to a 3.7V LiPo battery, providing a charging interface for the battery. The TP4056 manages the charging process by connecting its B+ and B- pins to the battery's positive and ground terminals, respectively.
Cirkit Designer LogoOpen Project in Cirkit Designer
Image of AIR QUALITY MONITORING: A project utilizing PMS5003 Board (6-pin) in a practical application
Solar-Powered Environmental Monitoring Station with ESP32 and Gas Sensors
This circuit is designed to monitor various gas levels and air quality using a set of sensors (MQ-136, MQ-6, MQ-137, MQ-7, and PMS5003) interfaced with an ESP32 microcontroller. The ESP32 collects sensor data and can control a relay module potentially for activating systems like fans or alarms based on the sensor readings. Additional components include a DHT22 for temperature and humidity readings, a power supply with a step-down converter, and safety features like resettable fuses and an LVD (Low Voltage Disconnect) to protect the battery and circuit.
Cirkit Designer LogoOpen Project in Cirkit Designer

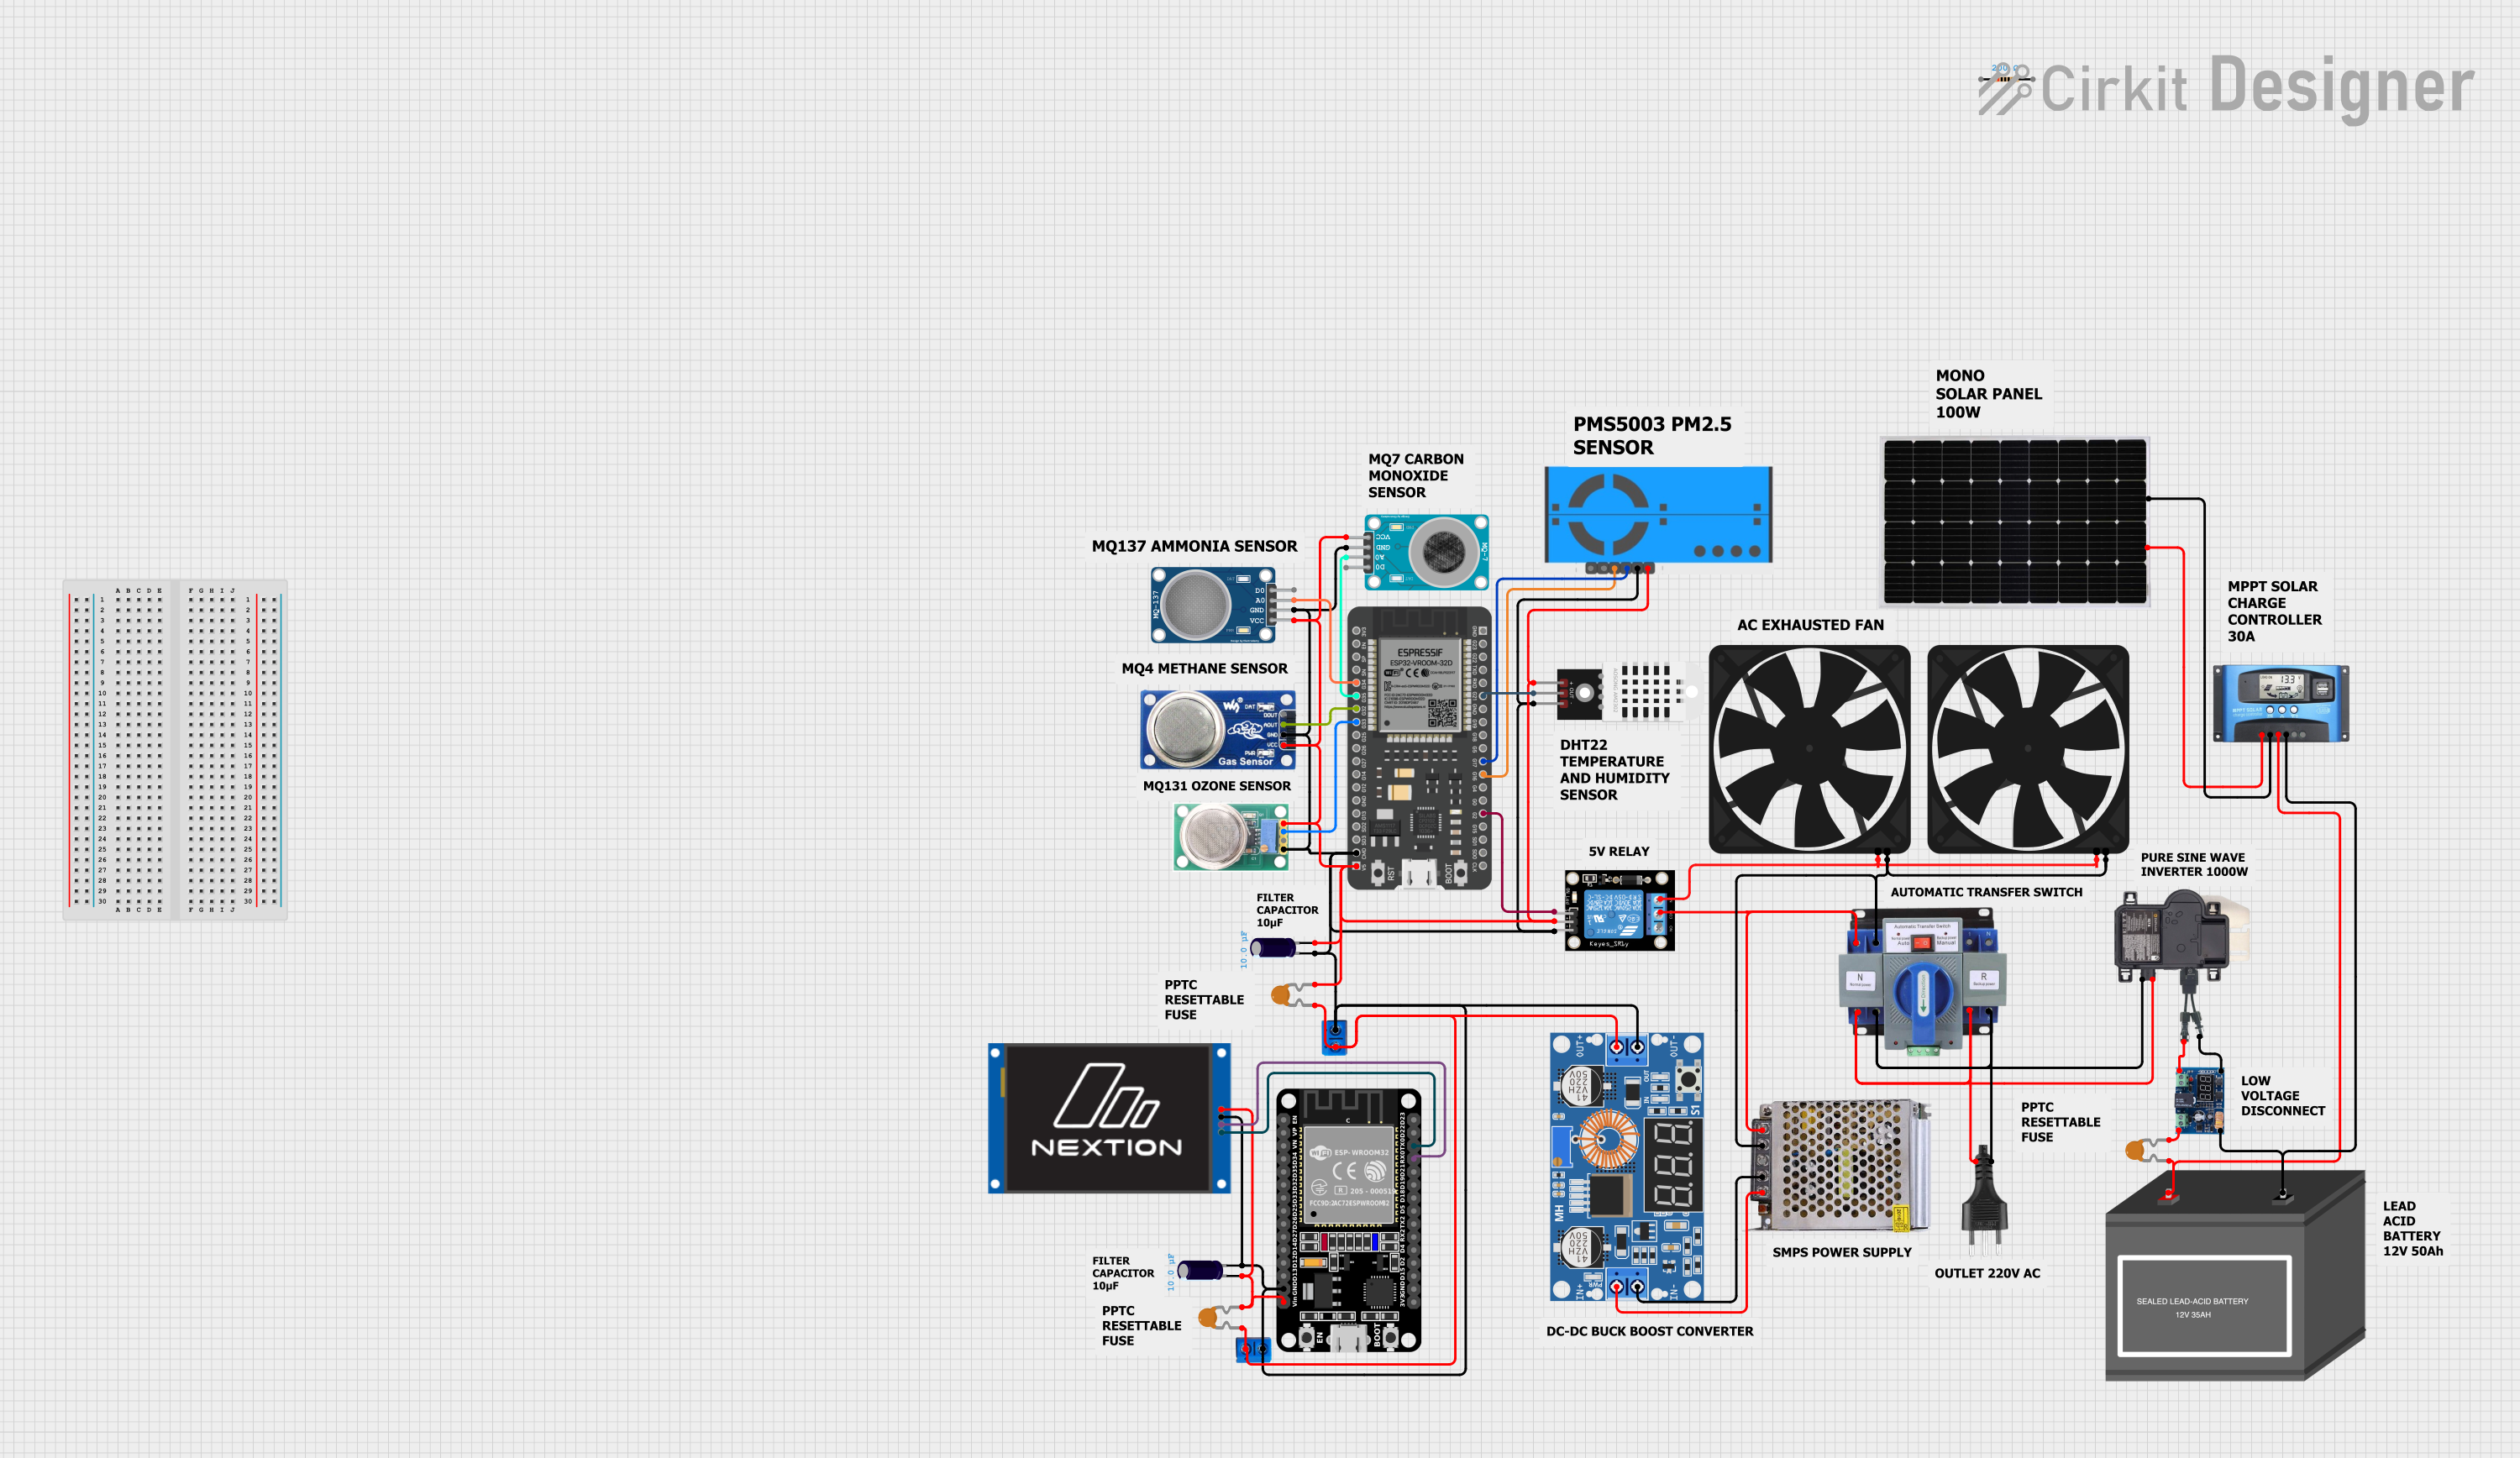
Common Applications and Use Cases

  • Air quality monitoring stations
  • HVAC systems with air quality control
  • Smart home air purifiers
  • Environmental data collection for research
  • Indoor air quality monitors for health-conscious individuals

Technical Specifications

Key Technical Details

  • Supply Voltage: 4.5V to 5.5V
  • Working Current: 100mA (typical)
  • Standby Current: ≤200μA
  • Measuring Range: 0.3μm to 10μm particle diameter
  • Output Data: PM1.0, PM2.5, PM10 concentrations (μg/m³)

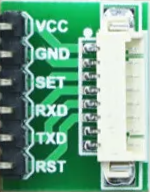
Pin Configuration and Descriptions

Pin Number Name Description
1 VCC Power supply (4.5V-5.5V)
2 GND Ground connection
3 SET Set pin (active low to enter sleep mode)
4 RX UART receive pin (connect to TX of the controller)
5 TX UART transmit pin (connect to RX of the controller)
6 RESET Reset pin (active low)

Usage Instructions

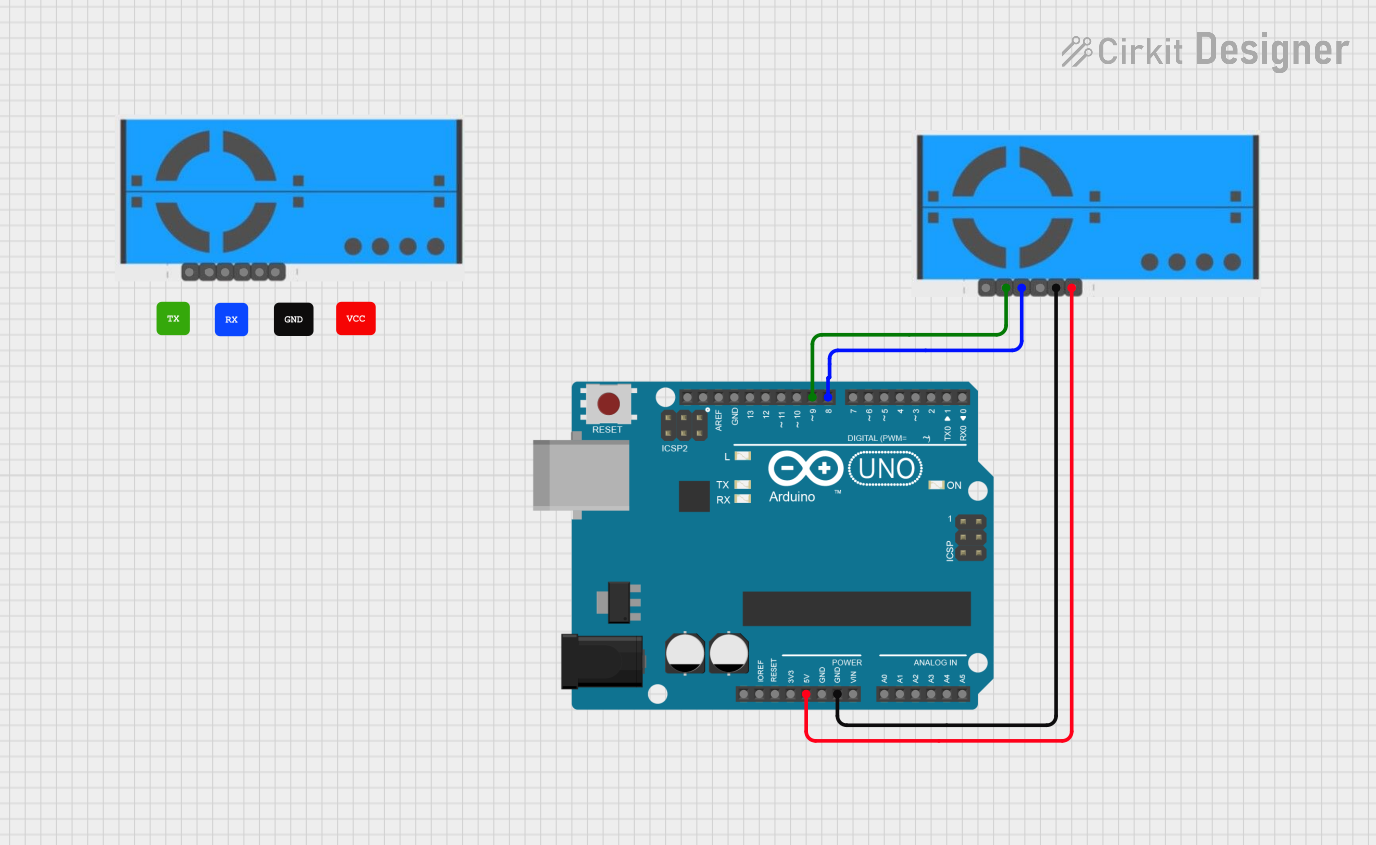
How to Use the Component in a Circuit

  1. Power Supply: Connect the VCC pin to a 5V power supply and the GND pin to the common ground.
  2. Serial Communication: Connect the RX pin to the TX pin of your microcontroller (e.g., Arduino UNO) and the TX pin to the RX pin of the microcontroller.
  3. Set and Reset: The SET pin can be left unconnected if sleep mode is not used. Otherwise, connect it to a digital pin on your microcontroller for control. The RESET pin can be connected to another digital pin for resetting the sensor.

Important Considerations and Best Practices

  • Ensure that the power supply is stable and within the specified voltage range.
  • Avoid placing the sensor in environments with high concentrations of volatile organic compounds (VOCs) or high humidity, as these can affect sensor accuracy.
  • Use a logic level converter if you are interfacing with a 3.3V microcontroller to protect the sensor's RX and TX pins.
  • Allow the sensor to preheat for at least 30 seconds before taking measurements to ensure accuracy.

Example Code for Arduino UNO

#include <SoftwareSerial.h>

SoftwareSerial pmsSerial(10, 11); // RX, TX

void setup() {
  Serial.begin(9600);
  pmsSerial.begin(9600);
}

void loop() {
  if (pmsSerial.available()) {
    // Read data from the sensor
    uint8_t buffer[32];
    int index = 0;
    while (pmsSerial.available() && index < 32) {
      buffer[index++] = pmsSerial.read();
    }
    // Process and output the data
    if (index == 32) {
      int PM_AE_UG_1_0 = buffer[10] * 256 + buffer[11];
      int PM_AE_UG_2_5 = buffer[12] * 256 + buffer[13];
      int PM_AE_UG_10_0 = buffer[14] * 256 + buffer[15];
      Serial.print("PM 1.0 (ug/m3): ");
      Serial.println(PM_AE_UG_1_0);
      Serial.print("PM 2.5 (ug/m3): ");
      Serial.println(PM_AE_UG_2_5);
      Serial.print("PM 10 (ug/m3): ");
      Serial.println(PM_AE_UG_10_0);
    }
  }
  // Wait for a bit before reading again
  delay(1000);
}

Troubleshooting and FAQs

Common Issues

  • No Data Output: Ensure that the sensor is correctly powered and that the serial connections are properly made.
  • Inaccurate Readings: Check for any environmental factors that may affect the sensor's accuracy. Allow the sensor to preheat.

Solutions and Tips for Troubleshooting

  • Sensor Not Responding: Try resetting the sensor using the RESET pin or power cycling the sensor.
  • Serial Communication Issues: Verify the baud rate and ensure that the RX and TX connections are not reversed.

FAQs

Q: How often should the sensor be calibrated? A: The PMS5003 is factory-calibrated and typically does not require additional calibration. However, it's good practice to compare readings with a known reference periodically.

Q: Can the sensor measure the size of individual particles? A: No, the PMS5003 provides the concentration of particles in different size categories, not the size of individual particles.

Q: Is the sensor waterproof? A: No, the PMS5003 is not waterproof and should be protected from moisture and water exposure.

For further assistance, consult the manufacturer's datasheet and technical support resources.