
How to Use AVR 10-pin ICSP Header: Examples, Pinouts, and Specs
 Design with AVR 10-pin ICSP Header in Cirkit Designer
Introduction
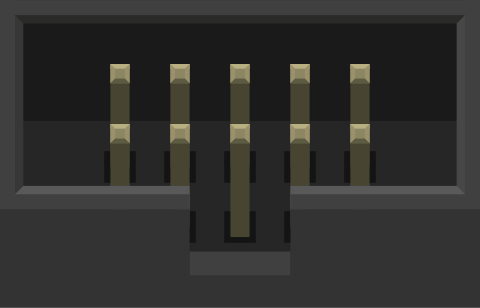
The AVR 10-pin ICSP (In-Circuit Serial Programming) Header is a standardized connector used for programming and debugging AVR microcontrollers. It allows developers to program microcontrollers directly on the circuit board without the need to remove the chip. This header is commonly found in development boards and custom PCB designs that utilize AVR microcontrollers.
Explore Projects Built with AVR 10-pin ICSP Header
 Open Project in Cirkit Designer
 Open Project in Cirkit Designer
 Open Project in Cirkit Designer
 Open Project in Cirkit Designer
Explore Projects Built with AVR 10-pin ICSP Header
Open Project in Cirkit DesignerOpen Project in Cirkit DesignerOpen Project in Cirkit DesignerOpen Project in Cirkit DesignerCommon Applications and Use Cases
- Programming AVR microcontrollers in embedded systems.
- Debugging firmware during development.
- Updating firmware in deployed devices.
- Used in conjunction with AVR programmers such as the AVRISP, USBasp, or Atmel-ICE.
Technical Specifications
The AVR 10-pin ICSP Header follows the standard 2x5 pin configuration with a 0.1-inch (2.54 mm) pitch. Below are the key technical details and pin descriptions:
Key Technical Details
- Connector Type: 2x5 pin header.
- Pin Pitch: 2.54 mm (0.1 inch).
- Voltage Levels: Compatible with 5V and 3.3V systems (depending on the programmer and target device).
- Signal Type: Serial communication for programming and debugging.
Pin Configuration and Descriptions
The following table describes the pinout of the AVR 10-pin ICSP Header:
| Pin Number | Signal Name | Description |
|---|---|---|
| 1 | MISO | Master In Slave Out - Data from target to programmer. |
| 2 | VCC | Power supply for the target device (3.3V or 5V). |
| 3 | SCK | Serial Clock - Synchronizes data transfer. |
| 4 | GND | Ground connection. |
| 5 | MOSI | Master Out Slave In - Data from programmer to target. |
| 6 | GND | Ground connection (redundant). |
| 7 | RESET | Resets the target microcontroller. |
| 8 | GND | Ground connection (redundant). |
| 9 | (NC) | Not connected (reserved for future use). |
| 10 | GND | Ground connection (redundant). |
Note: Pins 4, 6, 8, and 10 are all connected to ground to ensure a reliable ground reference.
Usage Instructions
How to Use the AVR 10-pin ICSP Header in a Circuit
Connect the Header to the Target Device:
- Ensure the 10-pin ICSP header is properly soldered to the PCB.
- Align the programmer's connector with the header, ensuring pin 1 matches the orientation (usually marked with a dot or triangle).
Connect the Programmer:
- Use an AVR-compatible programmer (e.g., AVRISP, USBasp, or Atmel-ICE).
- Plug the programmer's cable into the ICSP header.
Power the Circuit:
- Ensure the target device is powered either through the programmer (if supported) or an external power source.
Program the Microcontroller:
- Use software such as Atmel Studio, AVRDUDE, or Arduino IDE to upload firmware to the microcontroller.
Important Considerations and Best Practices
- Orientation Matters: Always ensure the programmer's connector is aligned correctly with the ICSP header. Reversing the connection can damage the programmer or the target device.
- Check Voltage Compatibility: Verify that the programmer's voltage matches the target device's operating voltage (e.g., 3.3V or 5V).
- Avoid Signal Interference: Keep the ICSP header and programming lines away from high-frequency or high-current traces on the PCB.
- Use Proper Software: Ensure the programming software supports the specific AVR microcontroller being used.
Example: Using the ICSP Header with an Arduino UNO
The Arduino UNO does not have a 10-pin ICSP header but uses a 6-pin ICSP header. However, you can use an adapter to connect a 10-pin programmer to the Arduino UNO. Below is an example of using AVRDUDE to program an AVR microcontroller via the ICSP header:
Command to program an AVR microcontroller using AVRDUDE
avrdude -c usbasp -p m328p -U flash:w:firmware.hex
-c usbasp: Specifies the programmer type (e.g., USBasp).
-p m328p: Specifies the target microcontroller (e.g., ATmega328P).
-U flash:w:firmware.hex: Writes the firmware file to the microcontroller's flash memory.
Troubleshooting and FAQs
Common Issues and Solutions
Programmer Not Detected:
- Cause: Incorrect driver installation or faulty USB connection.
- Solution: Ensure the programmer's drivers are installed correctly. Try a different USB port or cable.
Target Device Not Responding:
- Cause: Incorrect ICSP header connection or microcontroller not powered.
- Solution: Verify the orientation of the programmer's connector. Ensure the target device is powered.
Programming Fails with "Device Signature" Error:
- Cause: Incorrect microcontroller selection in the programming software.
- Solution: Double-check the microcontroller model and ensure it matches the selected device in the software.
Firmware Upload is Incomplete:
- Cause: Insufficient power supply or noisy signals.
- Solution: Ensure a stable power supply and minimize interference on the ICSP lines.
FAQs
Q: Can I use the AVR 10-pin ICSP Header with a 6-pin programmer?
A: Yes, you can use a 10-pin to 6-pin adapter to connect a 6-pin programmer to the 10-pin ICSP header.
Q: What happens if I connect the ICSP header incorrectly?
A: Incorrect connections can damage the programmer or the target device. Always double-check the pin alignment before connecting.
Q: Is the ICSP header compatible with all AVR microcontrollers?
A: The ICSP header is compatible with most AVR microcontrollers that support in-circuit serial programming. However, always verify the microcontroller's datasheet for compatibility.
Q: Can I use the ICSP header for debugging?
A: Yes, the ICSP header can be used for debugging if the programmer supports debugging functionality.