How to Use Voltage Sensor: Examples, Pinouts, and Specs
Introduction
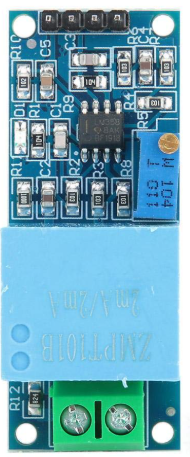
The ZMPT101B Voltage Sensor, manufactured by Arduino, is a compact and reliable device designed to measure the electrical potential difference between two points in a circuit. It provides real-time voltage readings, making it an essential tool for monitoring and control in various electronic applications. This sensor is widely used in projects requiring voltage measurement, such as energy monitoring systems, power supply diagnostics, and automation systems.
Explore Projects Built with Voltage Sensor
Explore Projects Built with Voltage Sensor
Common Applications and Use Cases
- Energy monitoring in residential, commercial, and industrial setups
- Power supply voltage measurement and diagnostics
- Automation systems requiring real-time voltage feedback
- Educational projects and prototyping with Arduino boards
- Battery voltage monitoring in renewable energy systems
Technical Specifications
The ZMPT101B Voltage Sensor is designed for precision voltage measurement with high sensitivity and stability. Below are its key technical details:
| Parameter | Specification |
|---|---|
| Manufacturer | Arduino |
| Part ID | ZMPT101B |
| Input Voltage Range | 0V to 250V AC |
| Output Voltage Range | 0V to 5V DC (analog output) |
| Operating Voltage | 5V DC |
| Operating Current | ≤ 2mA |
| Accuracy | High precision with adjustable gain |
| Isolation Voltage | 2kV (galvanic isolation) |
| Dimensions | 49mm x 19mm x 16mm |
| Operating Temperature | -40°C to 85°C |
Pin Configuration and Descriptions
The ZMPT101B Voltage Sensor module has the following pin configuration:
| Pin | Name | Description |
|---|---|---|
| 1 | VCC | Power supply input (5V DC) |
| 2 | GND | Ground connection |
| 3 | OUT | Analog voltage output proportional to the measured AC voltage |
| 4 | ADJ | Potentiometer for adjusting the gain and sensitivity of the voltage measurement |
Usage Instructions
The ZMPT101B Voltage Sensor is easy to integrate into circuits and works seamlessly with Arduino boards. Follow the steps below to use the sensor effectively:
Connecting the Sensor
- Power Supply: Connect the
VCCpin to the 5V output of your Arduino and theGNDpin to the Arduino's ground. - Voltage Measurement: Connect the AC voltage source to the input terminals of the ZMPT101B module.
- Output Signal: Connect the
OUTpin to an analog input pin on the Arduino (e.g., A0). - Adjust Sensitivity: Use the onboard potentiometer (
ADJ) to calibrate the sensor for accurate readings.
Sample Arduino Code
Below is an example of how to use the ZMPT101B Voltage Sensor with an Arduino UNO to measure AC voltage:
// ZMPT101B Voltage Sensor Example Code
// This code reads the analog output of the ZMPT101B and calculates the AC voltage.

const int sensorPin = A0;  // Analog pin connected to the sensor's OUT pin
float sensorValue = 0;     // Variable to store the sensor reading
float voltage = 0;         // Variable to store the calculated voltage

void setup() {
  Serial.begin(9600);  // Initialize serial communication at 9600 baud
}

void loop() {
  sensorValue = analogRead(sensorPin);  // Read the analog value from the sensor
  voltage = (sensorValue / 1023.0) * 250.0;
  // Convert the analog value to voltage
  // Assuming the sensor is calibrated for 0-250V AC range

  Serial.print("Voltage: ");
  Serial.print(voltage);
  Serial.println(" V");  // Print the voltage value to the Serial Monitor

  delay(1000);  // Wait for 1 second before the next reading
}
Important Considerations and Best Practices
- Calibration: Adjust the potentiometer (
ADJ) to ensure accurate voltage readings. Use a multimeter to verify the output. - Isolation: The ZMPT101B provides galvanic isolation, but ensure proper insulation when working with high voltages.
- Voltage Range: Do not exceed the sensor's input voltage range (250V AC) to avoid damage.
- Sampling Rate: For accurate AC voltage measurement, ensure the Arduino's sampling rate is sufficient to capture the waveform.
Troubleshooting and FAQs
Common Issues and Solutions
Inaccurate Voltage Readings:
- Ensure the potentiometer is calibrated correctly.
- Verify that the input voltage does not exceed the sensor's range.
- Check for loose or incorrect connections.
No Output Signal:
- Confirm that the sensor is powered (5V DC to
VCC). - Ensure the
OUTpin is connected to the correct analog input pin on the Arduino.
- Confirm that the sensor is powered (5V DC to
Fluctuating Readings:
- Use a capacitor across the output to stabilize the signal.
- Ensure the AC voltage source is stable and free from noise.
FAQs
Q: Can the ZMPT101B measure DC voltage?
A: No, the ZMPT101B is designed specifically for AC voltage measurement. For DC voltage, use a dedicated DC voltage sensor.
Q: How do I ensure safety when using the sensor?
A: Always handle high-voltage connections with care. Use proper insulation and avoid touching exposed wires.
Q: Can I use this sensor with microcontrollers other than Arduino?
A: Yes, the ZMPT101B can be used with other microcontrollers (e.g., ESP32, Raspberry Pi) as long as they support analog input and operate at 5V.
Q: What is the maximum voltage the sensor can measure?
A: The ZMPT101B can measure up to 250V AC. Exceeding this limit may damage the sensor.
By following this documentation, you can effectively integrate the ZMPT101B Voltage Sensor into your projects for accurate and reliable voltage measurement.