Cirkit Designer Logo
Cirkit Designer
Your all-in-one circuit design IDE
Home / 
Component Documentation

How to Use DFRobot Capacitive Soil Moisture Sensor (V1.0): Examples, Pinouts, and Specs

Image of DFRobot Capacitive Soil Moisture Sensor (V1.0)
Cirkit Designer LogoDesign with DFRobot Capacitive Soil Moisture Sensor (V1.0) in Cirkit Designer

Introduction

The DFRobot Capacitive Soil Moisture Sensor (V1.0) is an electronic device that measures the moisture content in soil. Unlike resistive soil moisture sensors, which determine moisture by passing current through the soil, the capacitive sensor measures the changes in capacitance caused by the dielectric constant of the soil, which changes with moisture content. This method offers the advantage of not corroding over time, as there is no direct electrical contact with the soil.

Explore Projects Built with DFRobot Capacitive Soil Moisture Sensor (V1.0)

Use Cirkit Designer to design, explore, and prototype these projects online. Some projects support real-time simulation. Click "Open Project" to start designing instantly!
Arduino UNO Based Soil Moisture Monitoring System
Image of Arduino-Based Soil Moisture Monitor: A project utilizing DFRobot Capacitive Soil Moisture Sensor (V1.0) in a practical application
This circuit is designed to monitor soil moisture levels using a DFRobot Capacitive Soil Moisture Sensor connected to an Arduino UNO microcontroller. The sensor's analog output is read by the Arduino on pin A0, and the microcontroller processes this data to determine if the soil is too wet, perfect, or too dry. The status is then output to the serial monitor, with the system taking readings at one-second intervals.
Cirkit Designer LogoOpen Project in Cirkit Designer
Arduino UNO Based Soil Moisture Monitoring with I2C LCD Display
Image of spa project : A project utilizing DFRobot Capacitive Soil Moisture Sensor (V1.0) in a practical application
This circuit features an Arduino UNO microcontroller connected to a DFRobot Capacitive Soil Moisture Sensor and an MKE-M08 LCD2004 I2C Module. The soil moisture sensor's analog output is connected to the Arduino's A0 pin for moisture level readings, while the LCD module is interfaced via I2C (SCL and SDA) for display purposes. The Arduino is programmed to read the moisture levels and potentially display the readings on the LCD screen.
Cirkit Designer LogoOpen Project in Cirkit Designer
Arduino UNO Based Soil Moisture Monitoring System
Image of capacitive sensor: A project utilizing DFRobot Capacitive Soil Moisture Sensor (V1.0) in a practical application
This circuit consists of an Arduino UNO microcontroller connected to a Capacitive Soil Moisture Sensor V1.2. The Arduino is programmed to read the moisture levels from the sensor and categorize the soil moisture content as 'Very Wet', 'Wet', or 'Dry', which is then output through the serial port. The sensor is powered by the Arduino's 5V supply, and its output is read by the Arduino's analog pin A0.
Cirkit Designer LogoOpen Project in Cirkit Designer
ESP32-Based Soil Moisture and Temperature Monitoring System
Image of soil: A project utilizing DFRobot Capacitive Soil Moisture Sensor (V1.0) in a practical application
This circuit features an ESP32 microcontroller connected to a DHT11 temperature and humidity sensor and a DFRobot Capacitive Soil Moisture Sensor. The ESP32 reads the soil moisture level from the analog output of the moisture sensor connected to pin D34 and the temperature and humidity data from the DHT11 sensor connected to pin D15. The circuit is likely designed for environmental monitoring, such as in a smart agriculture application, where it can monitor soil conditions and ambient temperature and humidity.
Cirkit Designer LogoOpen Project in Cirkit Designer

Explore Projects Built with DFRobot Capacitive Soil Moisture Sensor (V1.0)

Use Cirkit Designer to design, explore, and prototype these projects online. Some projects support real-time simulation. Click "Open Project" to start designing instantly!
Image of Arduino-Based Soil Moisture Monitor: A project utilizing DFRobot Capacitive Soil Moisture Sensor (V1.0) in a practical application
Arduino UNO Based Soil Moisture Monitoring System
This circuit is designed to monitor soil moisture levels using a DFRobot Capacitive Soil Moisture Sensor connected to an Arduino UNO microcontroller. The sensor's analog output is read by the Arduino on pin A0, and the microcontroller processes this data to determine if the soil is too wet, perfect, or too dry. The status is then output to the serial monitor, with the system taking readings at one-second intervals.
Cirkit Designer LogoOpen Project in Cirkit Designer
Image of spa project : A project utilizing DFRobot Capacitive Soil Moisture Sensor (V1.0) in a practical application
Arduino UNO Based Soil Moisture Monitoring with I2C LCD Display
This circuit features an Arduino UNO microcontroller connected to a DFRobot Capacitive Soil Moisture Sensor and an MKE-M08 LCD2004 I2C Module. The soil moisture sensor's analog output is connected to the Arduino's A0 pin for moisture level readings, while the LCD module is interfaced via I2C (SCL and SDA) for display purposes. The Arduino is programmed to read the moisture levels and potentially display the readings on the LCD screen.
Cirkit Designer LogoOpen Project in Cirkit Designer
Image of capacitive sensor: A project utilizing DFRobot Capacitive Soil Moisture Sensor (V1.0) in a practical application
Arduino UNO Based Soil Moisture Monitoring System
This circuit consists of an Arduino UNO microcontroller connected to a Capacitive Soil Moisture Sensor V1.2. The Arduino is programmed to read the moisture levels from the sensor and categorize the soil moisture content as 'Very Wet', 'Wet', or 'Dry', which is then output through the serial port. The sensor is powered by the Arduino's 5V supply, and its output is read by the Arduino's analog pin A0.
Cirkit Designer LogoOpen Project in Cirkit Designer
Image of soil: A project utilizing DFRobot Capacitive Soil Moisture Sensor (V1.0) in a practical application
ESP32-Based Soil Moisture and Temperature Monitoring System
This circuit features an ESP32 microcontroller connected to a DHT11 temperature and humidity sensor and a DFRobot Capacitive Soil Moisture Sensor. The ESP32 reads the soil moisture level from the analog output of the moisture sensor connected to pin D34 and the temperature and humidity data from the DHT11 sensor connected to pin D15. The circuit is likely designed for environmental monitoring, such as in a smart agriculture application, where it can monitor soil conditions and ambient temperature and humidity.
Cirkit Designer LogoOpen Project in Cirkit Designer

Common Applications and Use Cases

  • Agriculture and gardening to monitor soil moisture for optimal plant growth
  • Automated watering systems
  • Environmental monitoring
  • Educational projects to demonstrate soil moisture sensing

Technical Specifications

Key Technical Details

  • Operating Voltage: 3.3 - 5.5 VDC
  • Output Voltage: 0 - 3.0V
  • Interface: Analog
  • Current: 5mA
  • Sensing Depth: ~38mm
  • Operating Temperature: 10°C to 30°C

Pin Configuration and Descriptions

Pin Number Name Description
1 VCC Power supply (3.3 - 5.5 VDC)
2 GND Ground connection
3 AOUT Analog output signal

Usage Instructions

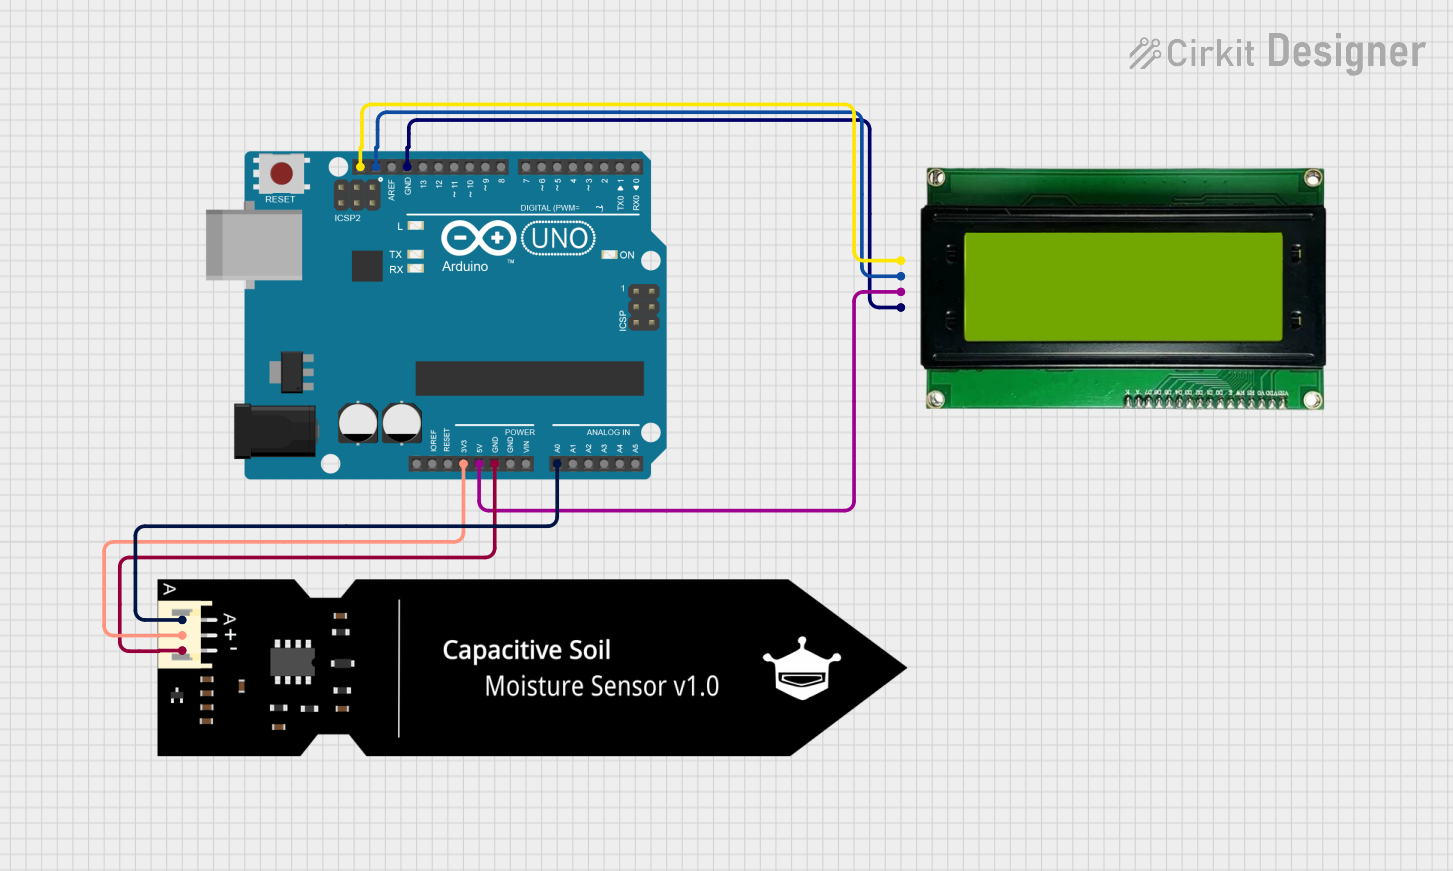
How to Use the Component in a Circuit

  1. Connect the VCC pin to the 3.3V or 5V output on your microcontroller board.
  2. Connect the GND pin to the ground on your microcontroller board.
  3. Connect the AOUT pin to an analog input pin on your microcontroller.

Important Considerations and Best Practices

  • Avoid submerging the sensor completely in water or wetting the onboard circuitry, as it is not waterproof.
  • Calibrate the sensor for the specific soil type to get accurate readings.
  • Use a pull-up resistor if you experience unstable readings.
  • To prevent corrosion, do not leave the sensor in the soil for extended periods when not in use.

Example Code for Arduino UNO

// Define the sensor pin
const int sensorPin = A0;

void setup() {
  // Initialize serial communication at 9600 baud rate
  Serial.begin(9600);
}

void loop() {
  // Read the value from the sensor
  int sensorValue = analogRead(sensorPin);
  // Convert the analog reading to a voltage value
  float voltage = sensorValue * (5.0 / 1023.0);
  // Print the voltage
  Serial.print("Voltage: ");
  Serial.println(voltage);
  // Wait for a second before reading again
  delay(1000);
}

Troubleshooting and FAQs

Common Issues Users Might Face

  • Inconsistent Readings: Ensure that the sensor is properly calibrated for the soil type. Check for loose connections and use a pull-up resistor if necessary.
  • Sensor Corrosion: Even though the sensor is capacitive and less prone to corrosion, avoid leaving it in the soil for long periods when not in use.
  • No Readings: Verify that the sensor is connected correctly with the correct polarity and that the microcontroller is supplying power.

Solutions and Tips for Troubleshooting

  • If the sensor provides erratic readings, stabilize the power supply with a capacitor across the VCC and GND pins.
  • For calibration, take readings in completely dry soil and fully submerged in water to establish the sensor's range.
  • Ensure the analog input pin on the microcontroller is functioning correctly by testing it with a known voltage source.

FAQs

Q: Can the sensor be used with a 5V microcontroller like the Arduino UNO? A: Yes, the sensor can operate on 3.3V to 5.5V, making it compatible with both 3.3V and 5V microcontrollers.

Q: How do I calibrate the sensor for accurate moisture readings? A: Take readings in known conditions (completely dry and fully wet soil) and map these to the sensor's output range to create a calibration curve.

Q: Is the sensor waterproof? A: The sensor probe is water-resistant, but the onboard circuitry is not waterproof. Avoid getting the electronic components wet.

Q: How long can I leave the sensor in the soil? A: While the capacitive design reduces corrosion risk, it is still recommended to remove the sensor from the soil when not actively taking measurements to extend its lifespan.