How to Use Shelly 1 gen3: Examples, Pinouts, and Specs
Introduction
The Shelly 1 Gen3 is a compact and versatile Wi-Fi relay switch designed for smart home automation. Manufactured by Shelly, this device allows users to remotely control electrical appliances and lighting through a smartphone app or integrate it with popular home automation platforms such as Google Home, Amazon Alexa, or MQTT-based systems. Its small form factor and wide voltage input range make it suitable for retrofitting into existing electrical setups without requiring significant modifications.
Explore Projects Built with Shelly 1 gen3


Explore Projects Built with Shelly 1 gen3
Common Applications and Use Cases
- Remote control of lights, fans, and other appliances.
- Integration into smart home systems for automation and scheduling.
- Retrofitting traditional switches to enable Wi-Fi control.
- Monitoring and controlling electrical devices via smartphone apps or voice assistants.
- Use in DIY home automation projects.
Technical Specifications
The Shelly 1 Gen3 is designed to be highly adaptable and reliable. Below are its key technical specifications:
| Parameter | Specification |
|---|---|
| Manufacturer | Shelly |
| Part ID | shelly1g3 |
| Power Supply | 110-240V AC, 50/60Hz or 24-60V DC |
| Maximum Load | 16A (Resistive Load) |
| Wireless Connectivity | Wi-Fi 802.11 b/g/n, 2.4 GHz |
| Operating Temperature | -20°C to +40°C |
| Dimensions | 41mm x 36mm x 17mm |
| Power Consumption | < 1W |
| Control Interfaces | Mobile App (Shelly Cloud), REST API, MQTT, HTTP, and Webhooks |
| Certifications | CE, FCC |
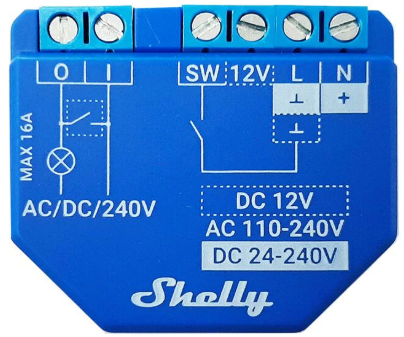
Pin Configuration and Descriptions
The Shelly 1 Gen3 has a simple pinout for easy integration into electrical systems. Below is the pin configuration:
| Pin Name | Description |
|---|---|
| L | Line input for AC power (110-240V AC) |
| N | Neutral input for AC power |
| O | Output terminal for the connected load (e.g., light, fan) |
| I | Input terminal for the switch (used for manual control or external switches) |
| SW | Switch terminal for connecting a physical switch |
Usage Instructions
How to Use the Shelly 1 Gen3 in a Circuit
Wiring the Device:
- Connect the L and N terminals to the AC power supply.
- Connect the O terminal to the load (e.g., a light or fan).
- Optionally, connect a physical switch to the SW and I terminals for manual control.
- Ensure all connections are secure and insulated to prevent short circuits.
Connecting to Wi-Fi:
- Power on the Shelly 1 Gen3. It will create a Wi-Fi hotspot.
- Connect your smartphone to the Shelly Wi-Fi network.
- Open the Shelly app and follow the on-screen instructions to connect the device to your home Wi-Fi network.
Configuring the Device:
- Use the Shelly app to set up schedules, timers, and automation rules.
- Integrate the device with third-party platforms like Google Home, Alexa, or MQTT for advanced control.
Important Considerations and Best Practices
- Ensure the load connected to the Shelly 1 Gen3 does not exceed the maximum rated current of 16A.
- Use proper insulation and follow local electrical codes when installing the device.
- Avoid installing the device in areas with high humidity or extreme temperatures.
- For DC power supply, ensure the voltage is within the supported range (24-60V DC).
- Regularly update the firmware via the Shelly app to ensure optimal performance and security.
Example: Connecting Shelly 1 Gen3 to an Arduino UNO
The Shelly 1 Gen3 can be controlled via MQTT or HTTP requests. Below is an example of using an Arduino UNO to send an HTTP request to toggle the relay:
#include <WiFi.h>
#include <HTTPClient.h>

// Wi-Fi credentials
const char* ssid = "YourWiFiSSID";
const char* password = "YourWiFiPassword";

// Shelly 1 Gen3 IP address
const char* shellyIP = "192.168.1.100"; // Replace with your Shelly's IP address

void setup() {
  Serial.begin(115200);
  WiFi.begin(ssid, password);

  // Wait for Wi-Fi connection
  while (WiFi.status() != WL_CONNECTED) {
    delay(1000);
    Serial.println("Connecting to Wi-Fi...");
  }
  Serial.println("Connected to Wi-Fi");
}

void loop() {
  HTTPClient http;

  // URL to toggle the relay
  String url = String("http://") + shellyIP + "/relay/0?turn=toggle";

  // Send HTTP GET request
  http.begin(url);
  int httpResponseCode = http.GET();

  if (httpResponseCode > 0) {
    Serial.print("HTTP Response code: ");
    Serial.println(httpResponseCode);
  } else {
    Serial.print("Error code: ");
    Serial.println(httpResponseCode);
  }

  http.end();

  // Wait 5 seconds before toggling again
  delay(5000);
}
Notes:
- Replace
YourWiFiSSIDandYourWiFiPasswordwith your Wi-Fi credentials. - Replace
192.168.1.100with the actual IP address of your Shelly 1 Gen3. - Ensure the Shelly 1 Gen3 is configured to accept HTTP commands.
Troubleshooting and FAQs
Common Issues and Solutions
Device Not Connecting to Wi-Fi:
- Ensure the Wi-Fi network is 2.4 GHz (Shelly 1 Gen3 does not support 5 GHz networks).
- Check that the Wi-Fi credentials entered in the app are correct.
- Move the device closer to the router during setup.
Relay Not Switching:
- Verify that the load does not exceed the maximum rated current (16A).
- Check the wiring connections for loose or incorrect connections.
- Ensure the device is powered on and the firmware is up to date.
HTTP or MQTT Commands Not Working:
- Confirm the Shelly 1 Gen3 is connected to the same network as the controller (e.g., Arduino).
- Verify the IP address of the Shelly 1 Gen3.
- Check the device settings to ensure HTTP or MQTT control is enabled.
FAQs
Q: Can I use the Shelly 1 Gen3 with a 3-way switch setup?
A: Yes, the Shelly 1 Gen3 supports 3-way switch configurations. Refer to the Shelly app for wiring diagrams.
Q: Does the Shelly 1 Gen3 support dimming?
A: No, the Shelly 1 Gen3 is a relay switch and does not support dimming functionality.
Q: Can I control the Shelly 1 Gen3 without an internet connection?
A: Yes, the device can be controlled locally via its IP address or through a local MQTT broker.
Q: Is the Shelly 1 Gen3 compatible with Home Assistant?
A: Yes, the Shelly 1 Gen3 can be integrated with Home Assistant using MQTT or the Shelly integration.
Q: How do I reset the Shelly 1 Gen3?
A: Press and hold the reset button for 10 seconds until the LED indicator blinks, indicating a factory reset.
By following this documentation, users can effectively install, configure, and troubleshoot the Shelly 1 Gen3 for their smart home automation needs.