How to Use OLED 1602A: Examples, Pinouts, and Specs
Introduction
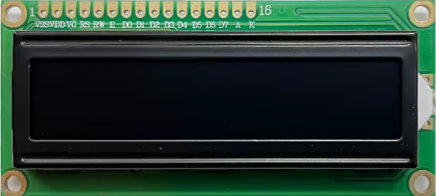
The OLED 1602A is a 16x2 character OLED display module designed to provide a clear and bright visual output for a wide range of applications. Unlike traditional LCD displays, the OLED 1602A offers high contrast, wide viewing angles, and low power consumption, making it an excellent choice for modern embedded systems and projects. Its compact size and simple interface make it ideal for use in microcontroller-based systems, such as Arduino, Raspberry Pi, and other development platforms.
Explore Projects Built with OLED 1602A


Explore Projects Built with OLED 1602A
Common Applications and Use Cases
- Home automation systems (e.g., displaying temperature, humidity, or time)
- IoT devices for status monitoring
- Embedded systems for user interfaces
- Educational and hobbyist projects
- Industrial control panels
Technical Specifications
The OLED 1602A is a versatile display module with the following key specifications:
| Parameter | Value |
|---|---|
| Display Type | OLED |
| Display Size | 16x2 characters |
| Operating Voltage | 3.3V - 5V |
| Interface Type | I2C |
| Power Consumption | Low (varies with brightness) |
| Viewing Angle | Wide |
| Character Size | 5x8 dot matrix per character |
| Dimensions | 80mm x 36mm x 12mm (approx.) |
| Operating Temperature | -40°C to +80°C |
Pin Configuration and Descriptions
The OLED 1602A uses a 4-pin I2C interface for communication. Below is the pin configuration:
| Pin | Name | Description |
|---|---|---|
| 1 | GND | Ground connection |
| 2 | VCC | Power supply (3.3V or 5V) |
| 3 | SDA | Serial Data Line for I2C communication |
| 4 | SCL | Serial Clock Line for I2C communication |
Usage Instructions
How to Use the OLED 1602A in a Circuit
- Power Connection: Connect the
VCCpin to a 3.3V or 5V power source and theGNDpin to the ground of your circuit. - I2C Communication: Connect the
SDAandSCLpins to the corresponding I2C pins on your microcontroller. For an Arduino UNO:SDAconnects to A4.SCLconnects to A5.
- Install Required Libraries: Use the
LiquidCrystal_I2Clibrary or a similar library to control the OLED 1602A. Install it via the Arduino IDE Library Manager. - Address Configuration: The default I2C address for the OLED 1602A is typically
0x27or0x3F. Verify the address using an I2C scanner sketch if needed.
Example Code for Arduino UNO
Below is an example code snippet to display "Hello, World!" on the OLED 1602A:
#include <Wire.h>
#include <LiquidCrystal_I2C.h>

// Initialize the OLED 1602A with I2C address 0x27
LiquidCrystal_I2C lcd(0x27, 16, 2);

void setup() {
  lcd.init(); // Initialize the display
  lcd.backlight(); // Turn on the backlight
  lcd.setCursor(0, 0); // Set cursor to the first row, first column
  lcd.print("Hello, World!"); // Print message on the first row
  lcd.setCursor(0, 1); // Set cursor to the second row, first column
  lcd.print("OLED 1602A"); // Print message on the second row
}

void loop() {
  // No actions needed in the loop for this example
}
Important Considerations and Best Practices
- Power Supply: Ensure the power supply voltage matches the module's requirements (3.3V or 5V).
- I2C Address: If the display does not respond, check the I2C address using an I2C scanner sketch.
- Contrast Adjustment: The OLED 1602A does not require a contrast adjustment potentiometer, unlike LCDs.
- Backlight Control: Use the
backlight()andnoBacklight()functions to control the backlight programmatically.
Troubleshooting and FAQs
Common Issues and Solutions
Display Not Turning On:
- Verify the power connections (
VCCandGND). - Ensure the I2C address is correct and matches the module's configuration.
- Verify the power connections (
Characters Not Displaying Properly:
- Check the I2C connections (
SDAandSCL) for loose or incorrect wiring. - Ensure the correct library is installed and initialized in the code.
- Check the I2C connections (
Flickering or Dim Display:
- Verify the power supply is stable and capable of providing sufficient current.
- Reduce the brightness if possible to lower power consumption.
I2C Address Conflict:
- Use an I2C scanner sketch to detect the correct address of the OLED 1602A.
- Ensure no other devices on the I2C bus share the same address.
FAQs
Q: Can I use the OLED 1602A with a 3.3V microcontroller?
A: Yes, the OLED 1602A supports both 3.3V and 5V logic levels, making it compatible with most microcontrollers.
Q: How do I change the I2C address of the OLED 1602A?
A: The I2C address is typically fixed but may be configurable via solder jumpers on the module. Refer to the module's datasheet for details.
Q: Is the OLED 1602A compatible with Raspberry Pi?
A: Yes, the OLED 1602A can be used with Raspberry Pi via the I2C interface. Use the appropriate libraries for Python, such as smbus.
Q: Can I display custom characters on the OLED 1602A?
A: Yes, you can create and display custom characters using the createChar() function in the LiquidCrystal_I2C library.
By following this documentation, you can effectively integrate the OLED 1602A into your projects and troubleshoot common issues with ease.