How to Use Grove Pi HAT: Examples, Pinouts, and Specs
Introduction
The Grove Pi HAT by Seeed Studio (Manufacturer Part ID: Raspberry PI HAT) is a versatile add-on board designed for the Raspberry Pi. It simplifies the process of connecting Grove sensors and actuators, making it an excellent choice for rapid prototyping and development of IoT (Internet of Things) projects. The Grove Pi HAT acts as a bridge between the Raspberry Pi and the Grove ecosystem, enabling seamless integration of a wide range of modules such as temperature sensors, light sensors, relays, and more.
Explore Projects Built with Grove Pi HAT


Explore Projects Built with Grove Pi HAT
Common Applications and Use Cases
- IoT prototyping and development
- Smart home automation systems
- Environmental monitoring
- Robotics and automation projects
- Educational projects and STEM learning
Technical Specifications
Key Technical Details
| Parameter | Specification |
|---|---|
| Compatible Boards | Raspberry Pi 2/3/4, Raspberry Pi Zero |
| Input Voltage | 5V (via Raspberry Pi GPIO header) |
| Communication Protocol | I2C |
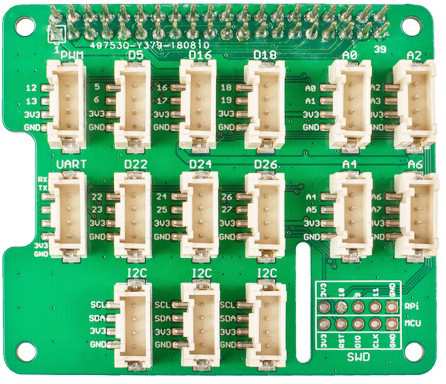
| Grove Ports | 15 (Digital, Analog, I2C, UART, PWM) |
| Operating Temperature | -20°C to 70°C |
| Dimensions | 65mm x 56mm x 25mm |
Pin Configuration and Descriptions
The Grove Pi HAT connects to the Raspberry Pi via the GPIO header. Below is a description of the key pins and their functions:
| Pin Name | Pin Number | Description |
|---|---|---|
| 5V Power | 2, 4 | Supplies power to the Grove Pi HAT and modules. |
| Ground (GND) | 6, 9, 14 | Common ground for the circuit. |
| I2C SDA | 3 | Data line for I2C communication. |
| I2C SCL | 5 | Clock line for I2C communication. |
| GPIO Pins | Various | Used for digital, analog, UART, and PWM signals. |
Usage Instructions
How to Use the Grove Pi HAT in a Circuit
- Attach the Grove Pi HAT: Align the Grove Pi HAT with the GPIO header on your Raspberry Pi and gently press it down to ensure a secure connection.
- Connect Grove Modules: Plug Grove sensors or actuators into the appropriate ports on the HAT (e.g., digital, analog, I2C, UART).
- Power the Raspberry Pi: Supply power to the Raspberry Pi via its micro-USB or USB-C port (depending on the model).
- Install Required Software:
- Boot up the Raspberry Pi and ensure it has an internet connection.
- Open a terminal and install the Grove Pi library:
curl -kL dexterindustries.com/update_grovepi | bash - Reboot the Raspberry Pi after installation.
- Write and Run Code: Use Python or other supported languages to interact with the connected Grove modules.
Important Considerations and Best Practices
- Ensure the Raspberry Pi is powered off before attaching or detaching the Grove Pi HAT.
- Use the correct Grove port type (digital, analog, I2C, UART) for each module.
- Avoid exceeding the maximum current draw of the Raspberry Pi GPIO header (typically 50mA per pin).
- Regularly update the Grove Pi firmware and libraries for optimal performance.
Example Code for Using a Grove Temperature Sensor
Below is an example Python script for reading data from a Grove Temperature Sensor connected to the Grove Pi HAT:
Import the required libraries
import grovepi # Library for interacting with the Grove Pi HAT import time # Library for adding delays in the script
Define the port where the temperature sensor is connected
In this example, the sensor is connected to analog port A0
sensor_port = 0
Main loop to read and display temperature data
try: while True: # Read the temperature value from the sensor temperature = grovepi.temp(sensor_port, '1.1')
    # Print the temperature value to the console
    print(f"Temperature: {temperature:.2f} °C")

    # Wait for 1 second before reading again
    time.sleep(1)
except KeyboardInterrupt: # Gracefully exit the script when Ctrl+C is pressed print("Exiting the program.")
except IOError: # Handle errors in case of communication issues print("Error reading from the sensor. Please check the connection.")
Troubleshooting and FAQs
Common Issues and Solutions
Grove Pi HAT Not Detected by Raspberry Pi
- Solution: Ensure the HAT is securely connected to the GPIO header. Verify that the I2C interface is enabled on the Raspberry Pi by running
sudo raspi-configand navigating to "Interfacing Options > I2C".
- Solution: Ensure the HAT is securely connected to the GPIO header. Verify that the I2C interface is enabled on the Raspberry Pi by running
Sensor Data Not Updating
- Solution: Check the connection of the sensor to the correct Grove port. Ensure the sensor is compatible with the Grove Pi HAT and that the correct port number is used in the code.
Error: "IOError: [Errno 121] Remote I/O error"
- Solution: This error typically occurs due to I2C communication issues. Verify that the Grove Pi HAT firmware is up to date and that no other devices are conflicting on the I2C bus.
Raspberry Pi Overheating
- Solution: Ensure proper ventilation and avoid overloading the GPIO pins with high-current devices. Use a heatsink or fan if necessary.
FAQs
Q: Can I use the Grove Pi HAT with Raspberry Pi Pico?
A: No, the Grove Pi HAT is designed specifically for Raspberry Pi boards with a 40-pin GPIO header.Q: How many Grove modules can I connect simultaneously?
A: The HAT has 15 ports, but the actual number of modules depends on the power and communication requirements of each module.Q: Is the Grove Pi HAT compatible with third-party Grove modules?
A: Yes, as long as the modules adhere to the Grove standard and are compatible with the supported port types.Q: Can I use the Grove Pi HAT with other programming languages?
A: Yes, libraries are available for Python, C, and other languages. Refer to the official documentation for details.