Cirkit Designer
Your all-in-one circuit design IDE
Home /
Component Documentation
How to Use Sensor temperatura y humedad: Examples, Pinouts, and Specs
Introduction
The SH-T10, manufactured by Sensirion, is a highly reliable sensor designed to measure and provide accurate readings of temperature and humidity in its environment. This versatile component is widely used in various applications, including HVAC systems, weather stations, industrial automation, and home automation systems. Its compact design and ease of integration make it a popular choice for both hobbyists and professionals.
Explore Projects Built with Sensor temperatura y humedad
ESP32-Based Automated Plant Watering System with Environmental Monitoring
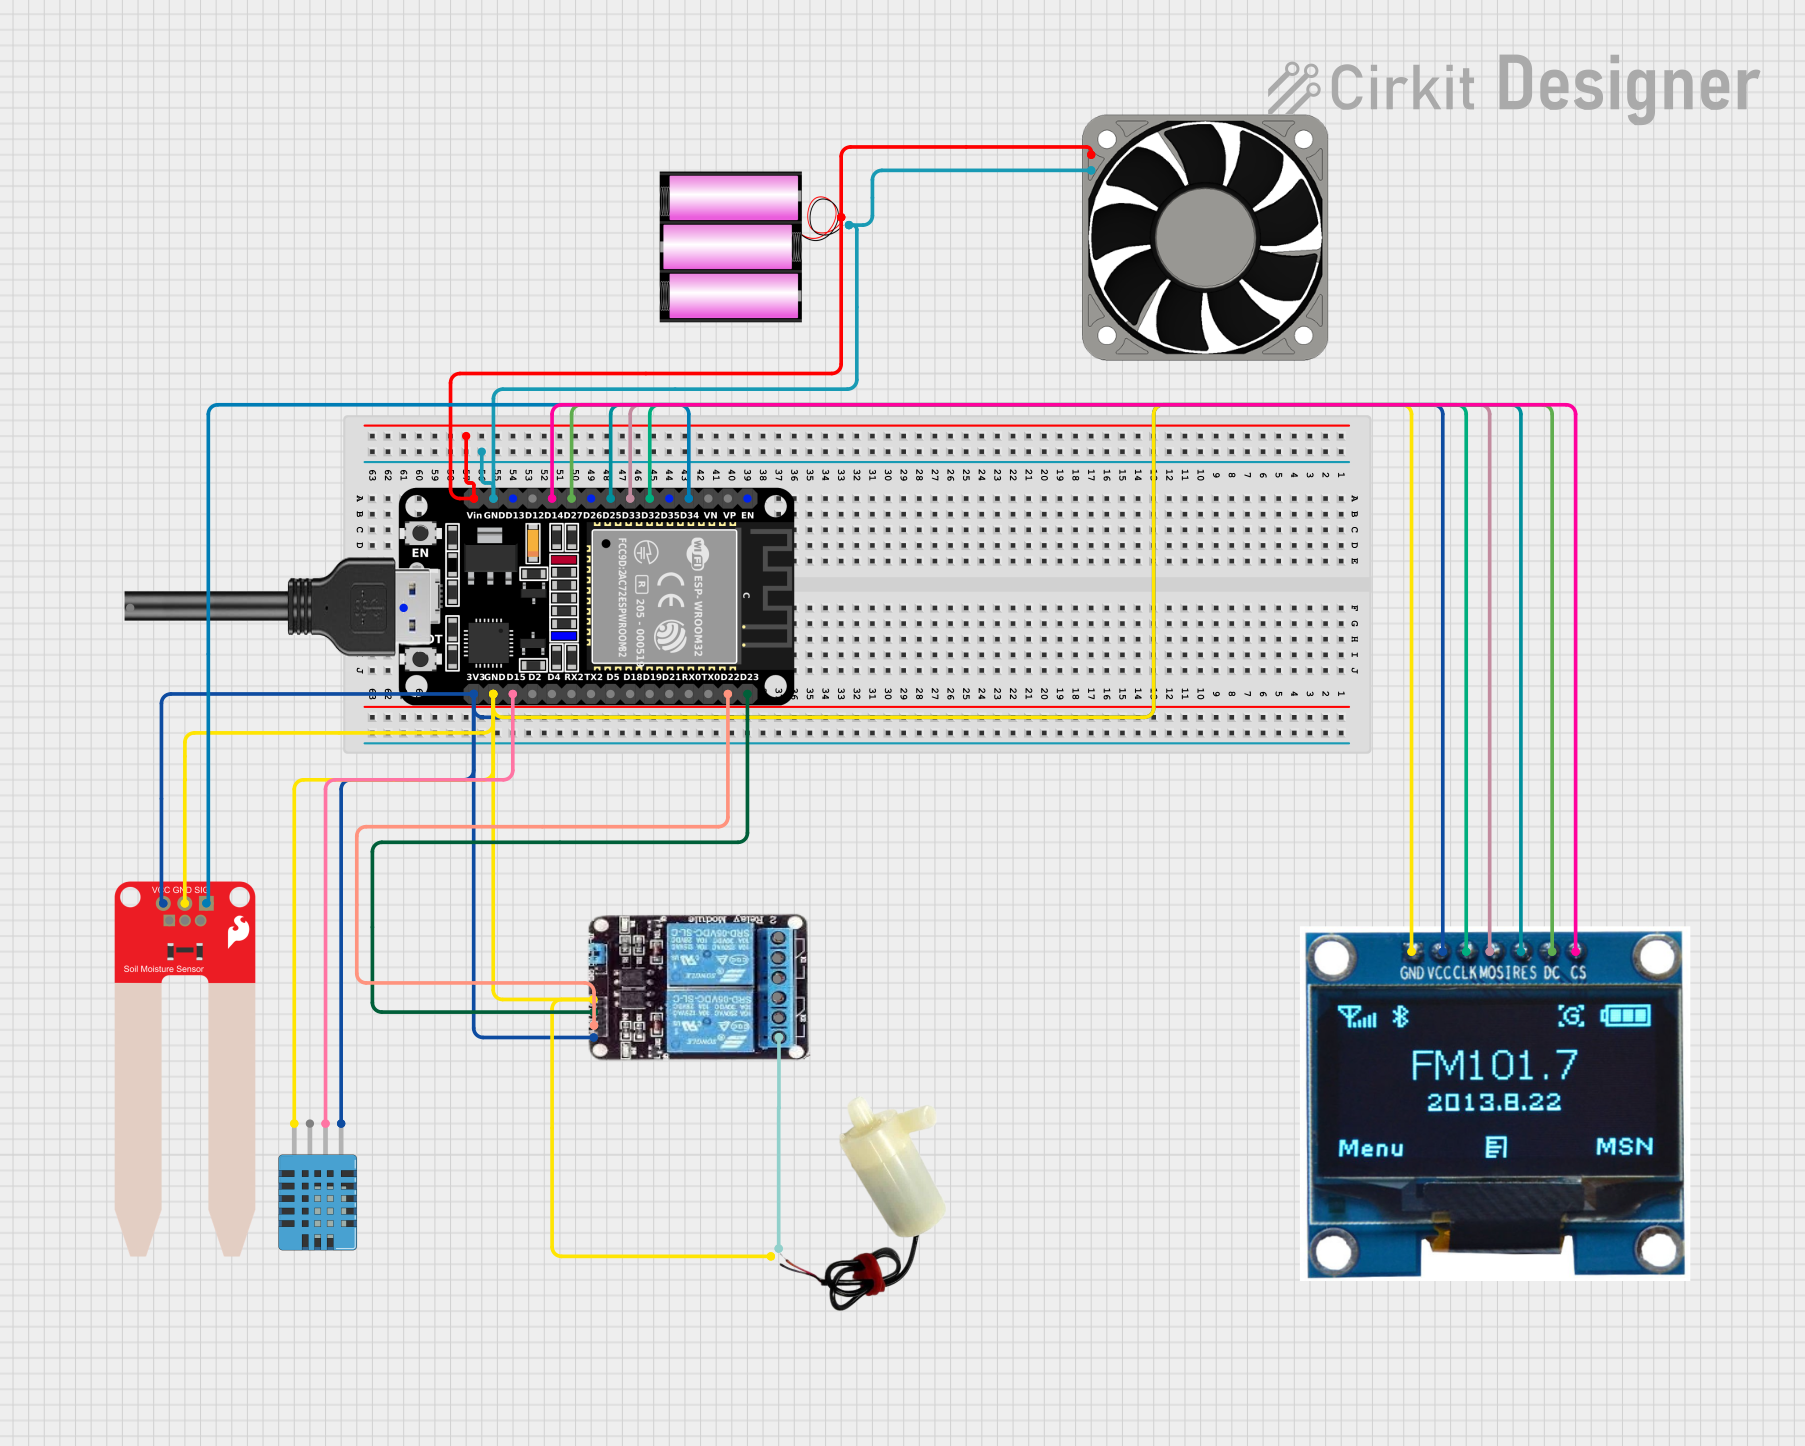
This is an environmental monitoring and control system designed to read soil moisture and air temperature/humidity, and to actuate a fan and water pump for maintaining desired conditions. The ESP32 microcontroller serves as the central processing unit, interfacing with sensors, an OLED display, and controlling actuators via a 2-channel relay. Power is supplied by a 12V battery, with the ESP32 managing power distribution to the components.
ESP32-Based Smart Greenhouse Monitoring System with Wi-Fi Control
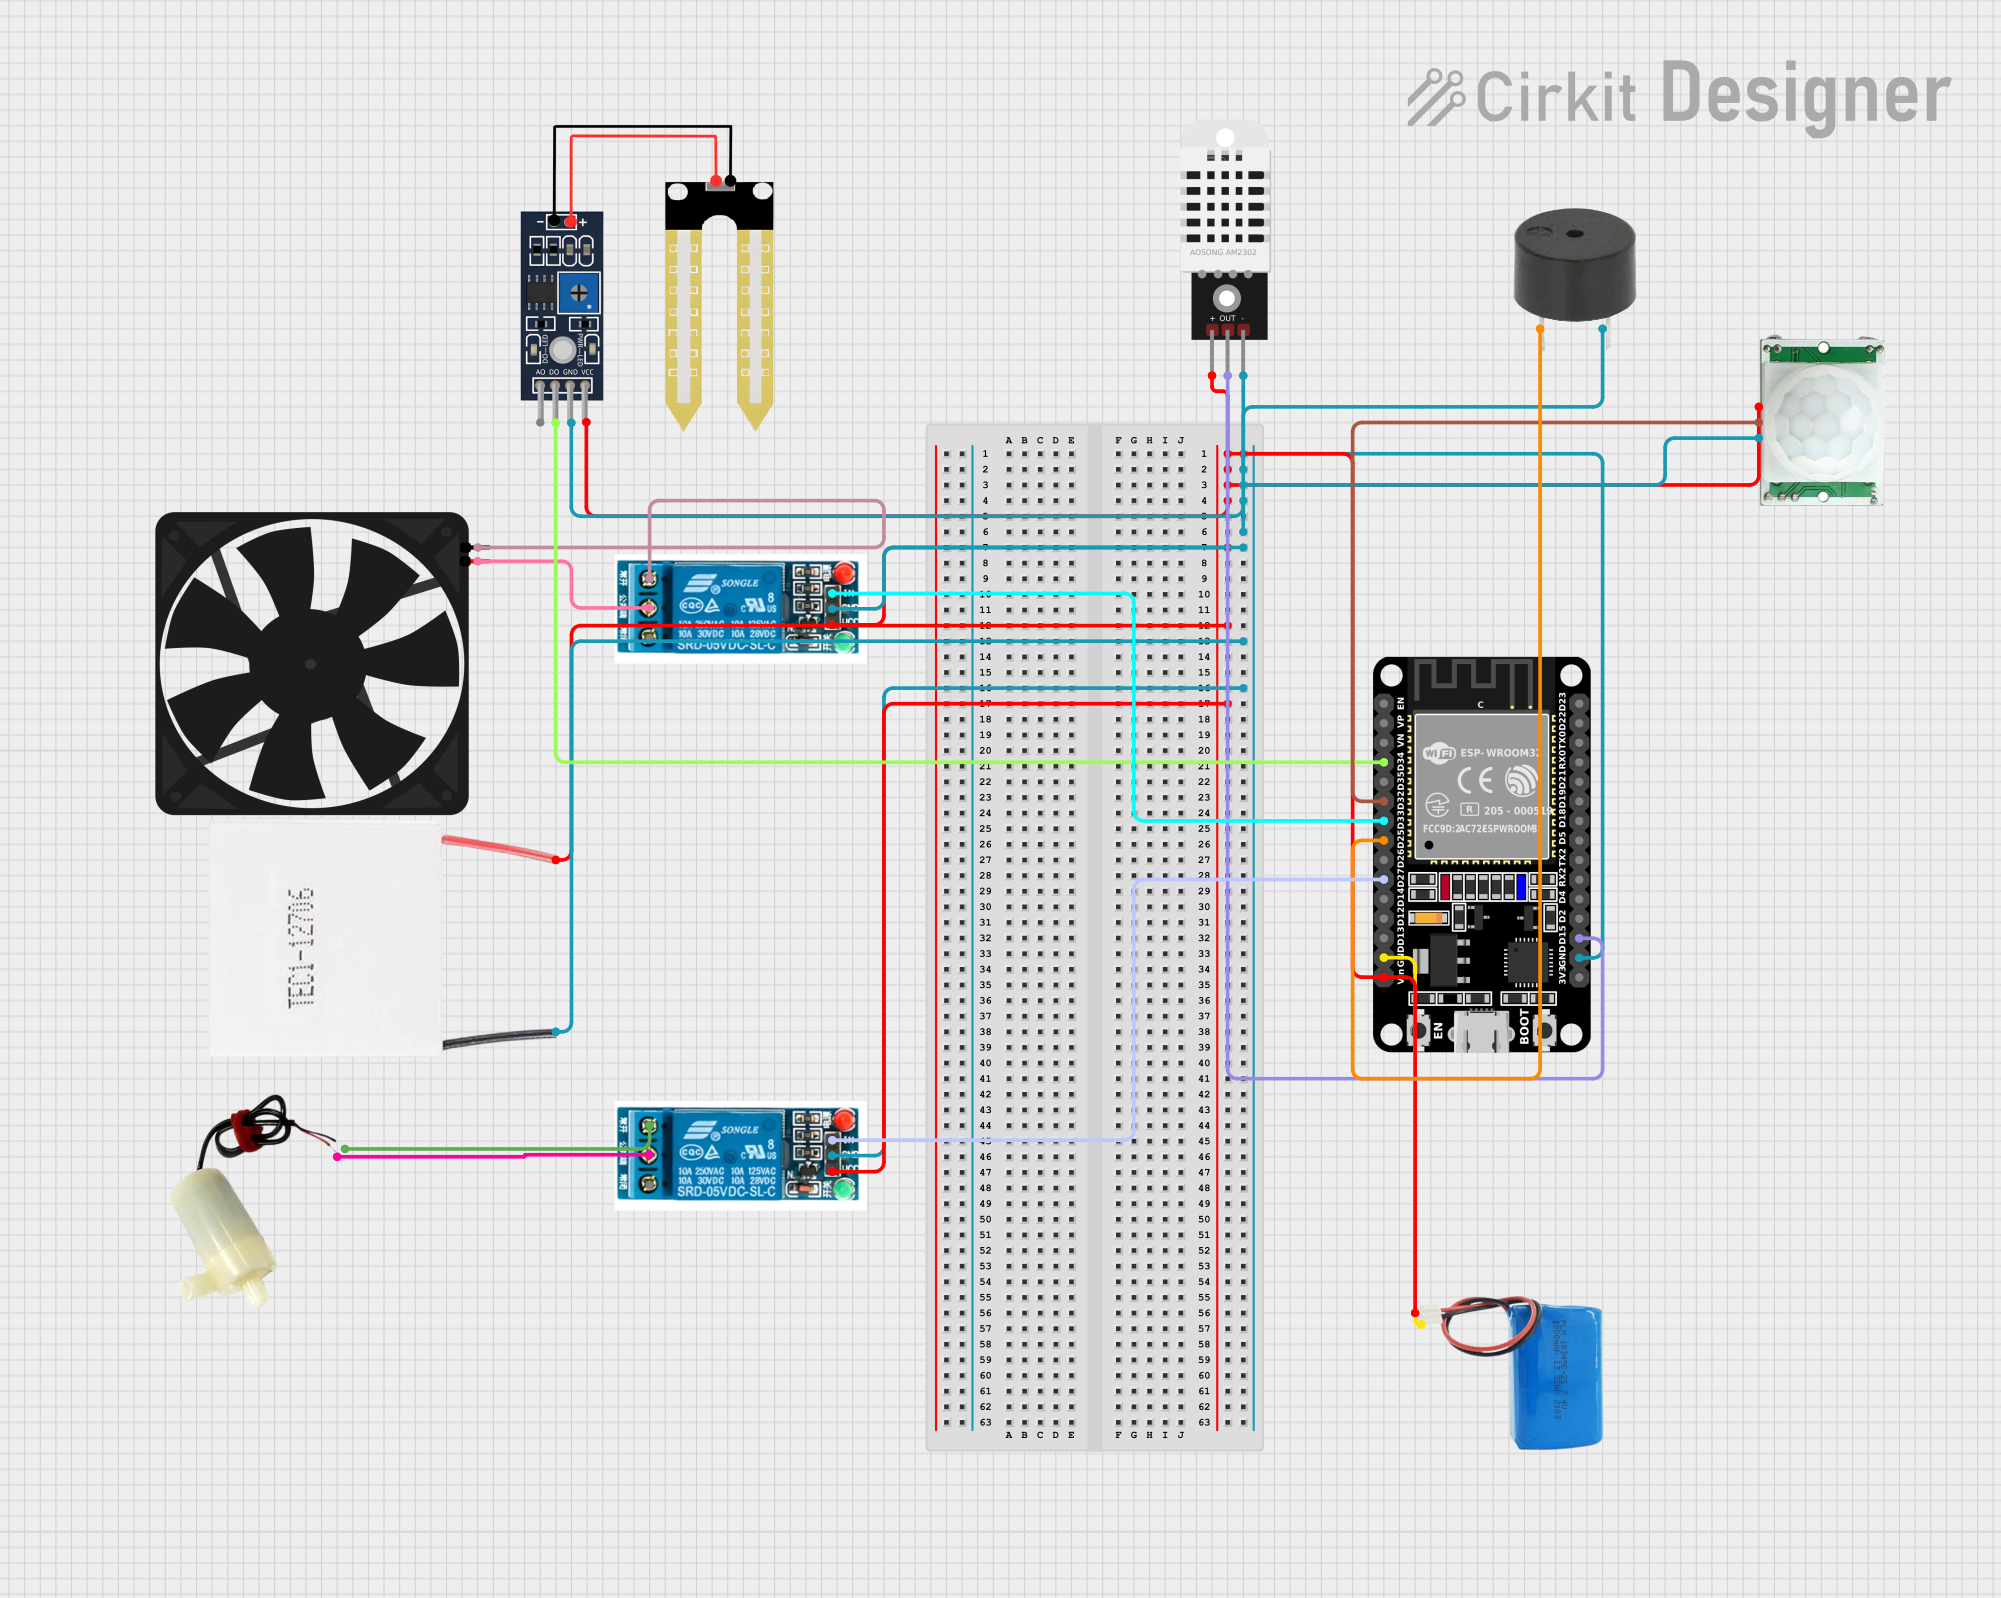
This smart greenhouse monitoring system uses an ESP32 microcontroller to control a water pump and a fan based on soil moisture and temperature readings. It integrates sensors for humidity, temperature, and motion detection, and communicates data to Firebase and Blynk for remote monitoring and control.
ESP32-Based Plant Monitoring System with Wi-Fi Control and Relay Switching
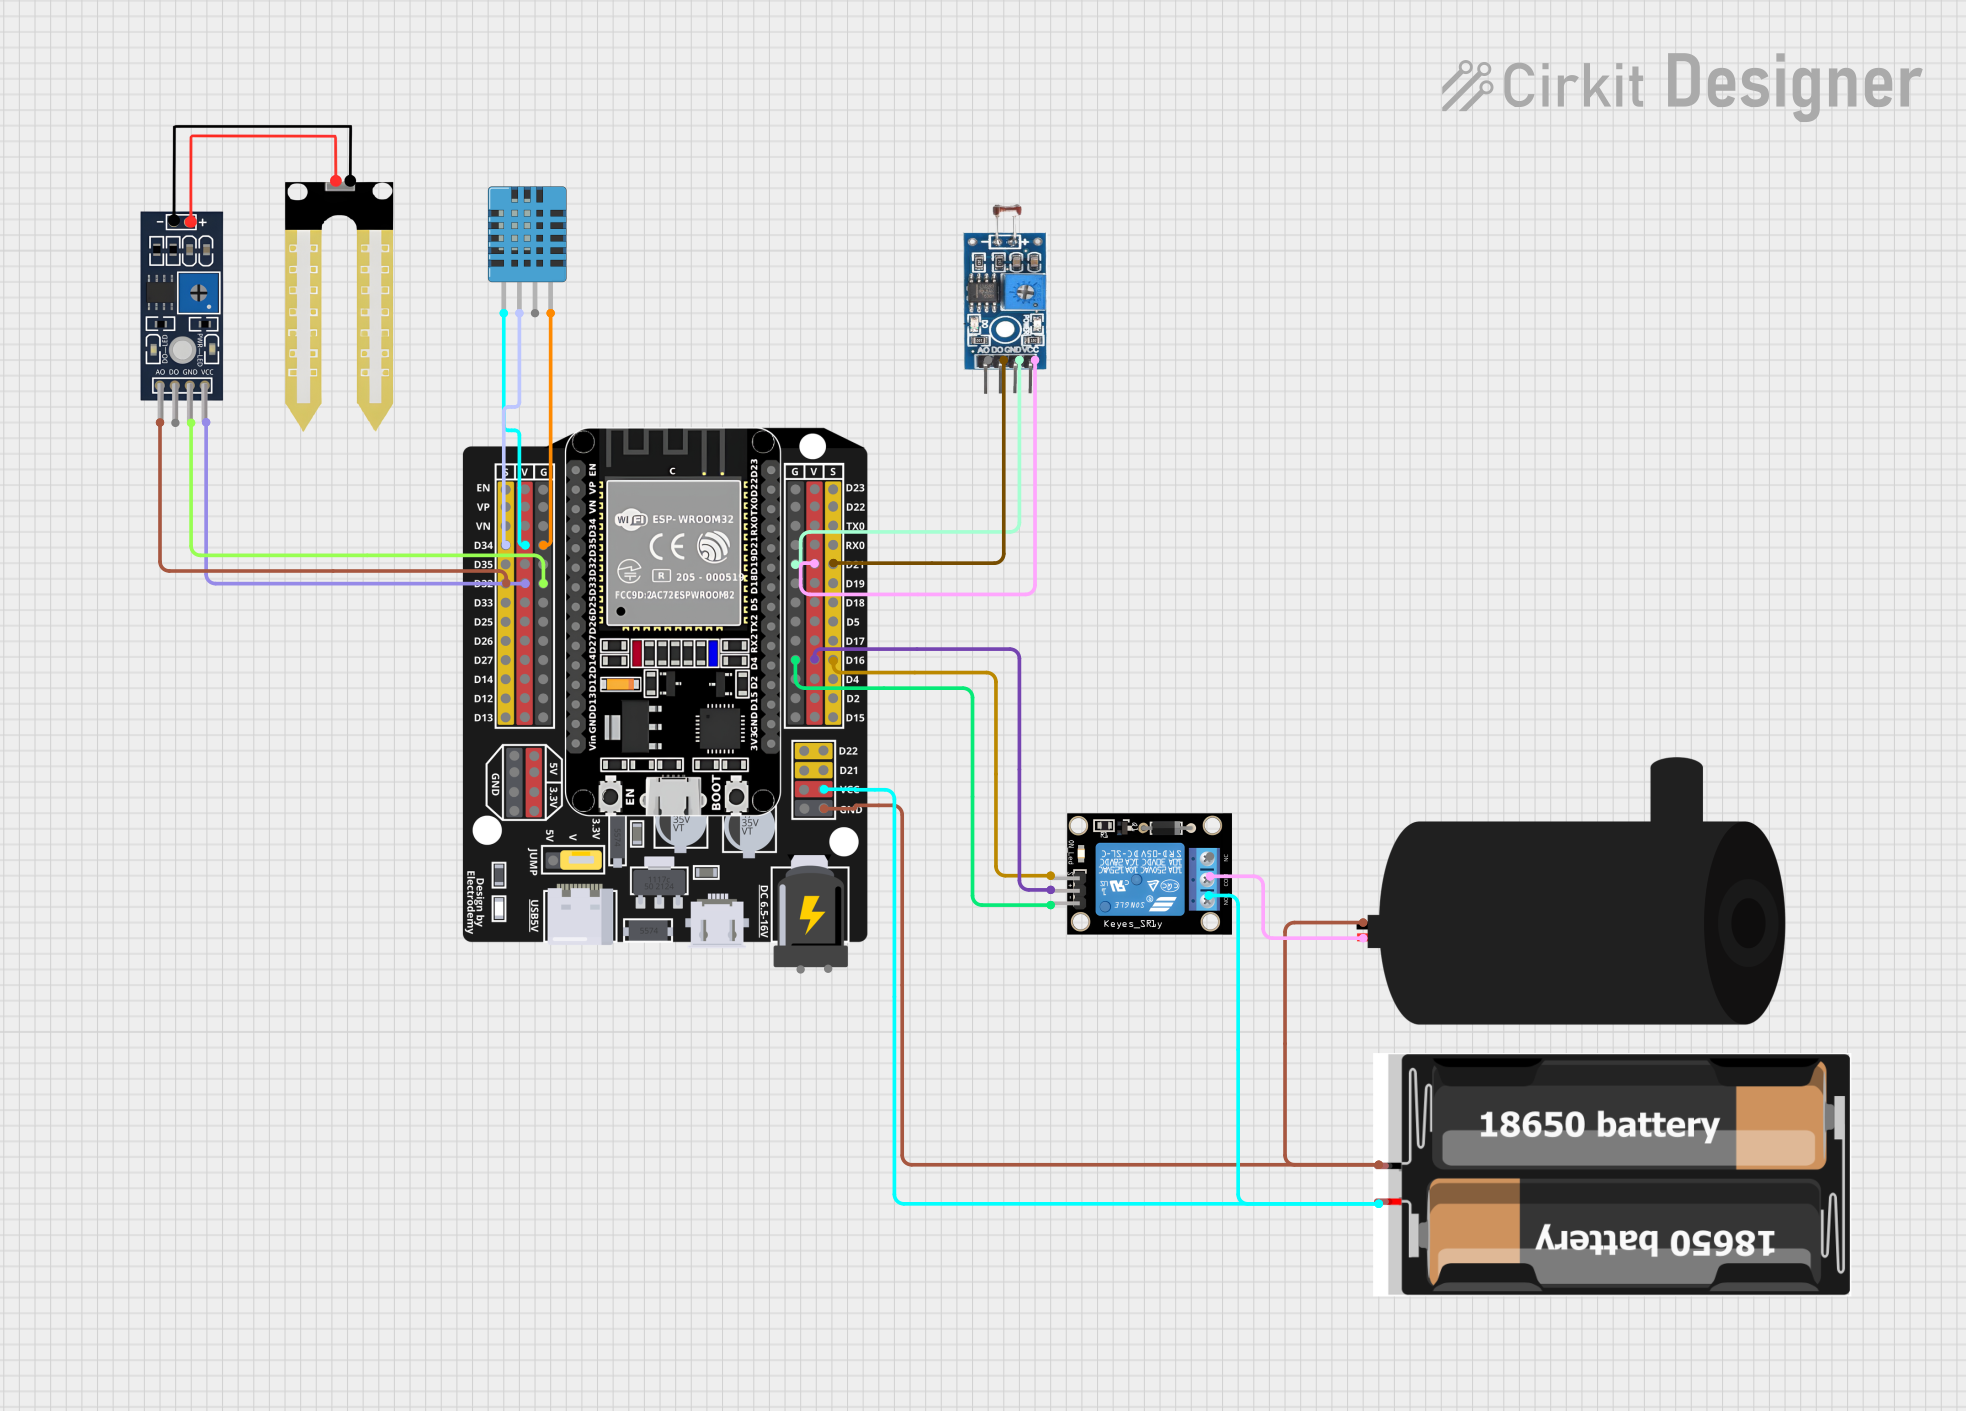
This circuit is designed for a plant monitoring system that measures soil moisture, ambient light, and temperature/humidity conditions. It uses an ESP32 microcontroller to read data from a DHT11 temperature and humidity sensor, a YL-69 soil moisture sensor, and a photosensitive sensor module. The ESP32 controls a relay module to power a water pump based on sensor inputs, and it interfaces with a Blynk application for remote monitoring and manual override via a physical button.
ESP32-Based Environmental Monitoring Station with CO2, Temperature, Humidity Sensing and Data Logging

This is a multi-sensor data logging system with an ESP32 microcontroller that measures environmental parameters such as humidity, temperature, and CO2 levels. It includes an LCD for data display, an RTC for timekeeping, and an SD card module for data storage, all powered by a 18650 battery shield.
Explore Projects Built with Sensor temperatura y humedad
ESP32-Based Automated Plant Watering System with Environmental Monitoring
This is an environmental monitoring and control system designed to read soil moisture and air temperature/humidity, and to actuate a fan and water pump for maintaining desired conditions. The ESP32 microcontroller serves as the central processing unit, interfacing with sensors, an OLED display, and controlling actuators via a 2-channel relay. Power is supplied by a 12V battery, with the ESP32 managing power distribution to the components.
ESP32-Based Smart Greenhouse Monitoring System with Wi-Fi Control
This smart greenhouse monitoring system uses an ESP32 microcontroller to control a water pump and a fan based on soil moisture and temperature readings. It integrates sensors for humidity, temperature, and motion detection, and communicates data to Firebase and Blynk for remote monitoring and control.
ESP32-Based Plant Monitoring System with Wi-Fi Control and Relay Switching
This circuit is designed for a plant monitoring system that measures soil moisture, ambient light, and temperature/humidity conditions. It uses an ESP32 microcontroller to read data from a DHT11 temperature and humidity sensor, a YL-69 soil moisture sensor, and a photosensitive sensor module. The ESP32 controls a relay module to power a water pump based on sensor inputs, and it interfaces with a Blynk application for remote monitoring and manual override via a physical button.
ESP32-Based Environmental Monitoring Station with CO2, Temperature, Humidity Sensing and Data Logging
This is a multi-sensor data logging system with an ESP32 microcontroller that measures environmental parameters such as humidity, temperature, and CO2 levels. It includes an LCD for data display, an RTC for timekeeping, and an SD card module for data storage, all powered by a 18650 battery shield.
Technical Specifications
Key Technical Details
| Parameter | Value |
|---|---|
| Supply Voltage | 2.4V to 5.5V |
| Operating Current | 150 µA (typical) |
| Temperature Range | -40°C to 125°C |
| Humidity Range | 0% to 100% RH |
| Temperature Accuracy | ±0.3°C |
| Humidity Accuracy | ±2% RH |
| Communication | I2C |
Pin Configuration and Descriptions
| Pin No. | Pin Name | Description |
|---|---|---|
| 1 | VCC | Power supply (2.4V to 5.5V) |
| 2 | GND | Ground |
| 3 | SDA | I2C data line |
| 4 | SCL | I2C clock line |
| 5 | NC | Not connected (leave unconnected or grounded) |
Usage Instructions
How to Use the SH-T10 in a Circuit
- Power Supply: Connect the VCC pin to a power supply within the range of 2.4V to 5.5V. Connect the GND pin to the ground of the power supply.
- I2C Communication: Connect the SDA (data) and SCL (clock) pins to the corresponding I2C pins on your microcontroller (e.g., Arduino UNO).
- Pull-up Resistors: Ensure that the SDA and SCL lines have pull-up resistors (typically 4.7kΩ) to the VCC.
Important Considerations and Best Practices
- Power Stability: Ensure a stable power supply to avoid fluctuations that could affect sensor readings.
- I2C Address: The default I2C address for the SH-T10 is 0x44. Ensure no address conflicts on the I2C bus.
- Environmental Factors: Avoid placing the sensor in direct sunlight or near heat sources to ensure accurate readings.
- Calibration: Although the SH-T10 is factory-calibrated, periodic calibration may be necessary for critical applications.
Example Code for Arduino UNO
#include <Wire.h>

#define SH_T10_ADDRESS 0x44

void setup() {
  Wire.begin();
  Serial.begin(9600);
  delay(1000); // Allow some time for the sensor to initialize
}

void loop() {
  float temperature, humidity;
  if (readSensorData(temperature, humidity)) {
    Serial.print("Temperature: ");
    Serial.print(temperature);
    Serial.println(" °C");
    Serial.print("Humidity: ");
    Serial.print(humidity);
    Serial.println(" %RH");
  } else {
    Serial.println("Failed to read from SH-T10 sensor");
  }
  delay(2000); // Wait for 2 seconds before the next reading
}

bool readSensorData(float &temperature, float &humidity) {
  Wire.beginTransmission(SH_T10_ADDRESS);
  Wire.write(0xE5); // Command to read temperature and humidity
  if (Wire.endTransmission() != 0) {
    return false; // Transmission error
  }
  delay(20); // Wait for the sensor to process the command
  Wire.requestFrom(SH_T10_ADDRESS, 6);
  if (Wire.available() != 6) {
    return false; // Not enough data received
  }
  uint16_t rawTemp = (Wire.read() << 8) | Wire.read();
  uint16_t rawHumidity = (Wire.read() << 8) | Wire.read();
  temperature = -45 + 175 * (rawTemp / 65535.0);
  humidity = 100 * (rawHumidity / 65535.0);
  return true;
}
Troubleshooting and FAQs
Common Issues Users Might Face
No Data from Sensor:
- Solution: Check the wiring connections, especially the SDA and SCL lines. Ensure pull-up resistors are in place.
Inaccurate Readings:
- Solution: Ensure the sensor is not exposed to direct sunlight or heat sources. Verify the power supply is stable.
I2C Address Conflict:
- Solution: Ensure no other devices on the I2C bus share the same address (0x44). If necessary, change the address of the conflicting device.
Solutions and Tips for Troubleshooting
- Check Connections: Ensure all connections are secure and correct.
- Use a Multimeter: Verify the voltage levels on the VCC and GND pins.
- Library Compatibility: Ensure you are using a compatible library for the SH-T10 sensor.
- Sensor Placement: Place the sensor in an environment representative of the area you wish to measure.
By following this documentation, users should be able to effectively integrate and utilize the SH-T10 temperature and humidity sensor in their projects. For further assistance, refer to the Sensirion datasheet and support resources.