Cirkit Designer Logo
Cirkit Designer
Your all-in-one circuit design IDE
Home / 
Component Documentation

How to Use Adafruit Circuit Playground Express: Examples, Pinouts, and Specs

Image of Adafruit Circuit Playground Express
Cirkit Designer LogoDesign with Adafruit Circuit Playground Express in Cirkit Designer

Introduction

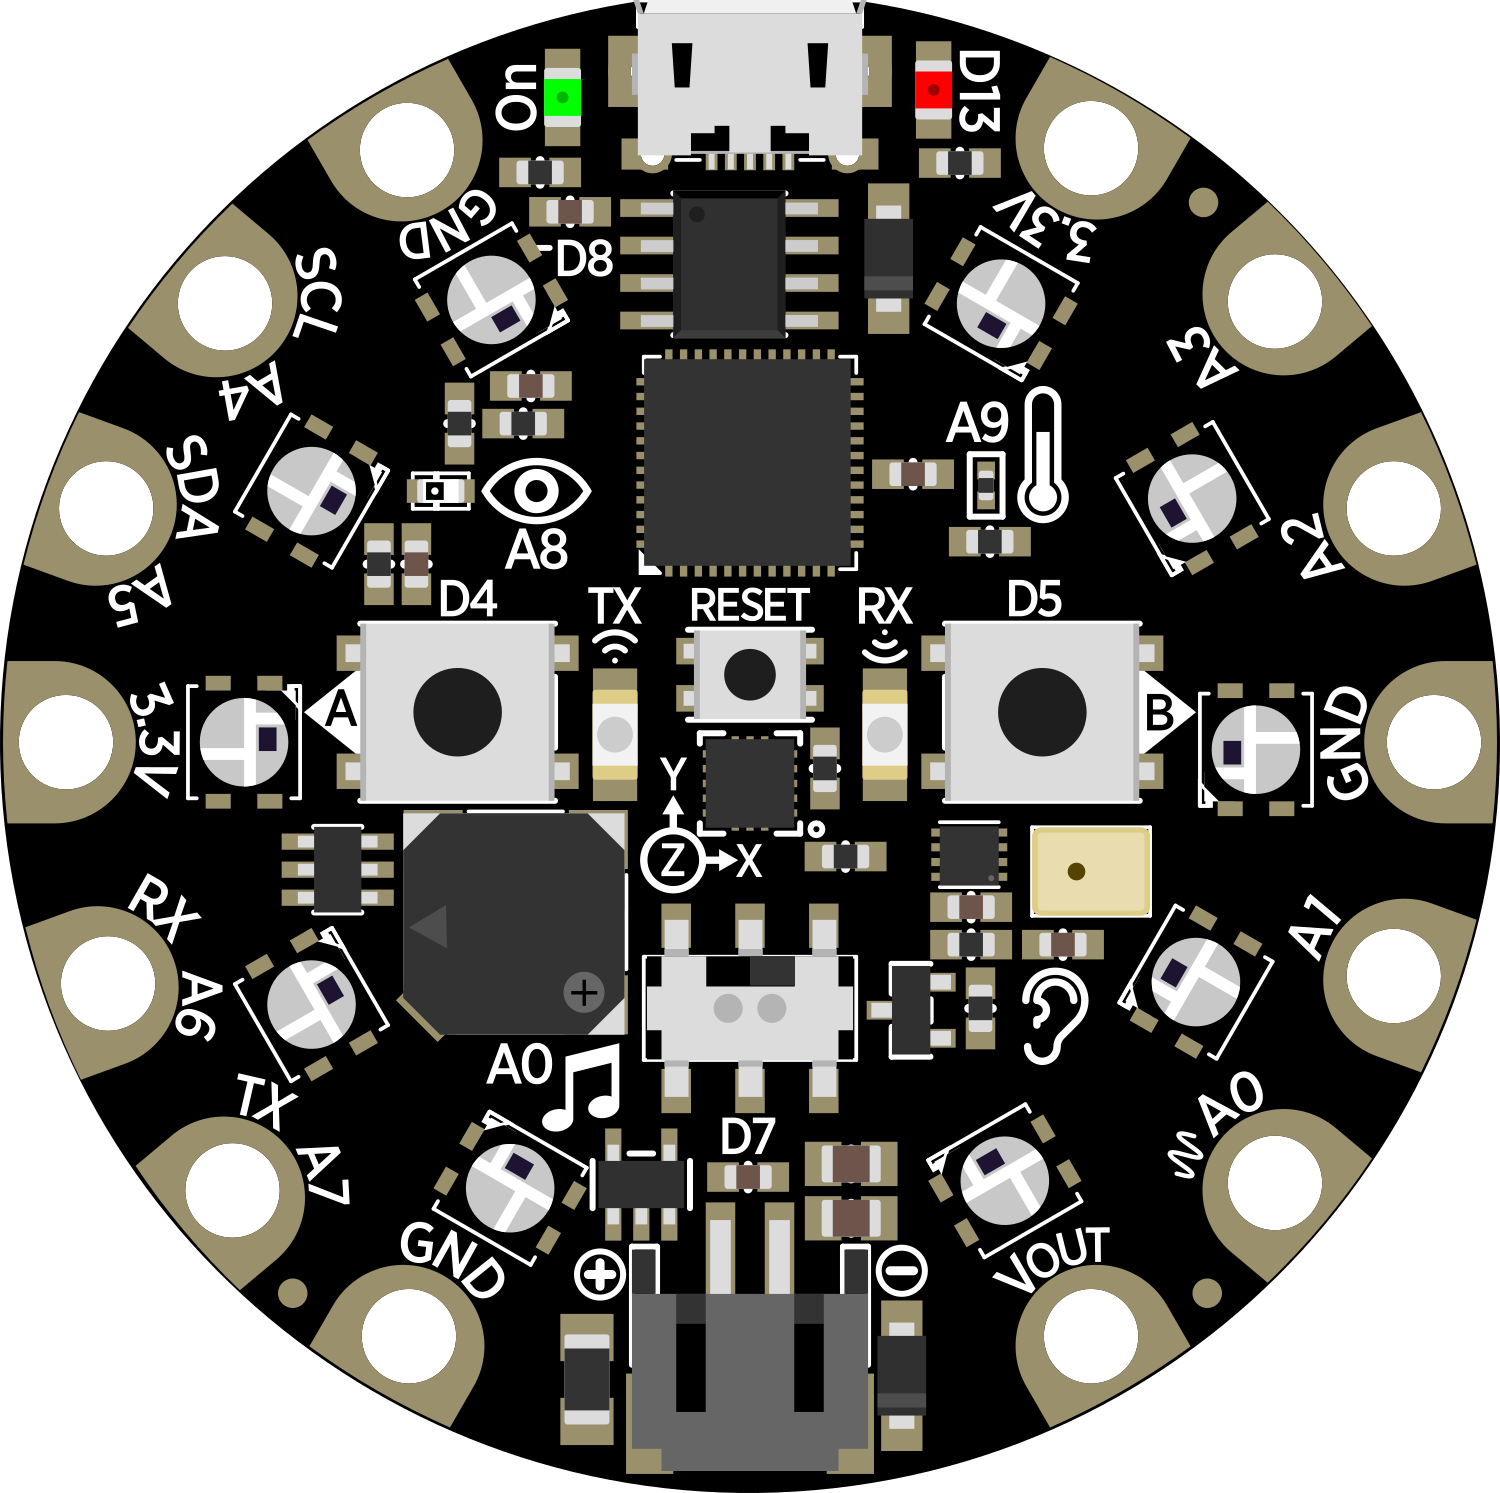
The Adafruit Circuit Playground Express (CPX) is a compact, all-in-one electronic development board that is ideal for beginners and experts alike. It is designed to provide a hands-on introduction to electronics and programming. With built-in sensors, LEDs, and buttons, the CPX is versatile enough to be used in a wide range of projects, from simple educational exercises to complex prototypes.

Explore Projects Built with Adafruit Circuit Playground Express

Use Cirkit Designer to design, explore, and prototype these projects online. Some projects support real-time simulation. Click "Open Project" to start designing instantly!
Adafruit Circuit Playground Bluefruit and Crickit-Based Smart RGB LED and Temperature Monitoring System
Image of Example: A project utilizing Adafruit Circuit Playground Express in a practical application
This circuit integrates an Adafruit Circuit Playground Bluefruit with an Adafruit Crickit for Circuit Playground Express to control a temperature sensor, a loudspeaker, and a series of WS2812 RGB LED strips. The Crickit board reads temperature data, drives the loudspeaker, and controls the LED strips to create visual effects based on the sensor input.
Cirkit Designer LogoOpen Project in Cirkit Designer
Adafruit Circuit Playground-Based Interactive Control System with Pushbutton and Slide Potentiometers
Image of Lever Up Controller: A project utilizing Adafruit Circuit Playground Express in a practical application
This circuit features an Adafruit Circuit Playground Dev Edition microcontroller interfaced with a pushbutton and two slide potentiometers. The pushbutton is connected to digital pin D6, while the potentiometers provide analog input to pins D9 and D10, allowing for variable control inputs.
Cirkit Designer LogoOpen Project in Cirkit Designer
Battery-Powered Smart Light with Proximity Sensor and OLED Display using Adafruit QT Py RP2040
Image of lab: A project utilizing Adafruit Circuit Playground Express in a practical application
This circuit is a portable, battery-powered system featuring an Adafruit QT Py RP2040 microcontroller that interfaces with an OLED display, a proximity sensor, an accelerometer, and an RGB LED strip. The system is powered by a lithium-ion battery with a step-up boost converter to provide 5V for the LED strip, and it includes a toggle switch for power control. The microcontroller communicates with the sensors and display via I2C.
Cirkit Designer LogoOpen Project in Cirkit Designer
NodeMCU ESP8266 Controlled Drone with TFT Display and nRF24L01 Communication
Image of receiver/transmitter: A project utilizing Adafruit Circuit Playground Express in a practical application
This circuit features a NodeMCU V3 ESP8266 microcontroller interfaced with an LCD TFT screen, an nRF24L01 wireless transceiver, and an Adafruit Analog 2-Axis Joystick. The NodeMCU collects joystick inputs and displays information on the TFT screen, while also communicating with other devices via the nRF24L01 module. The circuit is powered by a 9V battery, with the NodeMCU regulating the voltage for other components.
Cirkit Designer LogoOpen Project in Cirkit Designer

Explore Projects Built with Adafruit Circuit Playground Express

Use Cirkit Designer to design, explore, and prototype these projects online. Some projects support real-time simulation. Click "Open Project" to start designing instantly!
Image of Example: A project utilizing Adafruit Circuit Playground Express in a practical application
Adafruit Circuit Playground Bluefruit and Crickit-Based Smart RGB LED and Temperature Monitoring System
This circuit integrates an Adafruit Circuit Playground Bluefruit with an Adafruit Crickit for Circuit Playground Express to control a temperature sensor, a loudspeaker, and a series of WS2812 RGB LED strips. The Crickit board reads temperature data, drives the loudspeaker, and controls the LED strips to create visual effects based on the sensor input.
Cirkit Designer LogoOpen Project in Cirkit Designer
Image of Lever Up Controller: A project utilizing Adafruit Circuit Playground Express in a practical application
Adafruit Circuit Playground-Based Interactive Control System with Pushbutton and Slide Potentiometers
This circuit features an Adafruit Circuit Playground Dev Edition microcontroller interfaced with a pushbutton and two slide potentiometers. The pushbutton is connected to digital pin D6, while the potentiometers provide analog input to pins D9 and D10, allowing for variable control inputs.
Cirkit Designer LogoOpen Project in Cirkit Designer
Image of lab: A project utilizing Adafruit Circuit Playground Express in a practical application
Battery-Powered Smart Light with Proximity Sensor and OLED Display using Adafruit QT Py RP2040
This circuit is a portable, battery-powered system featuring an Adafruit QT Py RP2040 microcontroller that interfaces with an OLED display, a proximity sensor, an accelerometer, and an RGB LED strip. The system is powered by a lithium-ion battery with a step-up boost converter to provide 5V for the LED strip, and it includes a toggle switch for power control. The microcontroller communicates with the sensors and display via I2C.
Cirkit Designer LogoOpen Project in Cirkit Designer
Image of receiver/transmitter: A project utilizing Adafruit Circuit Playground Express in a practical application
NodeMCU ESP8266 Controlled Drone with TFT Display and nRF24L01 Communication
This circuit features a NodeMCU V3 ESP8266 microcontroller interfaced with an LCD TFT screen, an nRF24L01 wireless transceiver, and an Adafruit Analog 2-Axis Joystick. The NodeMCU collects joystick inputs and displays information on the TFT screen, while also communicating with other devices via the nRF24L01 module. The circuit is powered by a 9V battery, with the NodeMCU regulating the voltage for other components.
Cirkit Designer LogoOpen Project in Cirkit Designer

Common Applications and Use Cases

  • Educational purposes (learning programming and electronics)
  • Prototyping IoT devices
  • Creating interactive wearables
  • Developing simple games and animations
  • Building assistive technology devices

Technical Specifications

Key Technical Details

  • Microcontroller: ATSAMD21G18 ARM Cortex-M0
  • Operating Voltage: 3.3V
  • Input Voltage (recommended): 4.5V to 5.5V
  • Digital I/O Pins: 7
  • PWM Channels: 7
  • Analog Input Channels: 7
  • Flash Memory: 256KB
  • SRAM: 32KB
  • LEDs: 10x mini NeoPixels, each capable of displaying 16 million colors
  • Sensors:
    • Temperature sensor
    • Light sensor
    • Sound sensor (microphone)
    • 3-axis accelerometer (motion sensor)
    • Capacitive touch sensor

Pin Configuration and Descriptions

Pin Number Function Description
A1 Analog Input Can be used as a capacitive touch input
A2 Analog Input Can be used as a capacitive touch input
A3 Analog Input Can be used as a capacitive touch input
A4 Analog Input Can be used as a capacitive touch input
A5 Analog Input Can be used as a capacitive touch input
A6 Analog Input Can be used as a capacitive touch input
A7 Analog Input Can be used as a capacitive touch input
TX Digital Output Transmit pin for serial communication
RX Digital Input Receive pin for serial communication
#13 Digital I/O Can be used for digital input/output, has LED

Usage Instructions

How to Use the Component in a Circuit

  1. Powering the CPX: Connect the CPX to a computer or battery pack via the micro-USB port.
  2. Programming: Use the Microsoft MakeCode editor, CircuitPython, or the Arduino IDE to program the CPX.
  3. Connecting Additional Components: Use the alligator clip pads around the edge of the CPX to connect additional sensors, actuators, or components.

Important Considerations and Best Practices

  • Always ensure that the power supply voltage is within the recommended range.
  • When connecting external components, make sure they are compatible with the CPX's operating voltage.
  • Avoid static discharge by grounding yourself before handling the CPX.
  • When using the NeoPixels, be mindful of their power consumption, especially when displaying bright or white colors.

Example Code for Arduino UNO

#include <Adafruit_CircuitPlayground.h>

void setup() {
  // Initialize the Circuit Playground board
  CircuitPlayground.begin();
}

void loop() {
  // Turn on the first NeoPixel with red color
  CircuitPlayground.setPixelColor(0, 255, 0, 0); // Red color
  delay(500); // Wait for half a second

  // Turn off the first NeoPixel
  CircuitPlayground.setPixelColor(0, 0, 0, 0); // No color (off)
  delay(500); // Wait for half a second
}

Troubleshooting and FAQs

Common Issues

  • CPX Not Recognized by Computer: Ensure the micro-USB cable is properly connected and that it is a data cable, not just a charging cable.
  • Unable to Upload Code: Check that the correct board and port are selected in your IDE. Also, ensure the CPX is in bootloader mode if necessary.
  • NeoPixels Not Lighting Up: Verify that the NeoPixel code is correct and that the CPX is adequately powered.

Solutions and Tips for Troubleshooting

  • If the CPX is not detected, try using a different USB port or cable.
  • Press the reset button twice quickly to enter bootloader mode if you have trouble uploading code.
  • When working with NeoPixels, start with lower brightness to reduce power consumption.

FAQs

Q: Can I use the CPX with a battery? A: Yes, the CPX can be powered with an external battery pack.

Q: Is the CPX compatible with Arduino IDE? A: Yes, with the addition of the Adafruit Board Manager URL, you can program the CPX using Arduino IDE.

Q: How do I reset the CPX? A: Press the reset button on the board. If you need to enter the bootloader mode, press it twice quickly.

Q: Can I connect other I2C or SPI devices to the CPX? A: Yes, the CPX supports I2C and SPI communication, allowing you to connect a wide range of additional sensors and components.