How to Use 48V 적산계 음극 연결부: Examples, Pinouts, and Specs
Introduction
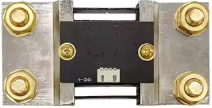
The 48V 적산계 음극 연결부, manufactured by 테무, is a negative terminal connection point designed for use with 48V integrated meters. This component plays a critical role in ensuring proper electrical connections and reliable operation of the meter. It is commonly used in industrial and commercial applications where monitoring and measuring electrical parameters, such as voltage, current, and power, are essential.
Explore Projects Built with 48V 적산계 음극 연결부


Explore Projects Built with 48V 적산계 음극 연결부
Common Applications and Use Cases
- Industrial power monitoring systems
- Commercial energy management setups
- Electrical distribution panels
- Renewable energy systems (e.g., solar or wind power monitoring)
- Battery management systems
Technical Specifications
The following table outlines the key technical details of the 48V 적산계 음극 연결부:
| Parameter | Specification |
|---|---|
| Manufacturer | 테무 |
| Part ID | 48V 적산계 음극 연결부 |
| Rated Voltage | 48V DC |
| Maximum Current | 10A |
| Operating Temperature | -20°C to 85°C |
| Material | High-conductivity copper with insulation |
| Mounting Type | Screw terminal |
| Dimensions | 25mm x 15mm x 10mm |
| Weight | 15g |
Pin Configuration and Descriptions
The 48V 적산계 음극 연결부 has a simple pin configuration, as detailed below:
| Pin | Name | Description |
|---|---|---|
| 1 | Negative Input | Connects to the negative terminal of the power source |
| 2 | Negative Output | Connects to the negative terminal of the integrated meter |
Usage Instructions
How to Use the Component in a Circuit
- Preparation: Ensure the power supply is turned off before making any connections to avoid electrical hazards.
- Connection:
- Connect the Negative Input pin to the negative terminal of the 48V DC power source.
- Connect the Negative Output pin to the negative terminal of the integrated meter.
- Secure the Connections: Use the screw terminals to firmly secure the wires, ensuring a reliable and stable connection.
- Power On: Once all connections are verified, power on the system and check for proper operation of the integrated meter.
Important Considerations and Best Practices
- Wire Selection: Use wires with appropriate gauge ratings to handle the maximum current (10A) without overheating.
- Polarity Check: Double-check the polarity of the connections to avoid damage to the meter or other components.
- Insulation: Ensure all exposed wires are properly insulated to prevent short circuits.
- Environmental Conditions: Avoid exposing the component to moisture or extreme temperatures beyond its operating range (-20°C to 85°C).
Arduino UNO Integration Example
While the 48V 적산계 음극 연결부 is not directly programmable, it can be used in circuits involving an Arduino UNO for monitoring purposes. Below is an example of how to integrate it into a system that measures voltage using an Arduino:
// Example: Measuring voltage across a 48V system using Arduino UNO
// Ensure proper connections to the 48V 적산계 음극 연결부 for negative terminal handling

const int voltagePin = A0; // Analog pin connected to the voltage divider
const float voltageDividerRatio = 10.0; // Adjust based on your resistor values

void setup() {
  Serial.begin(9600); // Initialize serial communication
}

void loop() {
  int sensorValue = analogRead(voltagePin); // Read analog value
  float voltage = (sensorValue * 5.0 / 1023.0) * voltageDividerRatio;

  // Print the measured voltage to the Serial Monitor
  Serial.print("Measured Voltage: ");
  Serial.print(voltage);
  Serial.println(" V");

  delay(1000); // Wait for 1 second before the next reading
}
Note: Use a voltage divider circuit to step down the 48V to a safe range (0-5V) for the Arduino's analog input pin.
Troubleshooting and FAQs
Common Issues Users Might Face
Loose Connections:
- Symptom: The integrated meter does not function or shows erratic readings.
- Solution: Ensure all wires are securely fastened to the screw terminals.
Overheating:
- Symptom: The component or wires become excessively hot during operation.
- Solution: Verify that the current does not exceed the 10A maximum rating. Use thicker wires if necessary.
Polarity Reversal:
- Symptom: The integrated meter fails to operate or gets damaged.
- Solution: Double-check the polarity of the connections before powering on the system.
Corrosion or Oxidation:
- Symptom: Poor electrical contact over time.
- Solution: Regularly inspect and clean the terminals to remove any corrosion.
FAQs
Q1: Can this component handle AC voltage?
A1: No, the 48V 적산계 음극 연결부 is designed specifically for DC voltage applications.
Q2: What is the recommended wire gauge for this component?
A2: For currents up to 10A, it is recommended to use wires with a gauge of 16 AWG or thicker.
Q3: Can this component be used in outdoor environments?
A3: While the component is durable, it is not waterproof. Use additional enclosures or protection for outdoor applications.
Q4: Is this component compatible with other voltage levels?
A4: This component is optimized for 48V DC systems. Using it with other voltage levels may result in suboptimal performance or damage.