Cirkit Designer Logo
Cirkit Designer
Your all-in-one circuit design IDE
Home / 
Component Documentation

How to Use Adafruit CharliePlex Bonnet: Examples, Pinouts, and Specs

Image of Adafruit CharliePlex Bonnet
Cirkit Designer LogoDesign with Adafruit CharliePlex Bonnet in Cirkit Designer

Introduction

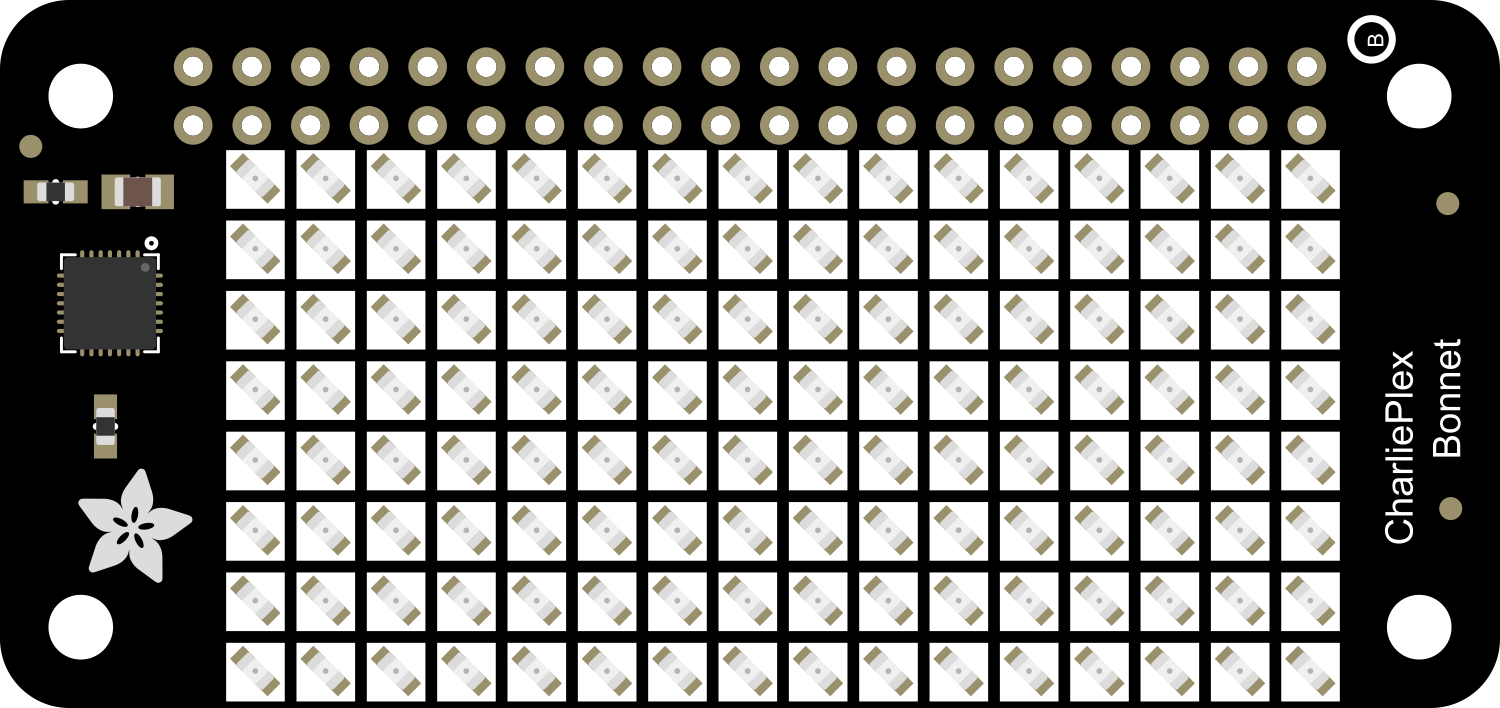
The Adafruit CharliePlex Bonnet is an innovative add-on board designed for the Raspberry Pi. It utilizes the Charlieplexing technique to control a multitude of LEDs with a minimal number of General Purpose Input/Output (GPIO) pins. This bonnet is perfect for creating LED matrices, light-up projects, and custom lighting effects without the need for complex wiring or additional components.

Explore Projects Built with Adafruit CharliePlex Bonnet

Use Cirkit Designer to design, explore, and prototype these projects online. Some projects support real-time simulation. Click "Open Project" to start designing instantly!
Raspberry Pi 4B-Based Multi-Sensor Interface Hub with GPS and GSM
Image of Rocket: A project utilizing Adafruit CharliePlex Bonnet in a practical application
This circuit features a Raspberry Pi 4B interfaced with an IMX296 color global shutter camera, a Neo 6M GPS module, an Adafruit BMP388 barometric pressure sensor, an MPU-6050 accelerometer/gyroscope, and a Sim800l GSM module for cellular connectivity. Power management is handled by an MT3608 boost converter, which steps up the voltage from a Lipo battery, with a resettable fuse PTC and a 1N4007 diode for protection. The Adafruit Perma-Proto HAT is used for organizing connections and interfacing the sensors and modules with the Raspberry Pi via I2C and GPIO pins.
Cirkit Designer LogoOpen Project in Cirkit Designer
Adafruit Circuit Playground Bluefruit and Crickit-Based Smart RGB LED and Temperature Monitoring System
Image of Example: A project utilizing Adafruit CharliePlex Bonnet in a practical application
This circuit integrates an Adafruit Circuit Playground Bluefruit with an Adafruit Crickit for Circuit Playground Express to control a temperature sensor, a loudspeaker, and a series of WS2812 RGB LED strips. The Crickit board reads temperature data, drives the loudspeaker, and controls the LED strips to create visual effects based on the sensor input.
Cirkit Designer LogoOpen Project in Cirkit Designer
Battery-Powered Smart Light with Proximity Sensor and OLED Display using Adafruit QT Py RP2040
Image of lab: A project utilizing Adafruit CharliePlex Bonnet in a practical application
This circuit is a portable, battery-powered system featuring an Adafruit QT Py RP2040 microcontroller that interfaces with an OLED display, a proximity sensor, an accelerometer, and an RGB LED strip. The system is powered by a lithium-ion battery with a step-up boost converter to provide 5V for the LED strip, and it includes a toggle switch for power control. The microcontroller communicates with the sensors and display via I2C.
Cirkit Designer LogoOpen Project in Cirkit Designer
Battery-Powered Smart Sensor Hub with Adafruit QT Py RP2040
Image of wearable final: A project utilizing Adafruit CharliePlex Bonnet in a practical application
This circuit features an Adafruit QT Py RP2040 microcontroller interfaced with an APDS9960 proximity sensor, an MPU6050 accelerometer and gyroscope, and an OLED display via I2C communication. It also includes a buzzer controlled by the microcontroller and is powered by a 3.7V LiPo battery with a toggle switch for power control.
Cirkit Designer LogoOpen Project in Cirkit Designer

Explore Projects Built with Adafruit CharliePlex Bonnet

Use Cirkit Designer to design, explore, and prototype these projects online. Some projects support real-time simulation. Click "Open Project" to start designing instantly!
Image of Rocket: A project utilizing Adafruit CharliePlex Bonnet in a practical application
Raspberry Pi 4B-Based Multi-Sensor Interface Hub with GPS and GSM
This circuit features a Raspberry Pi 4B interfaced with an IMX296 color global shutter camera, a Neo 6M GPS module, an Adafruit BMP388 barometric pressure sensor, an MPU-6050 accelerometer/gyroscope, and a Sim800l GSM module for cellular connectivity. Power management is handled by an MT3608 boost converter, which steps up the voltage from a Lipo battery, with a resettable fuse PTC and a 1N4007 diode for protection. The Adafruit Perma-Proto HAT is used for organizing connections and interfacing the sensors and modules with the Raspberry Pi via I2C and GPIO pins.
Cirkit Designer LogoOpen Project in Cirkit Designer
Image of Example: A project utilizing Adafruit CharliePlex Bonnet in a practical application
Adafruit Circuit Playground Bluefruit and Crickit-Based Smart RGB LED and Temperature Monitoring System
This circuit integrates an Adafruit Circuit Playground Bluefruit with an Adafruit Crickit for Circuit Playground Express to control a temperature sensor, a loudspeaker, and a series of WS2812 RGB LED strips. The Crickit board reads temperature data, drives the loudspeaker, and controls the LED strips to create visual effects based on the sensor input.
Cirkit Designer LogoOpen Project in Cirkit Designer
Image of lab: A project utilizing Adafruit CharliePlex Bonnet in a practical application
Battery-Powered Smart Light with Proximity Sensor and OLED Display using Adafruit QT Py RP2040
This circuit is a portable, battery-powered system featuring an Adafruit QT Py RP2040 microcontroller that interfaces with an OLED display, a proximity sensor, an accelerometer, and an RGB LED strip. The system is powered by a lithium-ion battery with a step-up boost converter to provide 5V for the LED strip, and it includes a toggle switch for power control. The microcontroller communicates with the sensors and display via I2C.
Cirkit Designer LogoOpen Project in Cirkit Designer
Image of wearable final: A project utilizing Adafruit CharliePlex Bonnet in a practical application
Battery-Powered Smart Sensor Hub with Adafruit QT Py RP2040
This circuit features an Adafruit QT Py RP2040 microcontroller interfaced with an APDS9960 proximity sensor, an MPU6050 accelerometer and gyroscope, and an OLED display via I2C communication. It also includes a buzzer controlled by the microcontroller and is powered by a 3.7V LiPo battery with a toggle switch for power control.
Cirkit Designer LogoOpen Project in Cirkit Designer

Common Applications and Use Cases

  • LED matrix displays for animations or scrolling text
  • Interactive art installations
  • Custom lighting projects
  • Educational purposes for learning about Charlieplexing and GPIO control
  • Prototyping for larger LED control systems

Technical Specifications

Key Technical Details

  • Operating Voltage: 3.3V (from Raspberry Pi)
  • Maximum Current per LED: 20mA
  • Total Number of Controllable LEDs: 128 (8x16 matrix)
  • Communication Interface: GPIO pin control

Pin Configuration and Descriptions

Pin Number Description Notes
1 3.3V Power Supply Power from Raspberry Pi
2 Ground Ground connection
3-10 GPIO Pins for LED Control Used for Charlieplexing signals
11-40 Not connected/Reserved Reserved for future use

Usage Instructions

How to Use the Component in a Circuit

  1. Attach the Bonnet: Carefully align the bonnet's GPIO connector with the Raspberry Pi's GPIO header and press down to connect.
  2. Install the Library: Install the Adafruit CharliePlex Bonnet library using the following command:
    sudo pip3 install adafruit-circuitpython-is31fl3731
    
  3. Connect the LEDs: Insert LEDs into the provided slots on the bonnet, ensuring correct orientation with the anode and cathode.
  4. Run the Example Code: Test the setup by running the example code provided with the library.

Important Considerations and Best Practices

  • Ensure the Raspberry Pi is powered off when attaching the bonnet to prevent any electrical damage.
  • Double-check LED polarity before inserting them into the bonnet.
  • Avoid exceeding the maximum current rating for each LED to prevent damage.
  • Use a proper external power supply if you plan to drive a large number of LEDs at high brightness levels.

Example Code for Raspberry Pi

import board
import busio
from adafruit_is31fl3731 import CharlieWing

Initialize the I2C bus

i2c = busio.I2C(board.SCL, board.SDA)

Initialize the CharlieWing LED matrix

matrix = CharlieWing(i2c)

Clear the matrix

matrix.fill(0)

Light up each LED in sequence

for x in range(16): for y in range(8): matrix[x, y] = 50 # Set brightness to 50 out of 255 time.sleep(0.05) matrix[x, y] = 0 # Turn off LED after a short delay


Troubleshooting and FAQs

Common Issues Users Might Face

  • LEDs Not Lighting Up: Ensure the LEDs are inserted correctly with the proper orientation. Check the GPIO connections and ensure the Raspberry Pi is powered on.
  • Dim LEDs: If the LEDs are too dim, check the brightness level in your code. Ensure you are not exceeding the power supply capabilities.
  • Inconsistent LED Behavior: This could be due to incorrect code or timing issues. Review your script for any errors and ensure the library is up to date.

Solutions and Tips for Troubleshooting

  • Recheck Wiring: Verify that all connections are secure and correct.
  • Review Code: Look for any errors in your script that could be causing the issue.
  • Update Library: Ensure you have the latest version of the Adafruit CharliePlex Bonnet library installed.
  • Power Supply: If using a large number of LEDs, ensure your power supply can handle the load.

FAQs

Q: How many LEDs can the CharliePlex Bonnet control? A: The bonnet can control up to 128 LEDs in an 8x16 matrix configuration.

Q: Can I use the CharliePlex Bonnet with other Raspberry Pi models? A: Yes, the bonnet is compatible with any Raspberry Pi model that has a 40-pin GPIO header.

Q: Do I need to use resistors with the LEDs? A: No, the CharliePlex Bonnet has built-in resistors for current limiting.

Q: Can I control individual LED brightness? A: Yes, you can control the brightness of each LED using PWM through the provided library.

For further assistance, refer to the Adafruit CharliePlex Bonnet forums and community resources.