How to Use 5A MPPT Solar Panel Controller DC-DC 6V-36V: Examples, Pinouts, and Specs
5A MPPT Solar Panel Controller DC-DC 6V-36V Documentation
1. Introduction
The 5A MPPT Solar Panel Controller (Part ID: MPPT) is a high-efficiency DC-DC converter designed to optimize the power output from solar panels. By employing Maximum Power Point Tracking (MPPT) technology, this controller ensures that the solar panel operates at its peak power point, maximizing energy conversion efficiency. It supports input voltages ranging from 6V to 36V and can handle a maximum current of 5A, making it suitable for a wide range of solar energy applications.
Common Applications:
- Solar-powered battery charging systems
- Off-grid solar energy systems
- Portable solar power banks
- IoT devices powered by solar panels
- Small-scale renewable energy projects
This controller is ideal for hobbyists, engineers, and renewable energy enthusiasts looking to improve the efficiency of their solar energy systems.
2. Technical Specifications
The following table outlines the key technical details of the 5A MPPT Solar Panel Controller:
| Parameter | Value |
|---|---|
| Input Voltage Range | 6V to 36V |
| Output Voltage Range | Adjustable (varies by load) |
| Maximum Output Current | 5A |
| Efficiency | Up to 96% (depending on load) |
| MPPT Tracking Speed | High-speed tracking |
| Operating Temperature | -40°C to +85°C |
| Dimensions | 60mm x 30mm x 20mm |
| Weight | ~30g |
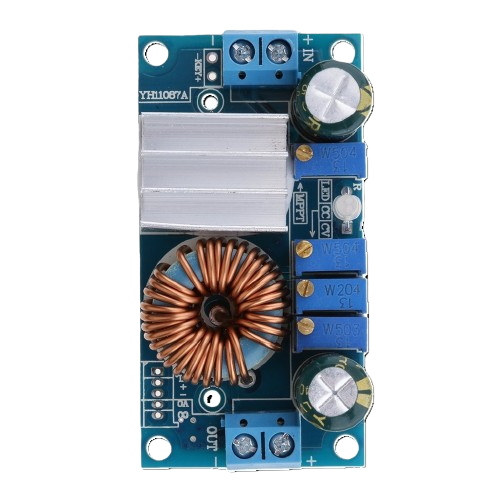
Pin Configuration and Descriptions
| Pin Name | Type | Description |
|---|---|---|
| VIN+ | Input (Positive) | Positive input terminal for the solar panel (6V-36V). |
| VIN- | Input (Negative) | Negative input terminal for the solar panel. |
| VOUT+ | Output (Positive) | Positive output terminal for the load or battery. |
| VOUT- | Output (Negative) | Negative output terminal for the load or battery. |
| MPPT | Control Signal | Optional pin for external MPPT control (if supported by the specific model). |
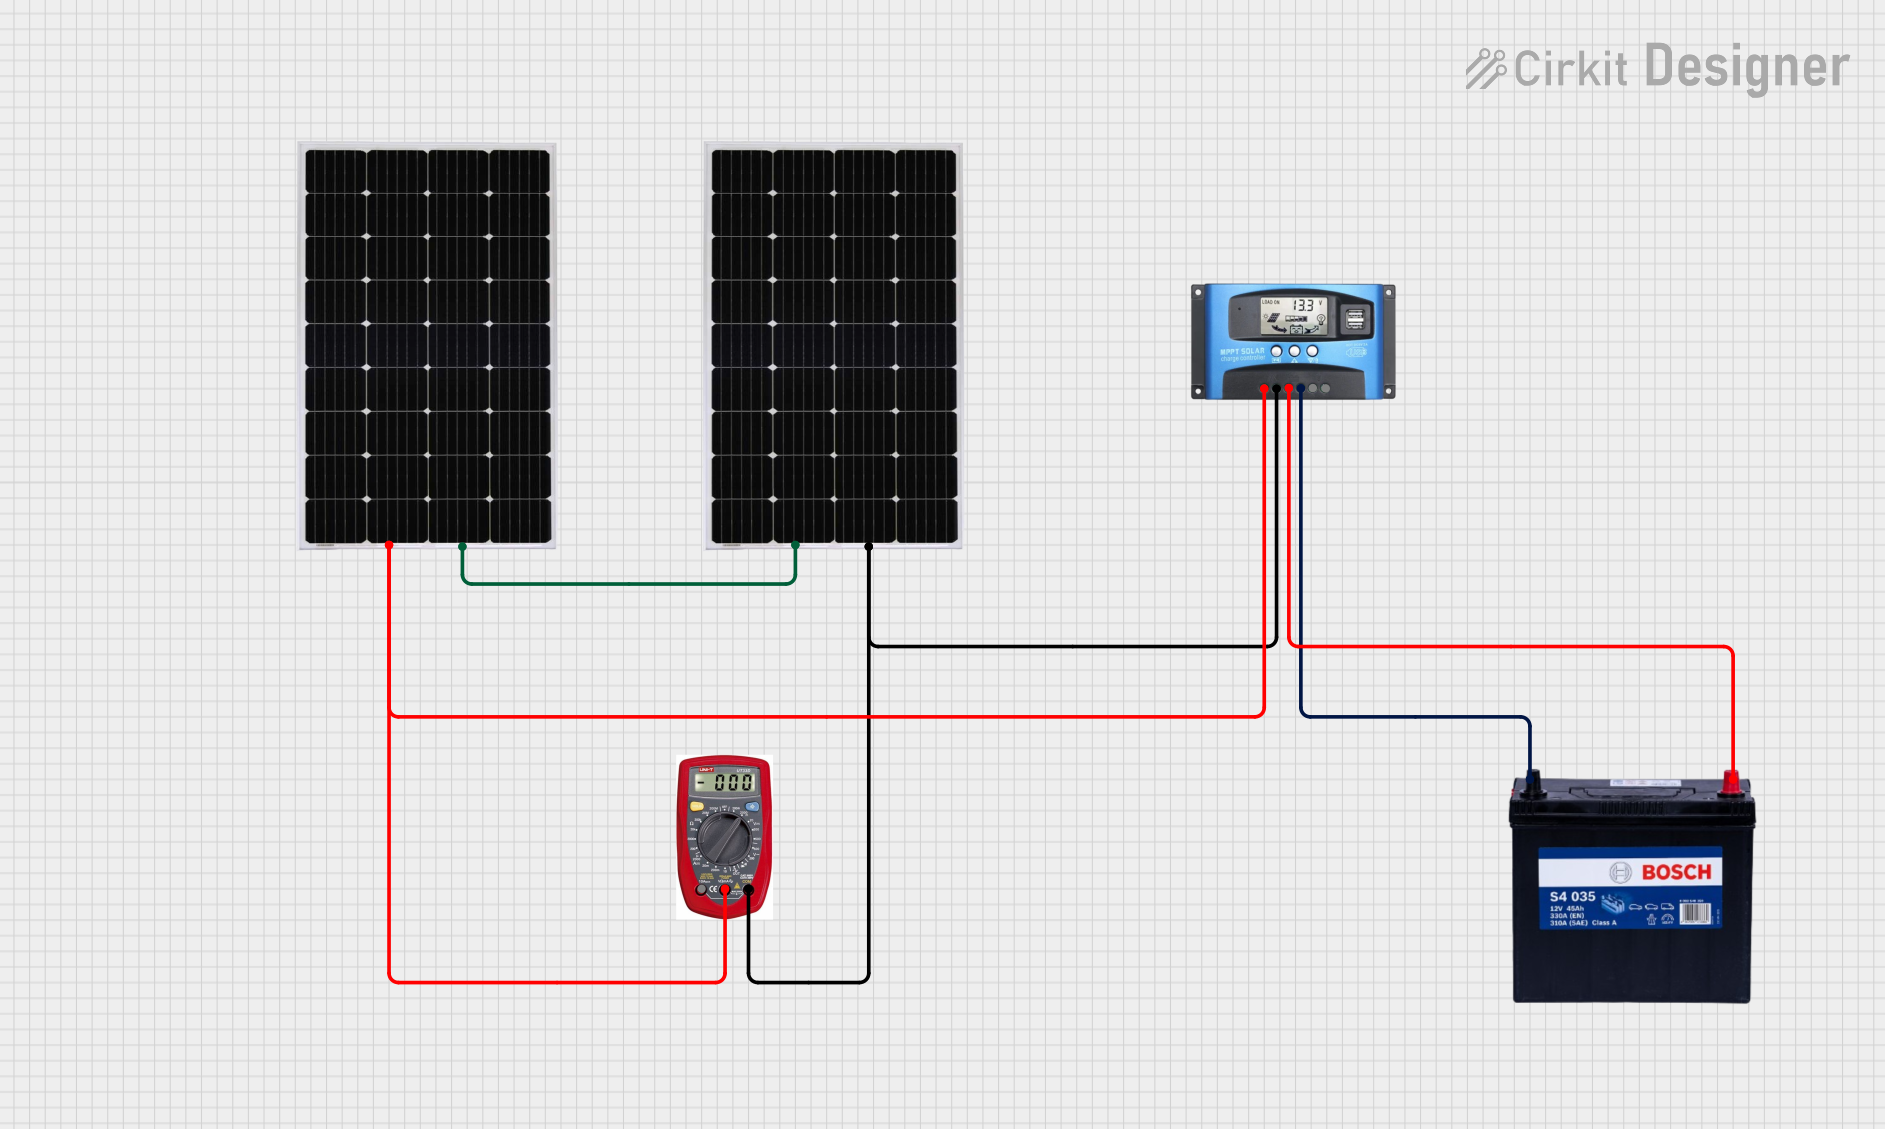
3. Usage Instructions
Connecting the MPPT Controller in a Circuit
Input Connection:
- Connect the solar panel's positive terminal to the VIN+ pin.
- Connect the solar panel's negative terminal to the VIN- pin.
- Ensure the solar panel's voltage is within the supported range (6V-36V).
Output Connection:
- Connect the battery or load's positive terminal to the VOUT+ pin.
- Connect the battery or load's negative terminal to the VOUT- pin.
Adjusting Output Voltage (if applicable):
- Some models may include a potentiometer to adjust the output voltage. Turn the potentiometer clockwise or counterclockwise to set the desired output voltage.
Power On:
- Once all connections are secure, expose the solar panel to sunlight. The MPPT controller will automatically track the maximum power point and regulate the output.
Important Considerations:
- Input Voltage: Ensure the solar panel's voltage is within the specified range (6V-36V). Exceeding this range may damage the controller.
- Heat Dissipation: The controller may heat up during operation. Ensure adequate ventilation or use a heatsink if necessary.
- Battery Compatibility: Verify that the output voltage is suitable for the connected battery or load.
- Polarity: Double-check all connections to avoid reverse polarity, which can damage the controller.
4. Example Arduino Integration
The 5A MPPT Solar Panel Controller can be used with an Arduino UNO to monitor the solar panel's voltage and current. Below is an example code snippet for such an application:
Required Components:
- Arduino UNO
- Voltage divider circuit (to measure voltage)
- Current sensor (e.g., ACS712)
- 5A MPPT Solar Panel Controller
Code Example:
// Example: Monitor solar panel voltage and current using Arduino UNO
// Ensure proper connections between the MPPT controller, sensors, and Arduino

// Define analog input pins for voltage and current sensors
const int voltagePin = A0; // Pin connected to voltage divider output
const int currentPin = A1; // Pin connected to current sensor output

// Calibration constants (adjust based on your sensors)
const float voltageDividerRatio = 5.0; // Ratio of the voltage divider
const float currentSensorSensitivity = 0.185; // Sensitivity of ACS712 (e.g., 185mV/A)

void setup() {
  Serial.begin(9600); // Initialize serial communication
  Serial.println("MPPT Solar Panel Monitoring");
}

void loop() {
  // Read voltage sensor value
  int voltageRaw = analogRead(voltagePin);
  float panelVoltage = (voltageRaw * 5.0 / 1023.0) * voltageDividerRatio;

  // Read current sensor value
  int currentRaw = analogRead(currentPin);
  float panelCurrent = (currentRaw * 5.0 / 1023.0 - 2.5) / currentSensorSensitivity;

  // Calculate power
  float panelPower = panelVoltage * panelCurrent;

  // Display results
  Serial.print("Voltage: ");
  Serial.print(panelVoltage);
  Serial.print(" V, Current: ");
  Serial.print(panelCurrent);
  Serial.print(" A, Power: ");
  Serial.print(panelPower);
  Serial.println(" W");

  delay(1000); // Update every second
}
Notes:
- Use a voltage divider to scale down the solar panel's voltage to a range readable by the Arduino (0-5V).
- Use a current sensor like the ACS712 to measure the current flowing through the load.
- Adjust the calibration constants (
voltageDividerRatioandcurrentSensorSensitivity) based on your specific setup.
5. Troubleshooting and FAQs
Common Issues and Solutions
| Issue | Possible Cause | Solution |
|---|---|---|
| No output voltage | Incorrect wiring or loose connections | Double-check all connections and ensure proper polarity. |
| Overheating of the controller | Excessive current draw or poor ventilation | Ensure the load does not exceed 5A and provide adequate cooling. |
| Low efficiency or poor performance | Solar panel not operating at peak power | Ensure the solar panel is exposed to sufficient sunlight and is clean. |
| Output voltage not adjustable | Faulty potentiometer or fixed output model | Verify if the model supports adjustable output and check the potentiometer. |
Frequently Asked Questions (FAQs)
Can this controller charge a 12V battery?
- Yes, as long as the solar panel's voltage is within the supported range and the output voltage is adjusted to match the battery's requirements.
What happens if the input voltage exceeds 36V?
- Exceeding the input voltage range may damage the controller. Use a solar panel with a voltage within the specified range.
Can I use this controller with an Arduino?
- Yes, you can monitor the solar panel's voltage and current using an Arduino, as shown in the example code.
Does the controller support reverse polarity protection?
- Most models include basic reverse polarity protection, but it is recommended to double-check connections to avoid damage.
This documentation provides a comprehensive guide to using the 5A MPPT Solar Panel Controller effectively. For further assistance, refer to the manufacturer's datasheet or contact technical support.
Explore Projects Built with 5A MPPT Solar Panel Controller DC-DC 6V-36V


Explore Projects Built with 5A MPPT Solar Panel Controller DC-DC 6V-36V