How to Use capacitive: Examples, Pinouts, and Specs

Introduction
A capacitor is a passive electronic component that stores electrical energy in an electric field. It consists of two conductive plates separated by a dielectric material. Capacitors are widely used in electronic circuits for various purposes, including filtering, timing, energy storage, and coupling/decoupling signals.
Explore Projects Built with capacitive


Explore Projects Built with capacitive
Common Applications and Use Cases
- Filtering: Smoothens voltage fluctuations in power supplies.
- Timing Circuits: Works with resistors to create time delays.
- Energy Storage: Temporarily stores energy for quick release.
- Signal Coupling/Decoupling: Blocks DC signals while allowing AC signals to pass.
- Tuning Circuits: Used in radio frequency (RF) applications for tuning.
Technical Specifications
Capacitors come in various types, such as ceramic, electrolytic, film, and tantalum, each with unique characteristics. Below are the general technical specifications for capacitors:
Key Technical Details
| Parameter | Description |
|---|---|
| Capacitance Range | Typically from picofarads (pF) to farads (F) |
| Voltage Rating | Maximum voltage the capacitor can handle (e.g., 6.3V, 16V, 50V, etc.) |
| Tolerance | Deviation from the nominal capacitance value (e.g., ±5%, ±10%) |
| Equivalent Series Resistance (ESR) | Resistance within the capacitor that affects performance |
| Temperature Range | Operating temperature range (e.g., -40°C to +85°C) |
| Dielectric Material | Determines the capacitor's properties (e.g., ceramic, electrolytic, etc.) |
Pin Configuration and Descriptions
Capacitors typically have two terminals (pins). The configuration depends on the type of capacitor:
Non-Polarized Capacitors (e.g., Ceramic, Film)
| Pin Name | Description |
|---|---|
| Pin 1 | Connects to one side of the circuit |
| Pin 2 | Connects to the other side of the circuit |
Polarized Capacitors (e.g., Electrolytic, Tantalum)
| Pin Name | Description |
|---|---|
| Positive (+) | Connects to the positive side of the circuit (higher voltage potential) |
| Negative (-) | Connects to the negative side of the circuit (lower voltage potential) |
Note: Reversing the polarity of a polarized capacitor can damage the component or cause it to fail.
Usage Instructions
How to Use a Capacitor in a Circuit
Determine the Required Capacitance and Voltage Rating:
- Select a capacitor with a capacitance value suitable for your application.
- Ensure the voltage rating exceeds the maximum voltage in your circuit.
Identify the Polarity (if applicable):
- For polarized capacitors, identify the positive and negative terminals. The negative terminal is usually marked with a stripe.
Connect the Capacitor:
- Place the capacitor in the circuit according to the schematic. For polarized capacitors, ensure the positive terminal is connected to the higher voltage side.
Verify Connections:
- Double-check the connections before powering the circuit to avoid damage.
Important Considerations and Best Practices
- Voltage Rating: Always use a capacitor with a voltage rating higher than the circuit's operating voltage.
- Polarity: For polarized capacitors, ensure correct polarity to prevent damage.
- Temperature: Consider the operating temperature range to ensure reliability.
- ESR: For high-frequency applications, choose capacitors with low ESR.
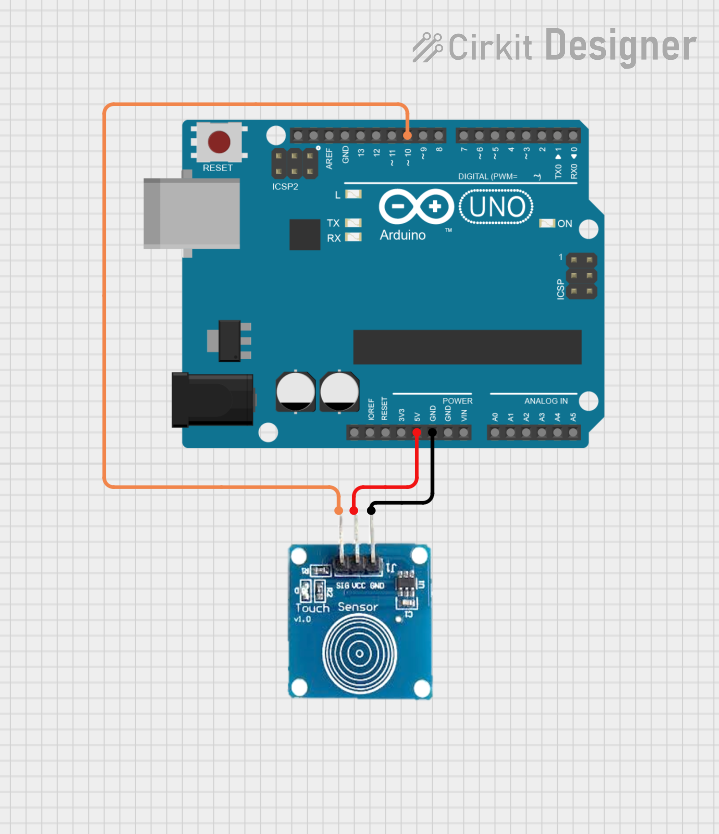
Example: Using a Capacitor with an Arduino UNO
Below is an example of using a capacitor for debouncing a push button connected to an Arduino UNO:
// Example: Debouncing a push button using a capacitor with Arduino UNO

const int buttonPin = 2;  // Pin connected to the push button
const int ledPin = 13;    // Pin connected to the onboard LED

int buttonState = 0;      // Variable to store the button state

void setup() {
  pinMode(buttonPin, INPUT);  // Set button pin as input
  pinMode(ledPin, OUTPUT);    // Set LED pin as output
}

void loop() {
  buttonState = digitalRead(buttonPin);  // Read the button state

  if (buttonState == HIGH) {
    digitalWrite(ledPin, HIGH);  // Turn on the LED if button is pressed
  } else {
    digitalWrite(ledPin, LOW);   // Turn off the LED if button is not pressed
  }
}

// Note: A capacitor (e.g., 10µF) is placed across the button terminals to reduce
// noise and debounce the signal. This ensures stable readings from the button.
Troubleshooting and FAQs
Common Issues and Solutions
Capacitor Overheating:
- Cause: Exceeding the voltage rating or incorrect polarity.
- Solution: Use a capacitor with a higher voltage rating and ensure correct polarity.
Circuit Not Working as Expected:
- Cause: Incorrect capacitance value or poor connections.
- Solution: Verify the capacitance value and check all connections.
Capacitor Fails or Explodes:
- Cause: Reversed polarity (for polarized capacitors) or excessive voltage.
- Solution: Double-check polarity and ensure the voltage rating is sufficient.
FAQs
Q: Can I use a non-polarized capacitor in place of a polarized one?
- A: It depends on the application. Non-polarized capacitors can be used in AC circuits, but they may not provide the required capacitance for DC applications.
Q: How do I measure the capacitance of a capacitor?
- A: Use a multimeter with a capacitance measurement function or a dedicated LCR meter.
Q: What happens if I use a capacitor with a lower voltage rating?
- A: The capacitor may fail, overheat, or even explode. Always use a capacitor with a voltage rating higher than the circuit's operating voltage.
Q: Can I connect capacitors in parallel or series?
- A: Yes. Connecting capacitors in parallel increases the total capacitance, while connecting them in series decreases the total capacitance.
By following this documentation, you can effectively use capacitors in your electronic projects while avoiding common pitfalls.