Cirkit Designer Logo
Cirkit Designer
Your all-in-one circuit design IDE
Home / 
Component Documentation

How to Use LED bulb AC / Bombillo AC: Examples, Pinouts, and Specs

Image of LED bulb AC / Bombillo AC
Cirkit Designer LogoDesign with LED bulb AC / Bombillo AC in Cirkit Designer

Introduction

An LED bulb AC, or Bombillo AC, is a highly efficient light-emitting diode (LED) designed to operate directly on alternating current (AC) power sources. Unlike traditional incandescent bulbs, LED bulbs use semiconductor materials to convert electricity into light, resulting in lower energy consumption and longer lifespan. These bulbs are commonly used in residential and commercial lighting applications due to their energy efficiency, durability, and minimal heat production.

Explore Projects Built with LED bulb AC / Bombillo AC

Use Cirkit Designer to design, explore, and prototype these projects online. Some projects support real-time simulation. Click "Open Project" to start designing instantly!
Wi-Fi Enabled Motion-Activated Lighting System with Radar Sensor
Image of CAPSTONE: A project utilizing LED bulb AC / Bombillo AC in a practical application
This circuit is designed to control an AC LED bulb using a 220V power source, with an infrared motion sensor and an MMWave radar sensor providing input signals. The two-channel relay is used to switch the LED bulb on and off based on the sensor inputs, while the ESP8266 microcontroller is likely programmed to process the sensor data and control the relay. A converter is included to interface between the sensors, microcontroller, and the relay, ensuring proper voltage levels.
Cirkit Designer LogoOpen Project in Cirkit Designer
Wi-Fi Controlled Smart Relay with ESP32 and AC LED Bulb
Image of Automatic Lamp: A project utilizing LED bulb AC / Bombillo AC in a practical application
This circuit uses an ESP32 microcontroller to control a relay module, which switches an LED bulb on and off. The ESP32 is powered by a 5V adapter connected to 220V AC, and the relay operates the bulb using a separate 220V AC connection.
Cirkit Designer LogoOpen Project in Cirkit Designer
Bluetooth-Controlled LED Lighting System with Arduino Mega and 4-Channel Relay
Image of Home automation : A project utilizing LED bulb AC / Bombillo AC in a practical application
This circuit is designed to control four AC-powered LED bulbs using an Arduino Mega 2560 microcontroller and a 4-channel relay module. The Arduino receives commands via a Bluetooth module to switch individual relays on or off, thus controlling the power to the LED bulbs. The relays act as digital switches that are interfaced with the Arduino's PWM pins and are powered by the same supply as the Bluetooth module.
Cirkit Designer LogoOpen Project in Cirkit Designer
Arduino UNO-Based Motion-Activated Relay Control for AC Lighting
Image of Motion Sensor: A project utilizing LED bulb AC / Bombillo AC in a practical application
This circuit is designed to control an AC-powered LED bulb using an Arduino UNO and a 2-channel relay module, with the relay's activation being triggered by an HC-SR501 motion sensor. The Arduino monitors the output from the motion sensor and switches the relay, which in turn connects or disconnects the AC power to the LED bulb. The system is intended to automatically turn on the light when motion is detected and turn it off when there is no motion.
Cirkit Designer LogoOpen Project in Cirkit Designer

Explore Projects Built with LED bulb AC / Bombillo AC

Use Cirkit Designer to design, explore, and prototype these projects online. Some projects support real-time simulation. Click "Open Project" to start designing instantly!
Image of CAPSTONE: A project utilizing LED bulb AC / Bombillo AC in a practical application
Wi-Fi Enabled Motion-Activated Lighting System with Radar Sensor
This circuit is designed to control an AC LED bulb using a 220V power source, with an infrared motion sensor and an MMWave radar sensor providing input signals. The two-channel relay is used to switch the LED bulb on and off based on the sensor inputs, while the ESP8266 microcontroller is likely programmed to process the sensor data and control the relay. A converter is included to interface between the sensors, microcontroller, and the relay, ensuring proper voltage levels.
Cirkit Designer LogoOpen Project in Cirkit Designer
Image of Automatic Lamp: A project utilizing LED bulb AC / Bombillo AC in a practical application
Wi-Fi Controlled Smart Relay with ESP32 and AC LED Bulb
This circuit uses an ESP32 microcontroller to control a relay module, which switches an LED bulb on and off. The ESP32 is powered by a 5V adapter connected to 220V AC, and the relay operates the bulb using a separate 220V AC connection.
Cirkit Designer LogoOpen Project in Cirkit Designer
Image of Home automation : A project utilizing LED bulb AC / Bombillo AC in a practical application
Bluetooth-Controlled LED Lighting System with Arduino Mega and 4-Channel Relay
This circuit is designed to control four AC-powered LED bulbs using an Arduino Mega 2560 microcontroller and a 4-channel relay module. The Arduino receives commands via a Bluetooth module to switch individual relays on or off, thus controlling the power to the LED bulbs. The relays act as digital switches that are interfaced with the Arduino's PWM pins and are powered by the same supply as the Bluetooth module.
Cirkit Designer LogoOpen Project in Cirkit Designer
Image of Motion Sensor: A project utilizing LED bulb AC / Bombillo AC in a practical application
Arduino UNO-Based Motion-Activated Relay Control for AC Lighting
This circuit is designed to control an AC-powered LED bulb using an Arduino UNO and a 2-channel relay module, with the relay's activation being triggered by an HC-SR501 motion sensor. The Arduino monitors the output from the motion sensor and switches the relay, which in turn connects or disconnects the AC power to the LED bulb. The system is intended to automatically turn on the light when motion is detected and turn it off when there is no motion.
Cirkit Designer LogoOpen Project in Cirkit Designer

Common Applications and Use Cases

  • Home lighting fixtures
  • Office and commercial space illumination
  • Outdoor and street lighting
  • Decorative and accent lighting
  • Industrial lighting systems

Technical Specifications

Key Technical Details

Specification Detail
Operating Voltage 110-240V AC (depending on region)
Power Consumption 3W - 20W (varies by model)
Luminous Efficiency 80-100 lumens/Watt
Color Temperature 2700K (Warm White) - 6500K (Daylight)
Base Type E26/E27, B22, GU10, etc.
Lifespan Up to 25,000 hours
Dimmable Yes/No (varies by model)

Pin Configuration and Descriptions

As LED bulbs are designed to fit into standard AC light fixtures, they do not have a pin configuration in the same way that other electronic components might. Instead, they have a base that screws or plugs into a matching socket. The most common base types are E26/E27 and B22.

Usage Instructions

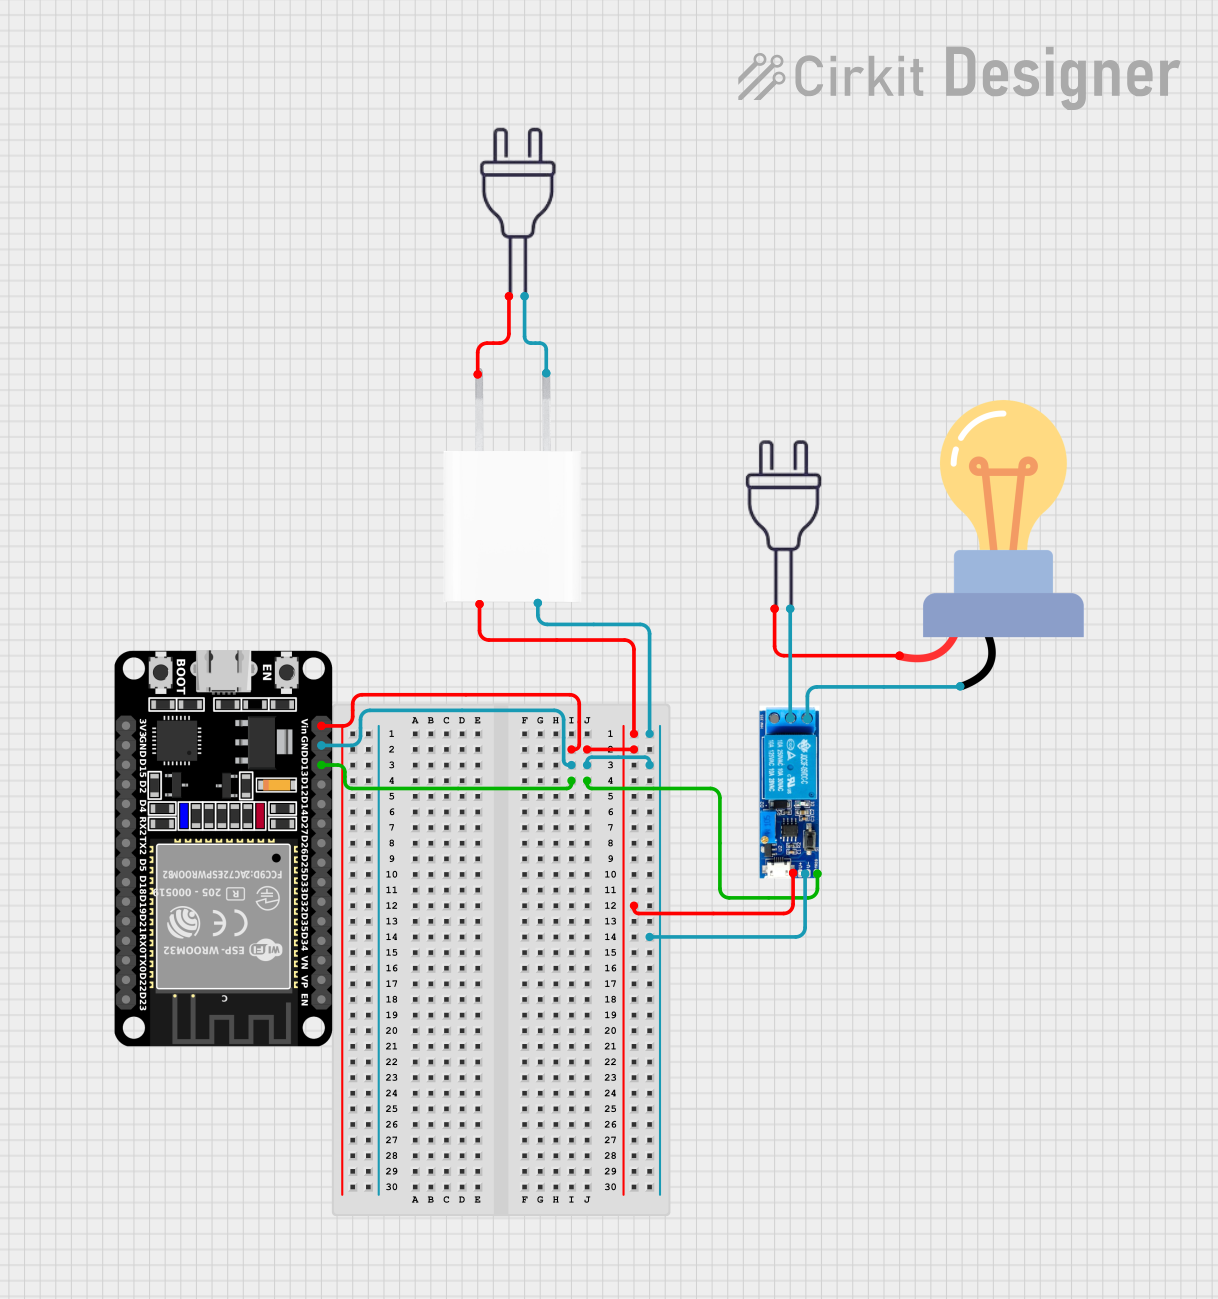
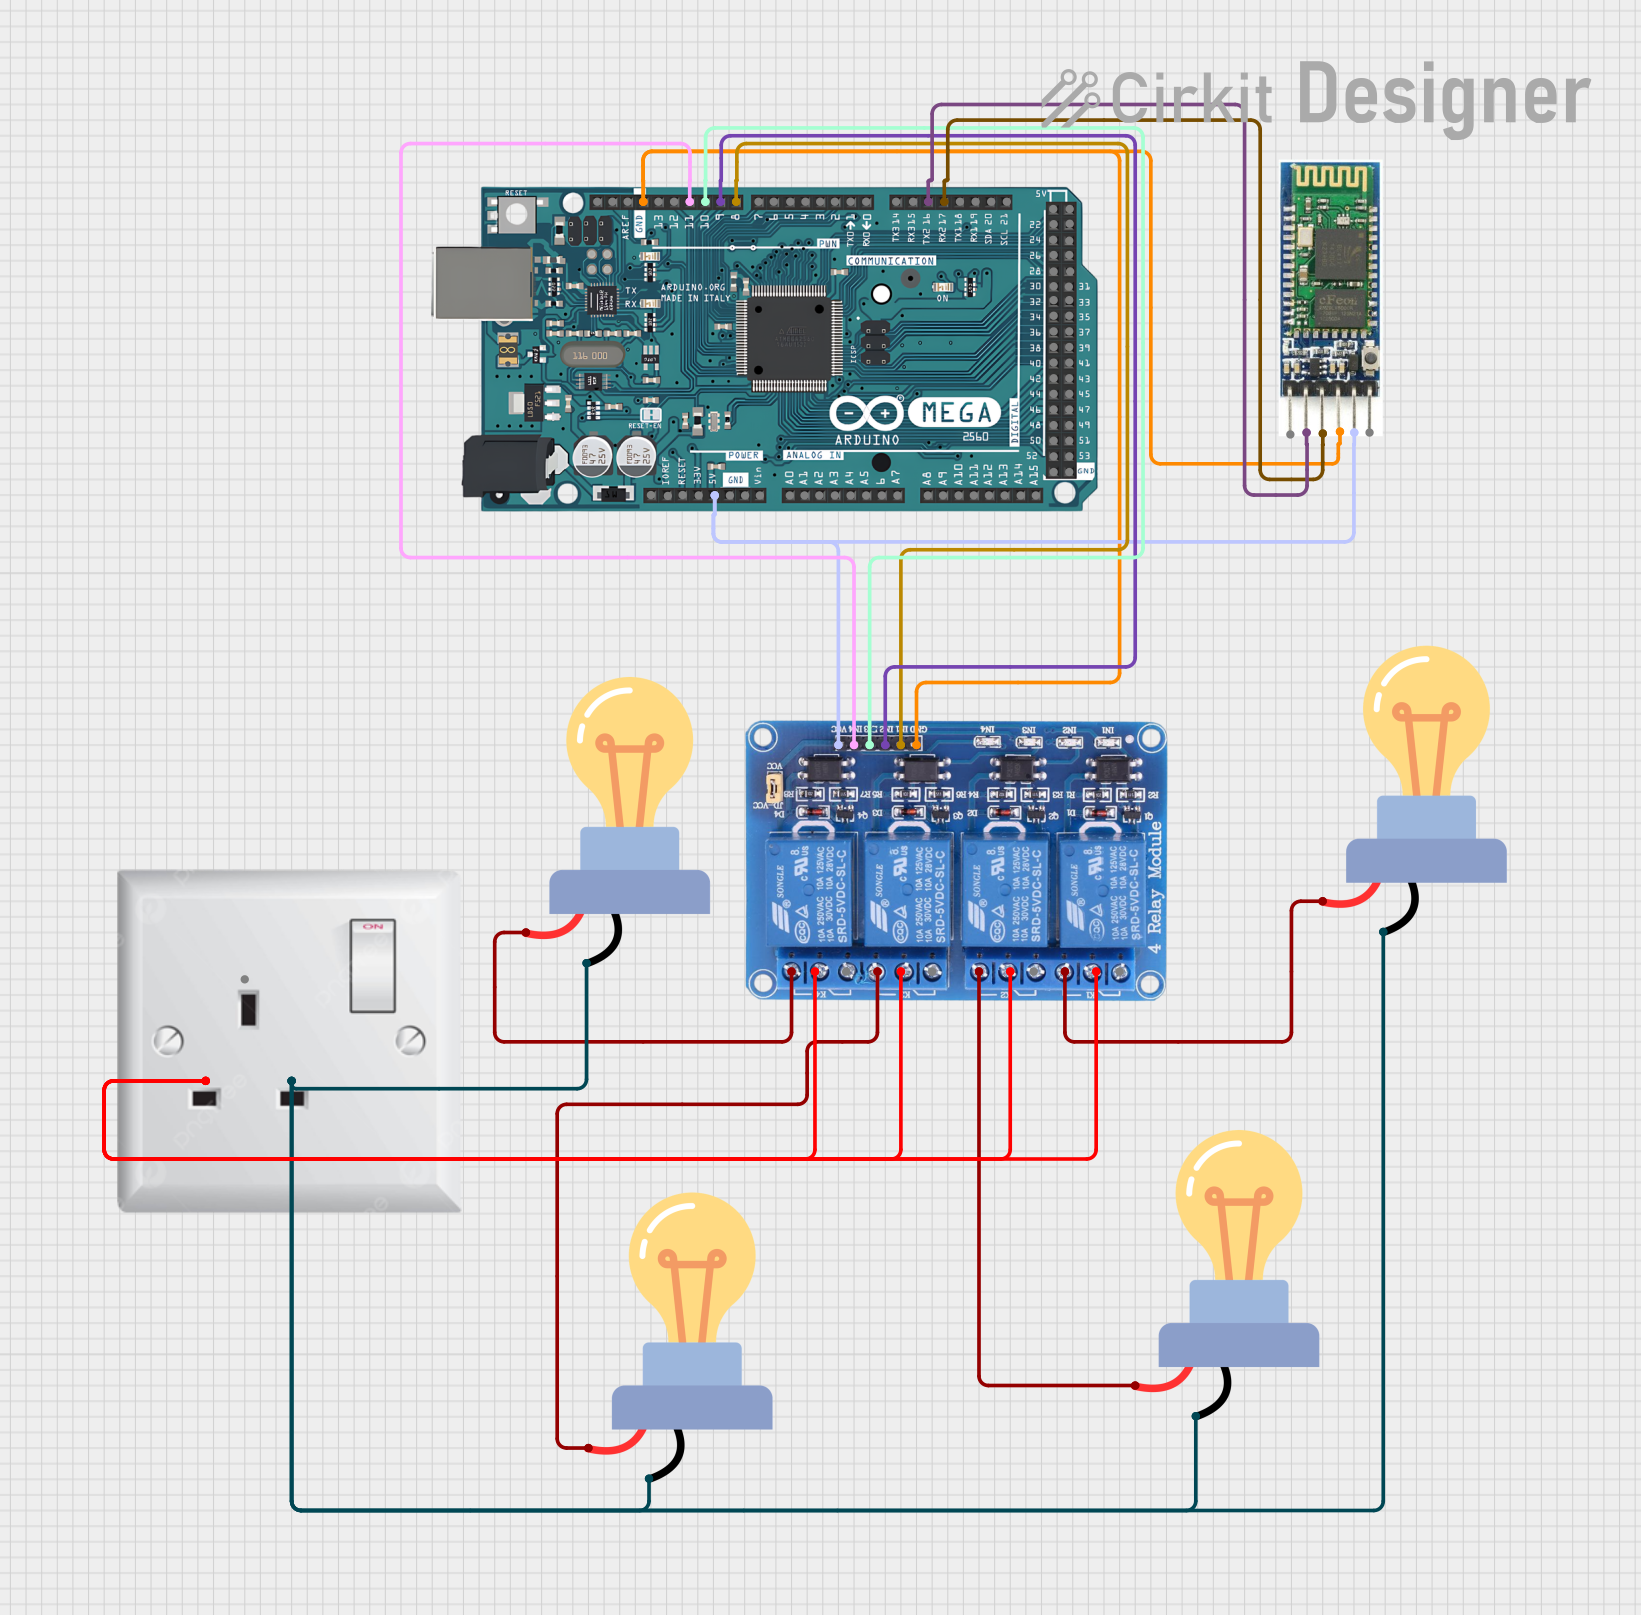
How to Use the Component in a Circuit

  1. Ensure Power Compatibility: Verify that the LED bulb's voltage rating is compatible with your local AC mains supply.
  2. Fixture Compatibility: Ensure the bulb base type (E26/E27, B22, etc.) matches the light fixture socket.
  3. Installation: Turn off the power to the light fixture before installation. Screw or plug the LED bulb into the socket.
  4. Power On: Once securely installed, turn on the power to test the LED bulb.

Important Considerations and Best Practices

  • Dimming: If using a dimmable LED bulb, ensure that the dimmer switch is compatible with LED technology to prevent flickering and to extend the bulb's lifespan.
  • Heat Dissipation: While LED bulbs generate less heat than incandescent bulbs, they should still be used in fixtures that allow for proper heat dissipation.
  • Outdoor Use: For outdoor applications, ensure the LED bulb is rated for outdoor use and the fixture provides adequate protection from the elements.
  • Disposal: At the end of its lifespan, dispose of the LED bulb according to local regulations, as it contains electronic components.

Troubleshooting and FAQs

Common Issues

  • Flickering: This can be caused by an incompatible dimmer switch or fluctuations in the AC power supply. Check the dimmer model or try the bulb in a different fixture.
  • Not Turning On: Ensure the bulb is properly screwed in and that there is power to the fixture. Check your circuit breaker or fuse box.
  • Dim Light Output: This may indicate that the bulb is nearing the end of its lifespan or that the voltage supply is lower than the bulb's rated voltage.

Solutions and Tips for Troubleshooting

  • Flickering Bulb: If the bulb is dimmable, replace the current dimmer switch with one that is LED-compatible. If not, consult an electrician to check for wiring issues.
  • Bulb Won't Turn On: Double-check the installation and try the bulb in a known working fixture. If it still doesn't work, the bulb may be defective.
  • Dim Light Output: If the bulb is old, replace it. If the issue persists with a new bulb, have an electrician check the voltage supply to the fixture.

FAQs

Q: Can I use an LED bulb AC in any light fixture? A: Yes, as long as the base type and voltage rating match the fixture and power supply.

Q: Are LED bulbs AC energy-efficient? A: Yes, LED bulbs are significantly more energy-efficient than traditional incandescent bulbs.

Q: How do I dispose of an LED bulb AC? A: LED bulbs should be disposed of according to local electronic waste regulations due to their electronic components.

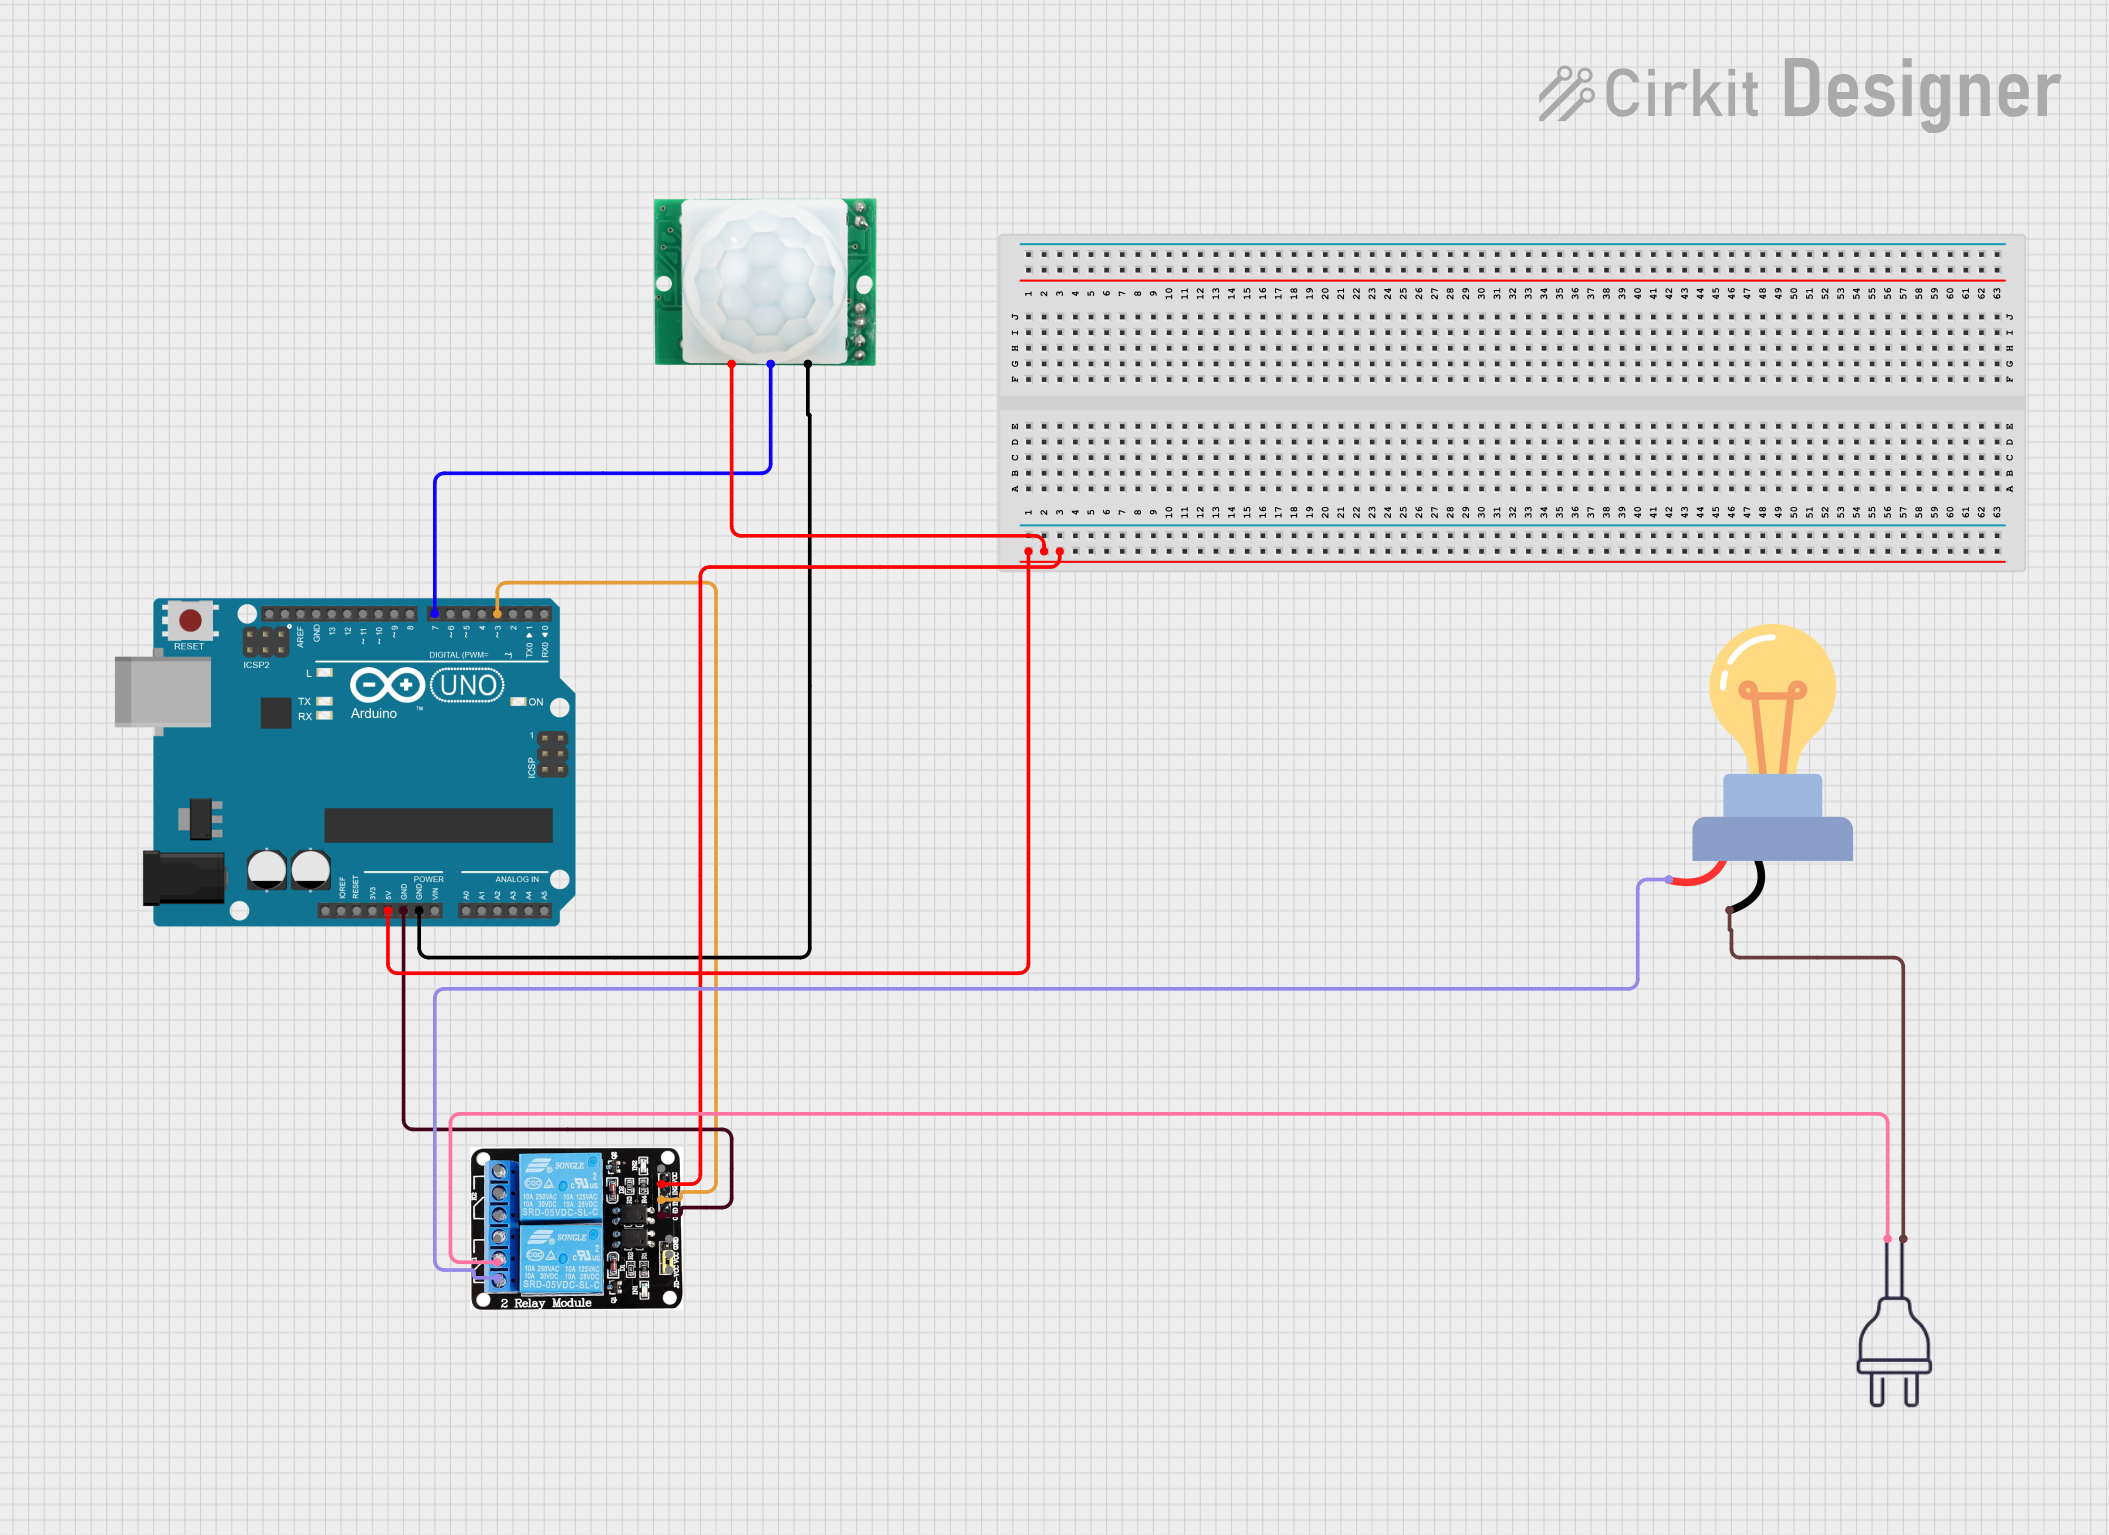
Q: Can LED bulbs be used with a timer or motion sensor? A: Yes, LED bulbs can be used with timers and motion sensors, provided these devices are compatible with LED loads.

Q: Why is my LED bulb AC not as bright as it used to be? A: LED bulbs can dim over time as they reach the end of their lifespan. Replacing the bulb should restore the original brightness.

For any further assistance or questions, please contact the manufacturer's customer support.