Cirkit Designer Logo
Cirkit Designer
Your all-in-one circuit design IDE
Home / 
Component Documentation

How to Use Adafruit AirLift FeatherWing: Examples, Pinouts, and Specs

Image of Adafruit AirLift FeatherWing
Cirkit Designer LogoDesign with Adafruit AirLift FeatherWing in Cirkit Designer

Introduction

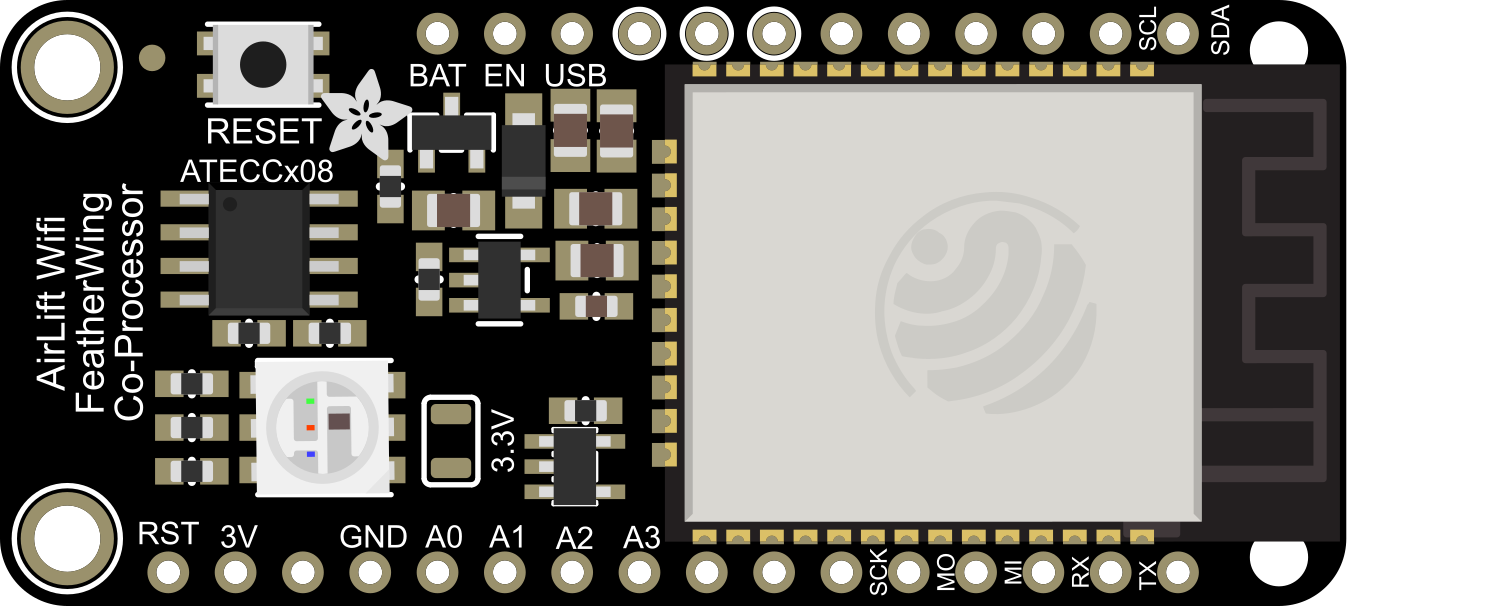
The Adafruit AirLift FeatherWing is an add-on board that grants Wi-Fi connectivity to any Feather board through the ESP32 module. It is designed to make Internet of Things (IoT) projects simpler by providing a reliable wireless communication interface. The AirLift FeatherWing is perfect for applications requiring remote data transfer, wireless control, and internet access.

Explore Projects Built with Adafruit AirLift FeatherWing

Use Cirkit Designer to design, explore, and prototype these projects online. Some projects support real-time simulation. Click "Open Project" to start designing instantly!
ESP32-Based Vibration Feedback System with Quad Alphanumeric Display and ADXL343 Accelerometer
Image of EC444 - Quest 3: A project utilizing Adafruit AirLift FeatherWing in a practical application
This circuit features an Adafruit HUZZAH32 ESP32 Feather board as the central microcontroller, which is connected to an Adafruit Quad AlphaNumeric Featherwing display and an Adafruit ADXL343 accelerometer via I2C communication (SCL and SDA lines). The ESP32 controls a vibration motor connected to one of its GPIO pins (A5_IO4) and shares a common power supply (3.3V) and ground (GND) with the other components. The purpose of this circuit is likely to read acceleration data, display information on the alphanumeric display, and provide haptic feedback through the vibration motor.
Cirkit Designer LogoOpen Project in Cirkit Designer
Solar-Powered Environmental Data Logger with Adafruit Feather M0 Express
Image of Lake Thoreau Monitoring Station: A project utilizing Adafruit AirLift FeatherWing in a practical application
This circuit is designed for environmental data collection and logging, utilizing an Adafruit Feather M0 Express microcontroller as the central processing unit. It interfaces with a BME280 sensor for atmospheric temperature, humidity, and pressure measurements, an SGP30 sensor for monitoring air quality (eCO2 and TVOC), and a STEMMA soil sensor for detecting soil moisture and temperature. The system is powered by a solar panel and a 3.7v LiPo battery, managed by an Adafruit BQ24074 Solar-DC-USB Lipo Charger, and provides easy access to the microcontroller's connections through an Adafruit Terminal Breakout FeatherWing.
Cirkit Designer LogoOpen Project in Cirkit Designer
Touch-Sensitive Interface with Adafruit MPR121 and Feather 32u4 Bluefruit
Image of MPR121: A project utilizing Adafruit AirLift FeatherWing in a practical application
This circuit integrates an Adafruit MPR121 capacitive touch sensor with an Adafruit Feather 32u4 Bluefruit microcontroller. The MPR121 is powered by the Feather and communicates via I2C (SCL and SDA) to detect touch inputs, which can be processed or transmitted wirelessly by the Feather.
Cirkit Designer LogoOpen Project in Cirkit Designer
ESP32-Based Force Measurement System with LSM303AGR Sensor
Image of final circuit diagram: A project utilizing Adafruit AirLift FeatherWing in a practical application
This circuit features an Adafruit HUZZAH32 ESP32 Feather microcontroller connected to an Adafruit LSM303AGR sensor via I2C communication lines (SCL and SDA), a force sensing resistor (FSR) interfaced through an analog input with a pull-up resistor, and powered by a 3xAA battery pack. The LSM303AGR sensor provides acceleration and magnetic field measurements, while the FSR detects applied force. The ESP32 processes these inputs and can be programmed to respond to sensor data for applications such as motion tracking and force measurement.
Cirkit Designer LogoOpen Project in Cirkit Designer

Explore Projects Built with Adafruit AirLift FeatherWing

Use Cirkit Designer to design, explore, and prototype these projects online. Some projects support real-time simulation. Click "Open Project" to start designing instantly!
Image of EC444 - Quest 3: A project utilizing Adafruit AirLift FeatherWing in a practical application
ESP32-Based Vibration Feedback System with Quad Alphanumeric Display and ADXL343 Accelerometer
This circuit features an Adafruit HUZZAH32 ESP32 Feather board as the central microcontroller, which is connected to an Adafruit Quad AlphaNumeric Featherwing display and an Adafruit ADXL343 accelerometer via I2C communication (SCL and SDA lines). The ESP32 controls a vibration motor connected to one of its GPIO pins (A5_IO4) and shares a common power supply (3.3V) and ground (GND) with the other components. The purpose of this circuit is likely to read acceleration data, display information on the alphanumeric display, and provide haptic feedback through the vibration motor.
Cirkit Designer LogoOpen Project in Cirkit Designer
Image of Lake Thoreau Monitoring Station: A project utilizing Adafruit AirLift FeatherWing in a practical application
Solar-Powered Environmental Data Logger with Adafruit Feather M0 Express
This circuit is designed for environmental data collection and logging, utilizing an Adafruit Feather M0 Express microcontroller as the central processing unit. It interfaces with a BME280 sensor for atmospheric temperature, humidity, and pressure measurements, an SGP30 sensor for monitoring air quality (eCO2 and TVOC), and a STEMMA soil sensor for detecting soil moisture and temperature. The system is powered by a solar panel and a 3.7v LiPo battery, managed by an Adafruit BQ24074 Solar-DC-USB Lipo Charger, and provides easy access to the microcontroller's connections through an Adafruit Terminal Breakout FeatherWing.
Cirkit Designer LogoOpen Project in Cirkit Designer
Image of MPR121: A project utilizing Adafruit AirLift FeatherWing in a practical application
Touch-Sensitive Interface with Adafruit MPR121 and Feather 32u4 Bluefruit
This circuit integrates an Adafruit MPR121 capacitive touch sensor with an Adafruit Feather 32u4 Bluefruit microcontroller. The MPR121 is powered by the Feather and communicates via I2C (SCL and SDA) to detect touch inputs, which can be processed or transmitted wirelessly by the Feather.
Cirkit Designer LogoOpen Project in Cirkit Designer
Image of final circuit diagram: A project utilizing Adafruit AirLift FeatherWing in a practical application
ESP32-Based Force Measurement System with LSM303AGR Sensor
This circuit features an Adafruit HUZZAH32 ESP32 Feather microcontroller connected to an Adafruit LSM303AGR sensor via I2C communication lines (SCL and SDA), a force sensing resistor (FSR) interfaced through an analog input with a pull-up resistor, and powered by a 3xAA battery pack. The LSM303AGR sensor provides acceleration and magnetic field measurements, while the FSR detects applied force. The ESP32 processes these inputs and can be programmed to respond to sensor data for applications such as motion tracking and force measurement.
Cirkit Designer LogoOpen Project in Cirkit Designer

Common Applications and Use Cases

  • IoT devices
  • Remote sensors
  • Wireless data loggers
  • Home automation
  • Remote control applications

Technical Specifications

Key Technical Details

  • Wireless Module: ESP32
  • Wi-Fi Standards: 802.11b/g/n
  • Bluetooth: Classic and BLE
  • Operating Voltage: 3.3V (from Feather board)
  • Logic Level: 3.3V compatible
  • Current Consumption: ~250mA (during Wi-Fi operation)

Pin Configuration and Descriptions

Pin Description
GND Ground connection
3V 3.3V power supply from the Feather board
SCK SPI Clock
MISO SPI Master In, Slave Out
MOSI SPI Master Out, Slave In
CS SPI Chip Select
BUSY ESP32 busy signal
RST ESP32 reset signal
GPIO0 ESP32 GPIO0, used for boot mode selection
EN ESP32 chip enable

Usage Instructions

Integration with a Feather Board

  1. Mounting: Attach the AirLift FeatherWing on top of a Feather board ensuring proper alignment of pins.
  2. Power Supply: Ensure that the Feather board can supply enough current for both the microcontroller and the AirLift module.
  3. SPI Connection: The AirLift FeatherWing communicates with the Feather board via the SPI interface. Make sure the SPI pins are not used by other peripherals.

Software Setup

  1. Arduino IDE: Install the latest version of the Arduino IDE.
  2. Board Manager: Install support for the ESP32 in the Arduino IDE through the Board Manager.
  3. Libraries: Install the Adafruit AirLift library and its dependencies.

Example Code for Arduino UNO

#include <WiFi.h>
#include <SPI.h>

// Replace with your network credentials
const char* ssid = "your_SSID";
const char* password = "your_PASSWORD";

void setup() {
  // Initialize serial communication for debugging
  Serial.begin(115200);

  // Start the Wi-Fi connection process
  WiFi.begin(ssid, password);

  // Wait for connection
  while (WiFi.status() != WL_CONNECTED) {
    delay(500);
    Serial.print(".");
  }

  // Once connected, print the IP address
  Serial.println("");
  Serial.println("WiFi connected.");
  Serial.println("IP address: ");
  Serial.println(WiFi.localIP());
}

void loop() {
  // Nothing to do here for this simple example
}

Important Considerations and Best Practices

  • Power Requirements: Ensure the Feather board can provide sufficient power for the AirLift FeatherWing.
  • Antenna: For better Wi-Fi performance, consider using an external antenna if your Feather board supports it.
  • Firmware Updates: Keep the ESP32 firmware up to date to ensure compatibility and security.
  • Secure Credentials: Avoid hardcoding Wi-Fi credentials in your code. Consider storing them securely or allowing user input.

Troubleshooting and FAQs

Common Issues

  • Wi-Fi Connection Failure: Ensure the network credentials are correct and the network is within range.
  • SPI Communication Errors: Check the connections between the AirLift FeatherWing and the Feather board.
  • Insufficient Power: If the Feather board resets unexpectedly, it may be due to insufficient power supply.

Solutions and Tips

  • Power Supply: Use a stable and sufficient power source.
  • Correct Library Versions: Make sure you have the latest versions of the required libraries.
  • Serial Monitor: Use the serial monitor to debug and check for error messages.

FAQs

Q: Can the AirLift FeatherWing be used with any Feather board? A: Yes, it is designed to be compatible with all Feather boards.

Q: Does the AirLift FeatherWing support over-the-air (OTA) updates? A: Yes, the ESP32 module supports OTA updates, but implementation depends on your code.

Q: How can I improve the Wi-Fi signal strength? A: Use an external antenna if your Feather board has an antenna connector, and place the device away from obstacles and interference sources.

For further assistance, consult the Adafruit forums or the community support channels.