How to Use Cytron IR Start Module: Examples, Pinouts, and Specs
Introduction
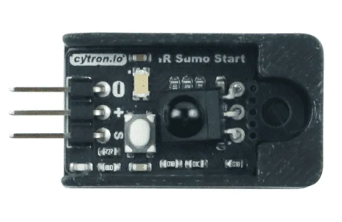
The Cytron IR Start Module is a compact and user-friendly module designed for infrared (IR) remote control applications. It enables users to wirelessly start and control devices using IR signals, making it ideal for projects requiring remote activation or control. This module is particularly useful in home automation, robotics, and other applications where wireless control is essential.
Explore Projects Built with Cytron IR Start Module

Explore Projects Built with Cytron IR Start Module
Common Applications and Use Cases
- Remote-controlled robots and vehicles
- Home automation systems
- Wireless device activation
- IR-based remote control projects
- Educational and prototyping purposes
Technical Specifications
The Cytron IR Start Module is designed to be simple yet versatile, with the following key specifications:
| Parameter | Value |
|---|---|
| Operating Voltage | 5V DC |
| Operating Current | < 20mA |
| IR Receiver Frequency | 38 kHz |
| Communication Protocol | Digital Output (Active Low) |
| Dimensions | 30mm x 20mm x 10mm |
| Operating Temperature | -20°C to 60°C |
Pin Configuration and Descriptions
The Cytron IR Start Module has a 3-pin interface for easy integration into circuits:
| Pin | Name | Description |
|---|---|---|
| 1 | VCC | Connect to a 5V DC power supply |
| 2 | GND | Connect to the ground of the power supply |
| 3 | OUT | Digital output pin; goes LOW when an IR signal is detected |
Usage Instructions
How to Use the Cytron IR Start Module in a Circuit
- Power the Module: Connect the
VCCpin to a 5V DC power source and theGNDpin to the ground. - Connect the Output: Connect the
OUTpin to a microcontroller (e.g., Arduino) or any digital input device to read the IR signal. - Position the Module: Ensure the IR receiver on the module is facing the IR remote control for optimal signal reception.
- Test the Module: Use an IR remote control to send signals to the module. The
OUTpin will go LOW when a valid IR signal is detected.
Important Considerations and Best Practices
- Line of Sight: Ensure there is a clear line of sight between the IR remote and the module for reliable signal reception.
- Power Supply: Use a stable 5V DC power source to avoid erratic behavior.
- Interference: Avoid placing the module near sources of IR interference, such as sunlight or fluorescent lights.
- Signal Decoding: If you need to decode specific IR signals, use a microcontroller with an IR library (e.g., Arduino IRremote).
Example: Connecting to an Arduino UNO
Below is an example of how to connect and use the Cytron IR Start Module with an Arduino UNO to detect IR signals:
Circuit Diagram
- Connect the
VCCpin of the module to the 5V pin on the Arduino. - Connect the
GNDpin of the module to the GND pin on the Arduino. - Connect the
OUTpin of the module to digital pin 2 on the Arduino.
Arduino Code
// Include the IRremote library for decoding IR signals
#include <IRremote.h>

// Define the pin connected to the OUT pin of the IR Start Module
const int irPin = 2;

void setup() {
  // Initialize serial communication for debugging
  Serial.begin(9600);

  // Initialize the IR receiver
  IrReceiver.begin(irPin, ENABLE_LED_FEEDBACK);
  Serial.println("IR Receiver Initialized");
}

void loop() {
  // Check if an IR signal is received
  if (IrReceiver.decode()) {
    Serial.println("IR Signal Detected!");

    // Print the decoded IR data (if applicable)
    Serial.print("Decoded Data: ");
    Serial.println(IrReceiver.decodedIRData.decodedRawData, HEX);

    // Resume the receiver for the next signal
    IrReceiver.resume();
  }
}
Notes on the Code
- The code uses the
IRremotelibrary, which must be installed in the Arduino IDE. You can install it via the Library Manager. - The
IrReceiver.decode()function checks for incoming IR signals, and the decoded data is printed to the Serial Monitor.
Troubleshooting and FAQs
Common Issues and Solutions
The module does not respond to IR signals.
- Ensure the module is powered correctly (5V to
VCCand GND toGND). - Verify that the IR remote is functional and emitting signals.
- Check for obstructions between the IR remote and the module.
- Ensure the module is powered correctly (5V to
The output pin does not change state.
- Confirm that the
OUTpin is properly connected to the microcontroller or digital input. - Ensure the IR remote is operating at the correct frequency (38 kHz).
- Confirm that the
Interference from ambient light.
- Avoid using the module in direct sunlight or near strong IR sources like fluorescent lights.
- Use the module indoors or in controlled lighting conditions for best results.
The Arduino does not detect the IR signal.
- Verify the wiring between the module and the Arduino.
- Ensure the correct pin is defined in the Arduino code (
irPinin the example).
FAQs
Q: Can the Cytron IR Start Module decode specific IR remote buttons?
A: No, the module itself only detects the presence of an IR signal. To decode specific buttons, you need to use a microcontroller with an IR decoding library, such as the Arduino with the IRremote library.
Q: What is the maximum range of the module?
A: The range depends on the power of the IR remote and environmental conditions. Typically, it works within 5-10 meters in a clear line of sight.
Q: Can I use this module with a 3.3V microcontroller?
A: The module requires a 5V power supply for proper operation. However, the OUT pin can be connected to a 3.3V logic input if the microcontroller supports it.
Q: Is the module compatible with all IR remotes?
A: The module is designed to work with standard 38 kHz IR remotes, which are commonly used in consumer electronics. Ensure your remote operates at this frequency.
By following this documentation, you can effectively integrate the Cytron IR Start Module into your projects and troubleshoot any issues that arise.