Cirkit Designer Logo
Cirkit Designer
Your all-in-one circuit design IDE
Home / 
Component Documentation

How to Use Voice recognition module: Examples, Pinouts, and Specs

Image of Voice recognition module
Cirkit Designer LogoDesign with Voice recognition module in Cirkit Designer

Introduction

The Voice Recognition Module is a sophisticated electronic component designed to interpret spoken commands, enabling users to interact with their projects through voice. This module is particularly useful in applications such as home automation systems, voice-activated controls, and interactive robotics. By integrating this module into your projects, you can create hands-free interfaces and enhance user accessibility.

Explore Projects Built with Voice recognition module

Use Cirkit Designer to design, explore, and prototype these projects online. Some projects support real-time simulation. Click "Open Project" to start designing instantly!
Arduino UNO Based Voice-Controlled Bluetooth Interface with OLED Display
Image of skripsi: A project utilizing Voice recognition module in a practical application
This circuit features an Arduino UNO microcontroller interfaced with a voice recognition module for audio input commands, an HC-05 Bluetooth module for wireless communication, and a 0.96" OLED display for visual output. The Arduino is programmed to handle inputs and outputs, with the voice recognition module connected to digital pins for serial communication, and the OLED display connected via I2C to the analog pins A4 (SDA) and A5 (SCL). The Bluetooth module is also connected to the Arduino's serial pins for remote data exchange.
Cirkit Designer LogoOpen Project in Cirkit Designer
Voice-Controlled Buzzer System with VC-02 Module
Image of vc: A project utilizing Voice recognition module in a practical application
This circuit features a VC-02 voice recognition module connected to a buzzer and powered by a 5V battery. The VC-02 module is programmed to listen for specific voice commands and, upon recognizing the command 'can you make a sound', it activates the buzzer for one second. The circuit is designed for voice-activated sound generation, with the VC-02 module handling voice recognition and serial communication, and the buzzer providing audible feedback.
Cirkit Designer LogoOpen Project in Cirkit Designer
Arduino UNO Voice Recognition Interface
Image of voice-controlled with arduino: A project utilizing Voice recognition module in a practical application
This circuit connects an Arduino UNO to a voice recognition module. The Arduino provides power to the module via the 5V and GND pins and communicates with it using digital pins D2 and D3 for serial data transmission. The purpose of this circuit is to enable voice recognition capabilities, which can be programmed and utilized through the Arduino's microcontroller.
Cirkit Designer LogoOpen Project in Cirkit Designer
ESP32-Based Voice Assistant with Battery-Powered Microphone and Speaker
Image of Minor: A project utilizing Voice recognition module in a practical application
This circuit is a voice-controlled system that uses an ESP32 microcontroller to process audio input from a microphone, send the data to a Gemini API for speech-to-text conversion, and output responses through a speaker. It includes an IR sensor for additional input, an LED for status indication, and a battery with a charging module for power management.
Cirkit Designer LogoOpen Project in Cirkit Designer

Explore Projects Built with Voice recognition module

Use Cirkit Designer to design, explore, and prototype these projects online. Some projects support real-time simulation. Click "Open Project" to start designing instantly!
Image of skripsi: A project utilizing Voice recognition module in a practical application
Arduino UNO Based Voice-Controlled Bluetooth Interface with OLED Display
This circuit features an Arduino UNO microcontroller interfaced with a voice recognition module for audio input commands, an HC-05 Bluetooth module for wireless communication, and a 0.96" OLED display for visual output. The Arduino is programmed to handle inputs and outputs, with the voice recognition module connected to digital pins for serial communication, and the OLED display connected via I2C to the analog pins A4 (SDA) and A5 (SCL). The Bluetooth module is also connected to the Arduino's serial pins for remote data exchange.
Cirkit Designer LogoOpen Project in Cirkit Designer
Image of vc: A project utilizing Voice recognition module in a practical application
Voice-Controlled Buzzer System with VC-02 Module
This circuit features a VC-02 voice recognition module connected to a buzzer and powered by a 5V battery. The VC-02 module is programmed to listen for specific voice commands and, upon recognizing the command 'can you make a sound', it activates the buzzer for one second. The circuit is designed for voice-activated sound generation, with the VC-02 module handling voice recognition and serial communication, and the buzzer providing audible feedback.
Cirkit Designer LogoOpen Project in Cirkit Designer
Image of voice-controlled with arduino: A project utilizing Voice recognition module in a practical application
Arduino UNO Voice Recognition Interface
This circuit connects an Arduino UNO to a voice recognition module. The Arduino provides power to the module via the 5V and GND pins and communicates with it using digital pins D2 and D3 for serial data transmission. The purpose of this circuit is to enable voice recognition capabilities, which can be programmed and utilized through the Arduino's microcontroller.
Cirkit Designer LogoOpen Project in Cirkit Designer
Image of Minor: A project utilizing Voice recognition module in a practical application
ESP32-Based Voice Assistant with Battery-Powered Microphone and Speaker
This circuit is a voice-controlled system that uses an ESP32 microcontroller to process audio input from a microphone, send the data to a Gemini API for speech-to-text conversion, and output responses through a speaker. It includes an IR sensor for additional input, an LED for status indication, and a battery with a charging module for power management.
Cirkit Designer LogoOpen Project in Cirkit Designer

Technical Specifications

General Features

  • Operating Voltage: 4.5V - 5.5V
  • Current Consumption: ~40mA (during recognition)
  • Recognition Accuracy: High with proper training
  • Microphone: Onboard, with the possibility of connecting an external one
  • Interface: UART/Serial

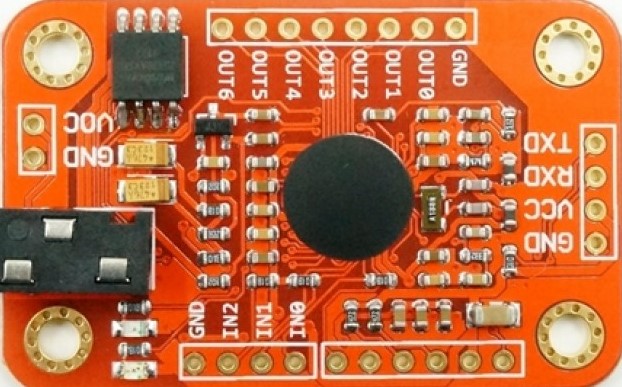
Pin Configuration and Descriptions

Pin Number Pin Name Description
1 VCC Connect to 5V power supply
2 GND Connect to ground
3 TX Transmits data to the microcontroller (connect to RX)
4 RX Receives data from the microcontroller (connect to TX)

Usage Instructions

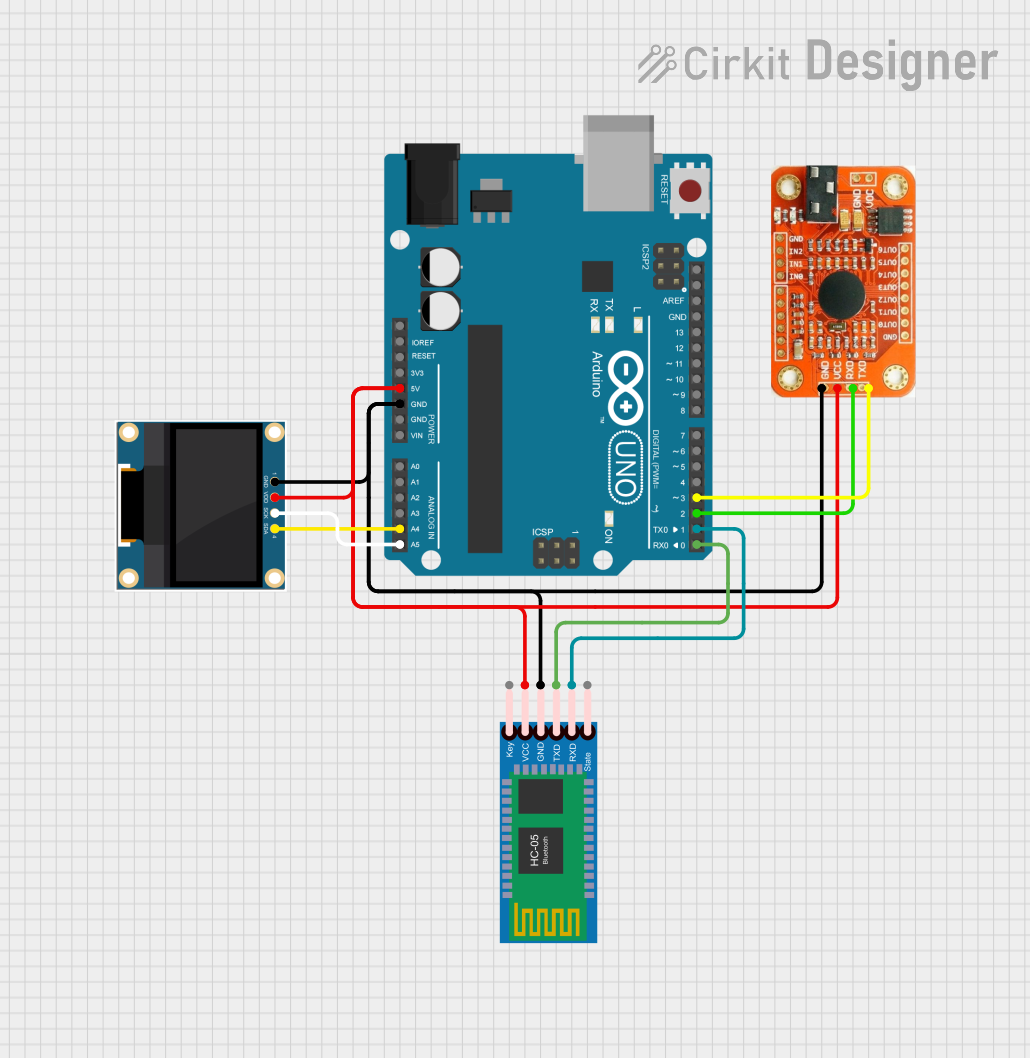
Interfacing with Arduino Mega

  1. Connecting the Module:

    • Connect the VCC pin to the 5V output on the Arduino Mega.
    • Connect the GND pin to one of the GND pins on the Arduino Mega.
    • Connect the TX pin of the module to the RX pin (Serial1, Serial2, or Serial3) on the Arduino Mega.
    • Connect the RX pin of the module to the TX pin (Serial1, Serial2, or Serial3) on the Arduino Mega.
  2. Programming the Arduino:

    • Open the Arduino IDE and select the correct board and COM port.
    • Use the following sample code to initialize the voice recognition module and set up basic voice command recognition.
#include <SoftwareSerial.h>

// Use one of the additional hardware serial ports on the Mega
// For example, Serial1 on pins 18 (TX) and 19 (RX)
#define VoiceSerial Serial1

void setup() {
  // Start the hardware serial port at 9600 baud
  VoiceSerial.begin(9600);
}

void loop() {
  if (VoiceSerial.available()) { // Check if there is data from the module
    String voiceCommand = VoiceSerial.readStringUntil('\n'); // Read the command
    // Implement your voice command handling logic here
    if (voiceCommand == "turn on") {
      // Code to turn on a device
    } else if (voiceCommand == "turn off") {
      // Code to turn off a device
    }
    // Add more voice command conditions as needed
  }
}
  1. Voice Command Training:
    • Follow the manufacturer's instructions to train the module with specific voice commands.
    • Ensure a quiet environment for accurate voice recognition during training.

Best Practices

  • Use a stable power supply to prevent erratic behavior.
  • Avoid background noise during both training and normal operation.
  • Place the microphone close to the user for better voice capture.
  • Implement debounce logic in the code to handle unintentional repeated voice commands.

Troubleshooting and FAQs

Common Issues

  • Module not recognizing commands: Ensure that the module has been properly trained with the commands and that the environment is similar to the training conditions.
  • Serial communication errors: Verify that the TX and RX pins are correctly connected and that the baud rate matches the module's default setting.

FAQs

  • Q: Can I use an external microphone with the module?

    • A: Yes, the module typically supports connecting an external microphone if better audio capture is needed.
  • Q: How many commands can the module recognize?

    • A: This depends on the specific model of the voice recognition module. Refer to the manufacturer's datasheet for the exact number.
  • Q: Is it possible to change the baud rate of the module?

    • A: Some modules allow baud rate configuration. Check the module's documentation for instructions on how to change it.

Remember to consult the manufacturer's datasheet and user manual for more detailed information and advanced configuration options.