
How to Use TMP102: Examples, Pinouts, and Specs
 Design with TMP102 in Cirkit Designer
Introduction
The TMP102 is a high-accuracy digital temperature sensor manufactured by Texas Instruments. It communicates via the I2C interface, making it easy to integrate into microcontroller-based systems. The sensor provides temperature readings with a range of -40°C to +125°C and boasts a resolution of 0.0625°C. Its low power consumption makes it ideal for battery-operated devices and energy-efficient applications.
Explore Projects Built with TMP102
 Open Project in Cirkit Designer
 Open Project in Cirkit Designer
 Open Project in Cirkit Designer
 Open Project in Cirkit Designer
Explore Projects Built with TMP102
Open Project in Cirkit DesignerOpen Project in Cirkit DesignerOpen Project in Cirkit DesignerOpen Project in Cirkit DesignerCommon Applications
- Environmental monitoring systems
- Consumer electronics (e.g., smartphones, laptops)
- Industrial temperature control
- Medical devices
- IoT (Internet of Things) applications
Technical Specifications
The TMP102 offers a combination of precision, low power consumption, and ease of use. Below are its key technical details:
Key Specifications
| Parameter | Value |
|---|---|
| Supply Voltage (Vcc) | 1.4V to 3.6V |
| Temperature Range | -40°C to +125°C |
| Accuracy | ±0.5°C (typical, -25°C to 85°C) |
| Resolution | 0.0625°C |
| Interface | I2C (2-wire) |
| Power Consumption | 10 µA (typical, active mode) |
| Shutdown Current | 0.5 µA (typical) |
| I2C Address (default) | 0x48 |
Pin Configuration
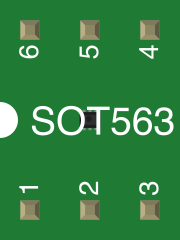
The TMP102 is available in a 6-pin SOT-563 package. Below is the pinout and description:
| Pin Number | Pin Name | Description |
|---|---|---|
| 1 | GND | Ground |
| 2 | SDA | Serial Data Line for I2C communication |
| 3 | SCL | Serial Clock Line for I2C communication |
| 4 | ALERT | Alert output for temperature threshold detection |
| 5 | ADD0 | Address select pin (sets I2C address) |
| 6 | V+ | Power supply input (1.4V to 3.6V) |
Usage Instructions
The TMP102 is straightforward to use in a circuit, thanks to its I2C interface. Below are the steps and considerations for integrating the TMP102 into your project.
Circuit Connection
- Power Supply: Connect the
V+pin to a 1.4V to 3.6V power source and theGNDpin to ground. - I2C Communication:
- Connect the
SDApin to the I2C data line of your microcontroller. - Connect the
SCLpin to the I2C clock line of your microcontroller. - Use pull-up resistors (typically 4.7kΩ) on both
SDAandSCLlines.
- Connect the
- Address Selection: Use the
ADD0pin to set the I2C address:- Connect
ADD0to GND for address0x48. - Connect
ADD0to V+ for address0x49.
- Connect
- Optional Alert Pin: The
ALERTpin can be used to trigger an interrupt when the temperature exceeds a user-defined threshold.
Example Code for Arduino UNO
Below is an example of how to interface the TMP102 with an Arduino UNO to read temperature data:
#include <Wire.h> // Include the Wire library for I2C communication

#define TMP102_ADDRESS 0x48 // Default I2C address of TMP102

void setup() {
  Wire.begin(); // Initialize I2C communication
  Serial.begin(9600); // Start serial communication for debugging
}

void loop() {
  float temperature = readTemperature(); // Read temperature from TMP102
  Serial.print("Temperature: ");
  Serial.print(temperature);
  Serial.println(" °C");
  delay(1000); // Wait for 1 second before reading again
}

float readTemperature() {
  Wire.beginTransmission(TMP102_ADDRESS); // Start communication with TMP102
  Wire.write(0x00); // Point to the temperature register
  Wire.endTransmission();

  Wire.requestFrom(TMP102_ADDRESS, 2); // Request 2 bytes of data
  if (Wire.available() == 2) {
    // Read the two bytes of temperature data
    byte msb = Wire.read(); // Most significant byte
    byte lsb = Wire.read(); // Least significant byte

    // Combine the bytes and convert to temperature
    int16_t rawTemperature = ((msb << 8) | lsb) >> 4;
    return rawTemperature * 0.0625; // Convert to Celsius
  }
  return NAN; // Return NaN if data is not available
}
Best Practices
- Use decoupling capacitors (e.g., 0.1 µF) near the
V+pin to stabilize the power supply. - Ensure proper pull-up resistors are used on the I2C lines.
- Avoid placing the TMP102 near heat sources to prevent inaccurate readings.
- Use the shutdown mode to conserve power in battery-operated applications.
Troubleshooting and FAQs
Common Issues
No Data from TMP102:
- Ensure the I2C address matches the configuration of the
ADD0pin. - Verify that pull-up resistors are connected to the
SDAandSCLlines. - Check the wiring for loose or incorrect connections.
- Ensure the I2C address matches the configuration of the
Inaccurate Temperature Readings:
- Ensure the sensor is not exposed to external heat sources.
- Verify that the power supply voltage is within the specified range (1.4V to 3.6V).
I2C Communication Errors:
- Confirm that the microcontroller and TMP102 share a common ground.
- Check the I2C clock speed; the TMP102 supports up to 400 kHz.
FAQs
Q: Can the TMP102 measure negative temperatures?
A: Yes, the TMP102 can measure temperatures as low as -40°C. Negative values are represented in two's complement format.
Q: What is the maximum cable length for I2C communication with the TMP102?
A: The maximum cable length depends on the pull-up resistor values and the I2C clock speed. For longer cables, use lower pull-up resistor values and slower clock speeds.
Q: How do I set temperature thresholds for the ALERT pin?
A: The TMP102 allows you to configure high and low temperature thresholds via its configuration registers. Refer to the TMP102 datasheet for details on register settings.
Q: Can I use the TMP102 with a 5V microcontroller?
A: Yes, but you must use level shifters or voltage dividers to ensure the I2C lines operate within the TMP102's voltage range (1.4V to 3.6V).