Cirkit Designer Logo
Cirkit Designer
Your all-in-one circuit design IDE
Home / 
Component Documentation

How to Use Adafruit 16 NeoPixel Ring: Examples, Pinouts, and Specs

Image of Adafruit 16 NeoPixel Ring
Cirkit Designer LogoDesign with Adafruit 16 NeoPixel Ring in Cirkit Designer

Introduction

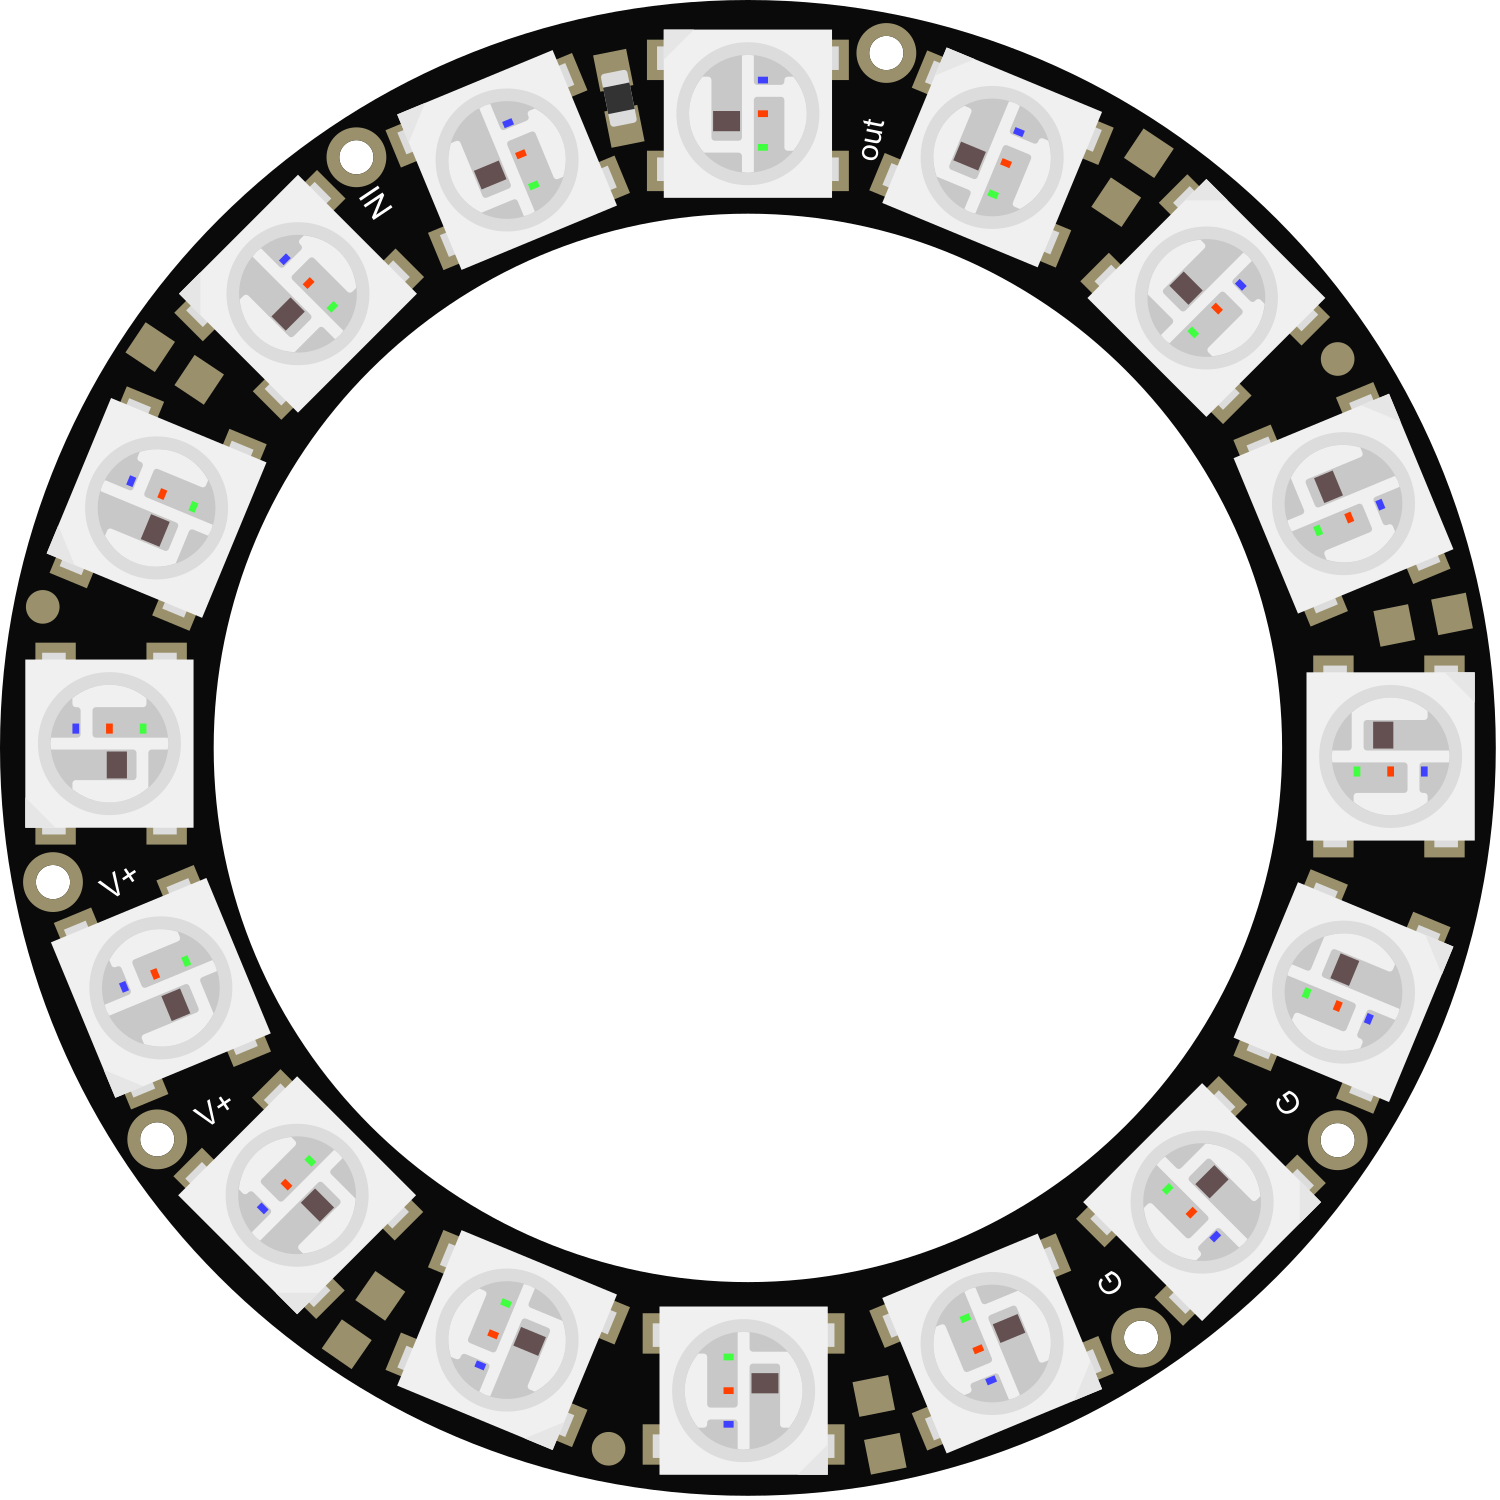
The Adafruit 16 NeoPixel Ring is a versatile and vibrant lighting solution that consists of a circular array of 16 individually addressable RGB LEDs. Each LED on the ring can be controlled independently, allowing for a wide range of color and brightness combinations. This component is widely used in wearable technology, decorative lighting, and interactive projects that require visual feedback.

Explore Projects Built with Adafruit 16 NeoPixel Ring

Use Cirkit Designer to design, explore, and prototype these projects online. Some projects support real-time simulation. Click "Open Project" to start designing instantly!
Arduino UNO Controlled NeoPixel Ring Light Show
Image of 6 Ring Series: A project utilizing Adafruit 16 NeoPixel Ring in a practical application
This circuit consists of an Arduino UNO microcontroller connected to six Adafruit 12 NeoPixel Rings, each with 12 LEDs, for a total of 72 LEDs. The Arduino controls the LEDs to display a yellow color with varying brightness, creating a pulsating effect.
Cirkit Designer LogoOpen Project in Cirkit Designer
Arduino-Controlled NeoPixel LED Display with Voltage Regulation
Image of KK project: A project utilizing Adafruit 16 NeoPixel Ring in a practical application
This circuit features an Arduino 101 controlling multiple individually addressable Adafruit NeoPixel LED rings, with power regulation and decoupling provided by 7805 voltage regulators and electrolytic capacitors, all powered by a 12V battery.
Cirkit Designer LogoOpen Project in Cirkit Designer
Arduino-Controlled NeoPixel Light Display with Rocker Switch
Image of EXP: A project utilizing Adafruit 16 NeoPixel Ring in a practical application
This circuit features an Arduino UNO microcontroller connected to an Adafruit 12 NeoPixel Ring and controlled by an SPST rocker switch. The switch enables or disables the signal from the Arduino to the NeoPixel Ring, which is powered by the Arduino's 5V output. The Arduino is programmed to interact with the NeoPixel Ring, potentially to control the lighting patterns or color output.
Cirkit Designer LogoOpen Project in Cirkit Designer
Wi-Fi Controlled Smart Target System with ESP8266 and NeoPixel Ring
Image of ETT: A project utilizing Adafruit 16 NeoPixel Ring in a practical application
This circuit is a smart target system that uses an ESP8266 NodeMCU to control an Adafruit NeoPixel Ring, a piezo buzzer, and sensors (vibration and sound) to detect hits. The system connects to a Wi-Fi network and communicates with a server to report hit events and receive configuration updates, utilizing an RS-485 module for additional communication capabilities.
Cirkit Designer LogoOpen Project in Cirkit Designer

Explore Projects Built with Adafruit 16 NeoPixel Ring

Use Cirkit Designer to design, explore, and prototype these projects online. Some projects support real-time simulation. Click "Open Project" to start designing instantly!
Image of 6 Ring Series: A project utilizing Adafruit 16 NeoPixel Ring in a practical application
Arduino UNO Controlled NeoPixel Ring Light Show
This circuit consists of an Arduino UNO microcontroller connected to six Adafruit 12 NeoPixel Rings, each with 12 LEDs, for a total of 72 LEDs. The Arduino controls the LEDs to display a yellow color with varying brightness, creating a pulsating effect.
Cirkit Designer LogoOpen Project in Cirkit Designer
Image of KK project: A project utilizing Adafruit 16 NeoPixel Ring in a practical application
Arduino-Controlled NeoPixel LED Display with Voltage Regulation
This circuit features an Arduino 101 controlling multiple individually addressable Adafruit NeoPixel LED rings, with power regulation and decoupling provided by 7805 voltage regulators and electrolytic capacitors, all powered by a 12V battery.
Cirkit Designer LogoOpen Project in Cirkit Designer
Image of EXP: A project utilizing Adafruit 16 NeoPixel Ring in a practical application
Arduino-Controlled NeoPixel Light Display with Rocker Switch
This circuit features an Arduino UNO microcontroller connected to an Adafruit 12 NeoPixel Ring and controlled by an SPST rocker switch. The switch enables or disables the signal from the Arduino to the NeoPixel Ring, which is powered by the Arduino's 5V output. The Arduino is programmed to interact with the NeoPixel Ring, potentially to control the lighting patterns or color output.
Cirkit Designer LogoOpen Project in Cirkit Designer
Image of ETT: A project utilizing Adafruit 16 NeoPixel Ring in a practical application
Wi-Fi Controlled Smart Target System with ESP8266 and NeoPixel Ring
This circuit is a smart target system that uses an ESP8266 NodeMCU to control an Adafruit NeoPixel Ring, a piezo buzzer, and sensors (vibration and sound) to detect hits. The system connects to a Wi-Fi network and communicates with a server to report hit events and receive configuration updates, utilizing an RS-485 module for additional communication capabilities.
Cirkit Designer LogoOpen Project in Cirkit Designer

Common Applications and Use Cases

  • Wearable electronics and fashion accessories
  • Decorative lighting and art installations
  • Indicators and notifications for devices
  • Interactive displays and games

Technical Specifications

Key Technical Details

  • Operating Voltage: 5V DC
  • Max Current per LED: 60mA (with all LEDs at full brightness)
  • Max Power Consumption: ~960mA (entire ring with all LEDs at full brightness)
  • LED Type: WS2812 or equivalent integrated RGB LEDs
  • Communication Protocol: Single-wire digital control interface

Pin Configuration and Descriptions

Pin Number Name Description
1 VDD Power supply (5V DC)
2 GND Ground connection
3 DIN Digital input signal
4 DOUT Digital output signal (for chaining multiple rings)

Usage Instructions

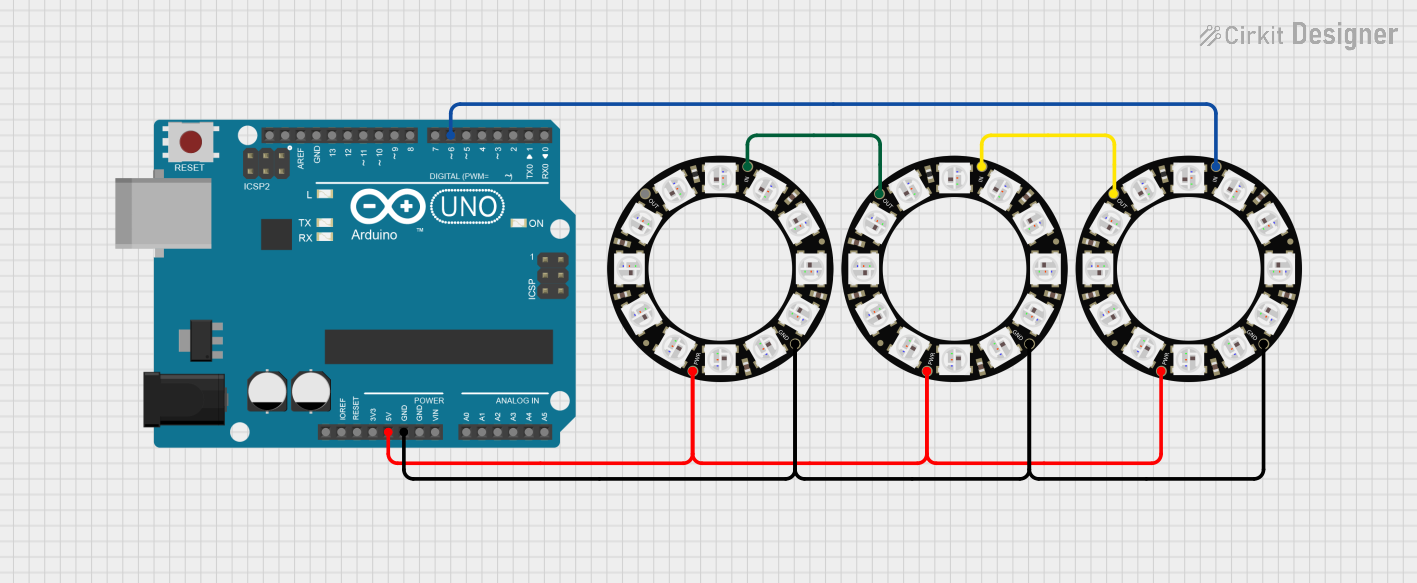
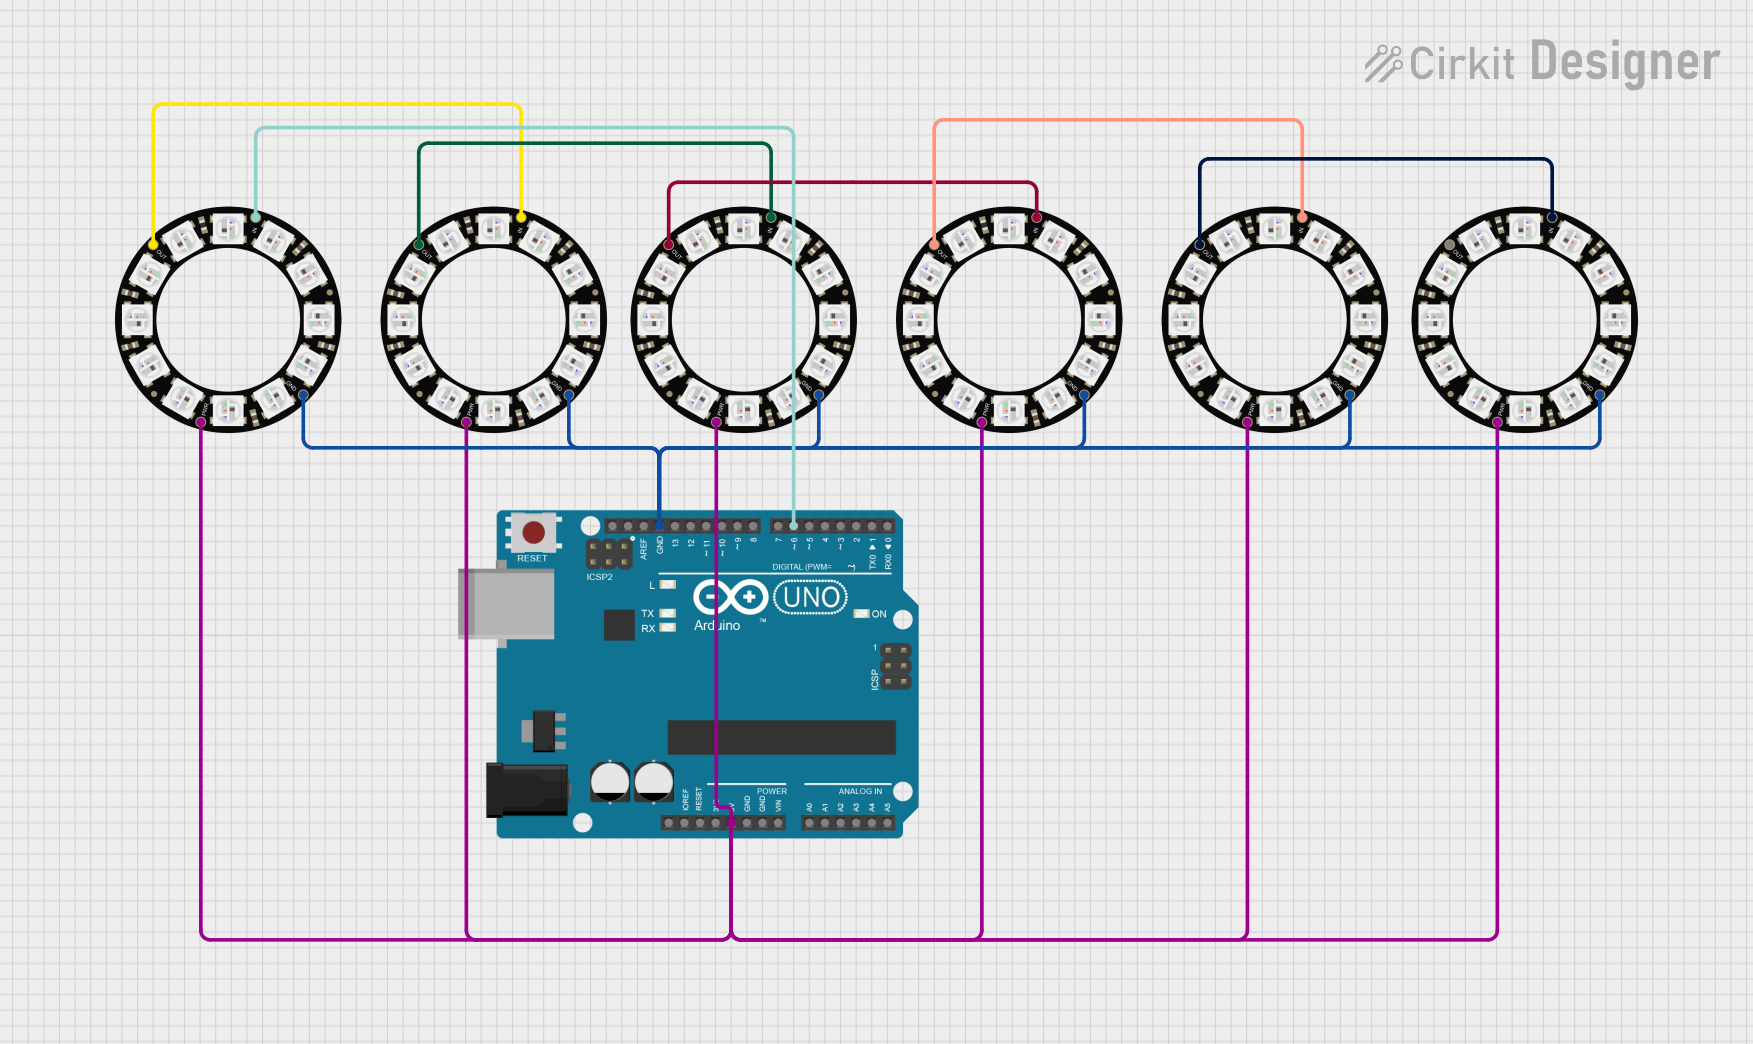
How to Use the Component in a Circuit

  1. Connect the VDD pin to a 5V power supply.
  2. Connect the GND pin to the ground of the power supply.
  3. Connect the DIN pin to a digital output pin on a microcontroller, such as an Arduino UNO.
  4. (Optional) If chaining multiple NeoPixel rings, connect the DOUT pin of the first ring to the DIN pin of the next.

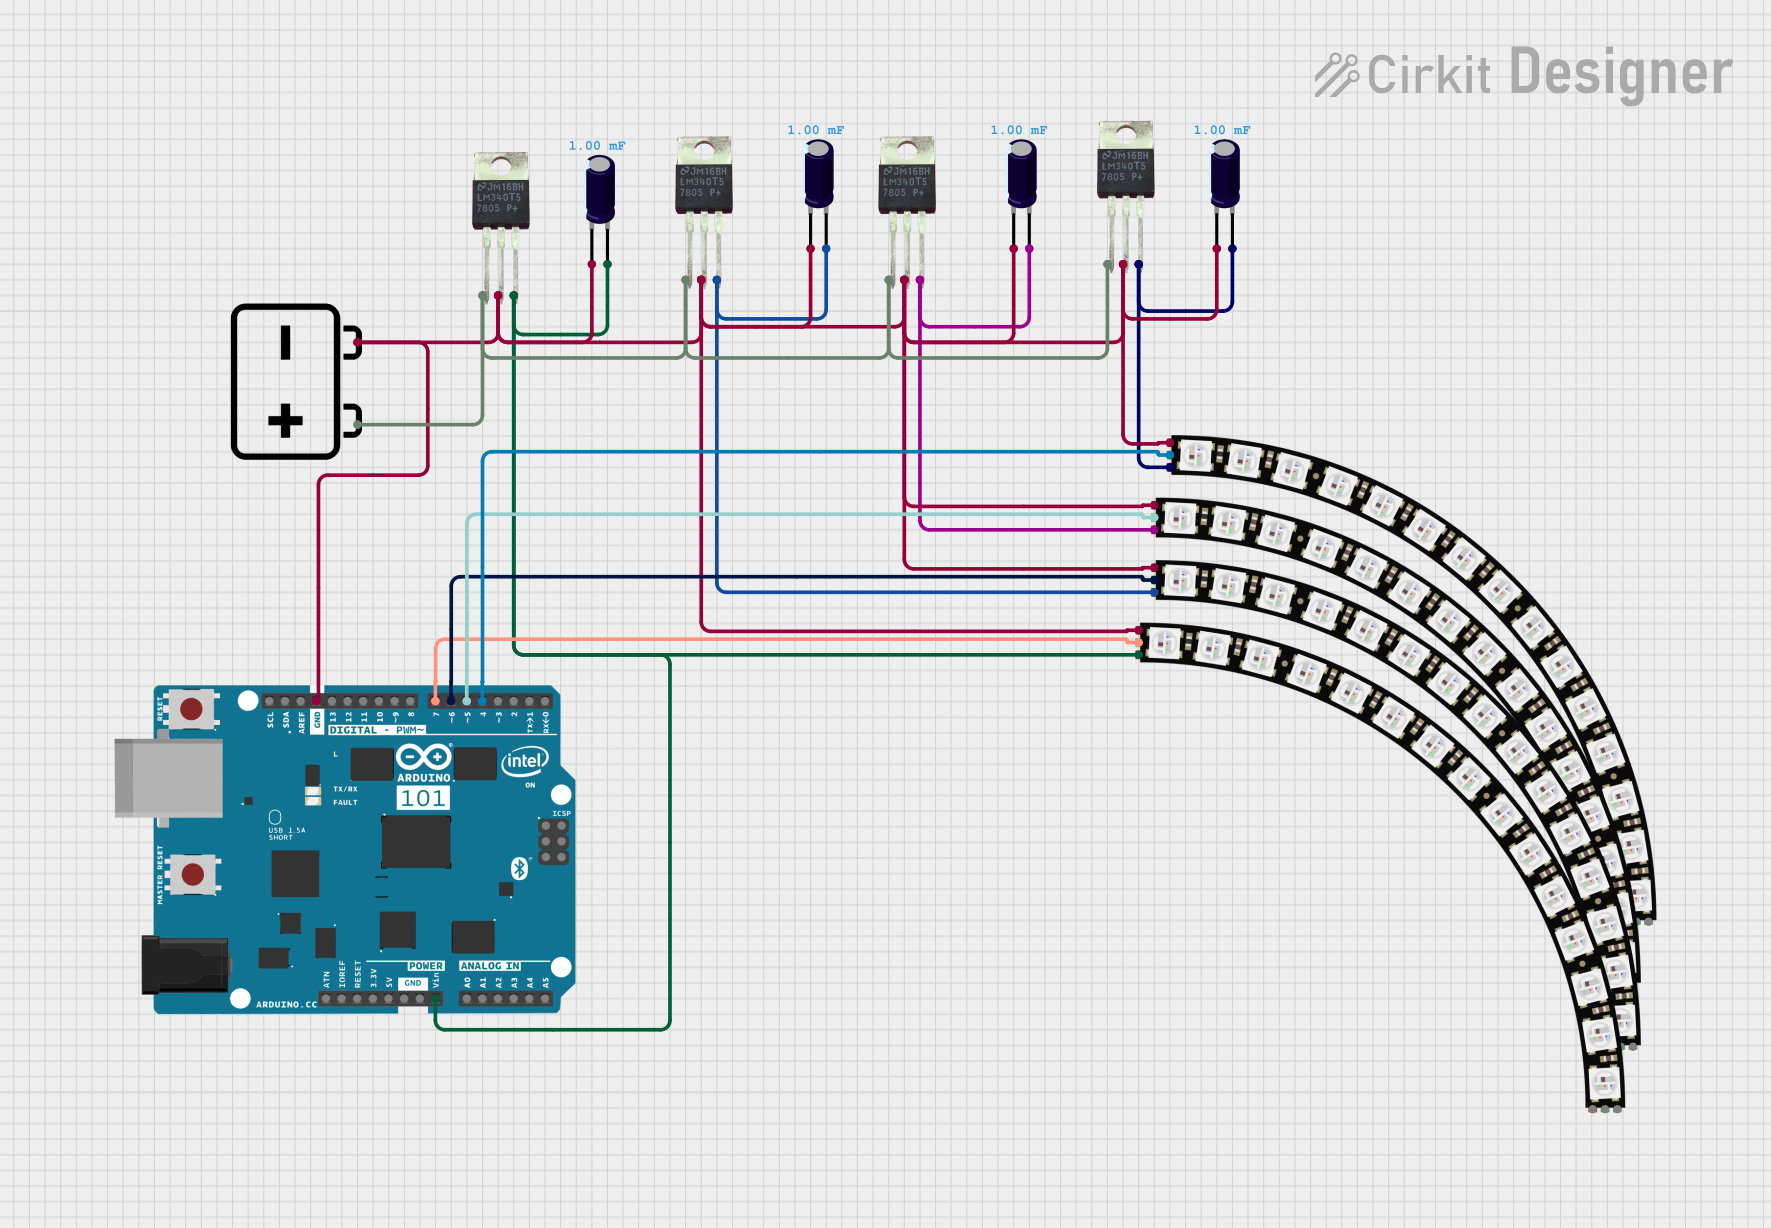
Important Considerations and Best Practices

  • Always use a current-limiting resistor (typically 300-500 ohms) on the DIN pin to prevent potential damage to the first LED.
  • Include a large capacitor (1000µF, 6.3V or higher) across the power supply terminals to smooth out power supply fluctuations.
  • Ensure that the power supply can handle the maximum current draw when all LEDs are at full brightness.
  • Avoid powering the NeoPixel Ring directly from the Arduino's 5V pin if all LEDs will be used at high brightness levels.
  • Use a separate power supply for larger installations or when chaining multiple rings.

Example Arduino Code

#include <Adafruit_NeoPixel.h>

#define PIN            6 // Define the digital I/O pin for the data signal
#define NUMPIXELS      16 // Number of NeoPixels in the ring

// Initialize the NeoPixel ring
Adafruit_NeoPixel pixels(NUMPIXELS, PIN, NEO_GRB + NEO_KHZ800);

void setup() {
  pixels.begin(); // Initialize the NeoPixel library
}

void loop() {
  for(int i=0; i<NUMPIXELS; i++) {
    pixels.setPixelColor(i, pixels.Color(255,0,0)); // Set the pixel to red
    pixels.show(); // Update the ring with the new color
    delay(50);
    pixels.setPixelColor(i, pixels.Color(0,0,0)); // Turn off the pixel
  }
}

Troubleshooting and FAQs

Common Issues Users Might Face

  • LEDs not lighting up: Check connections, ensure the power supply is 5V, and the current-limiting resistor is in place.
  • Incorrect colors displayed: Verify that the data signal is correctly connected and that the NeoPixel library is properly initialized in the code.
  • Flickering LEDs: This can be due to power supply issues. Ensure the power supply is stable and the capacitor is in place.

Solutions and Tips for Troubleshooting

  • Double-check wiring, especially the ground connection between the NeoPixel Ring and the microcontroller.
  • Use a multimeter to verify the voltage levels at the VDD and GND pins.
  • Ensure that the Arduino library for NeoPixel is up to date and correctly included in your project.
  • Reduce the brightness of the LEDs in your code to lower the overall current draw.

FAQs

Q: Can I power the NeoPixel Ring directly from the Arduino? A: It is possible for small-scale testing with low brightness, but for full brightness or multiple rings, use an external power supply.

Q: How many NeoPixel Rings can I chain together? A: This depends on the power supply capacity and the microcontroller's memory for storing the LED states. Ensure that the total current does not exceed the power supply's limit.

Q: Can I cut the NeoPixel Ring if I need fewer LEDs? A: No, the NeoPixel Ring is designed as a closed loop and should not be cut. Use individual NeoPixel LEDs if a custom arrangement is required.