Cirkit Designer Logo
Cirkit Designer
Your all-in-one circuit design IDE
Home / 
Component Documentation

How to Use Blood Pressure Sensor: Examples, Pinouts, and Specs

Image of Blood Pressure Sensor
Cirkit Designer LogoDesign with Blood Pressure Sensor in Cirkit Designer

Introduction

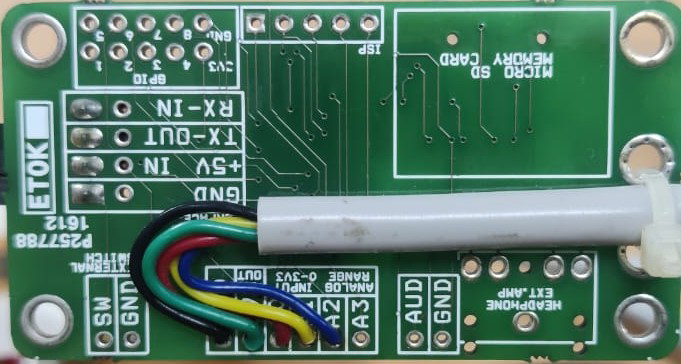
The Blood Pressure Sensor (Manufacturer: Sunrom, Part ID: 1437) is a device designed to measure the pressure of blood in the arteries. It is commonly used in medical and health monitoring applications to assess cardiovascular health. This sensor provides an analog output proportional to the blood pressure, making it suitable for integration into microcontroller-based systems for real-time monitoring and data logging.

Explore Projects Built with Blood Pressure Sensor

Use Cirkit Designer to design, explore, and prototype these projects online. Some projects support real-time simulation. Click "Open Project" to start designing instantly!
Arduino BMP180 Tire Pressure Monitoring System with LCD Display and NRF24L01 Wireless Transmission
Image of TPMS: A project utilizing Blood Pressure Sensor in a practical application
This circuit is designed for a Tire Pressure Monitoring System using an ATmega328P microcontroller. It reads temperature and pressure data from BMP180 sensors, displays the readings on a 16x2 LCD, and transmits the data wirelessly via an NRF24L01 module. The circuit is powered by a 5V battery, with a 3.3V battery specifically for the NRF24L01, and includes a resistor for the LCD backlight.
Cirkit Designer LogoOpen Project in Cirkit Designer
Arduino UNO and ESP8266-Based Smart Water Monitoring System with Wi-Fi Connectivity
Image of automatic water leak detection: A project utilizing Blood Pressure Sensor in a practical application
This circuit monitors water pressure and flow using a Gravity Analog Water Pressure Sensor and a water flow sensor, interfaced with an Arduino UNO. The Arduino UNO processes the sensor data and communicates with an ESP8266 module for potential wireless data transmission, all powered by a 5V adapter.
Cirkit Designer LogoOpen Project in Cirkit Designer
Wi-Fi Enabled Water Monitoring System with ESP8266
Image of Copy of automatic water leak detection: A project utilizing Blood Pressure Sensor in a practical application
This circuit monitors water pressure and flow using a Gravity analog water pressure sensor and a water flow sensor, respectively. The sensors are powered by a 5V adapter and their signals are read by an ESP8266 microcontroller, which can process and transmit the data for further use.
Cirkit Designer LogoOpen Project in Cirkit Designer
Wi-Fi Enabled Water Monitoring System with ESP8266
Image of automatic water leak detection: A project utilizing Blood Pressure Sensor in a practical application
This circuit monitors water pressure and flow using a Gravity analog water pressure sensor and a water flow sensor, respectively. The sensors are powered by a 5V adapter and their signals are read by an ESP8266 microcontroller, which can process and transmit the data for further use.
Cirkit Designer LogoOpen Project in Cirkit Designer

Explore Projects Built with Blood Pressure Sensor

Use Cirkit Designer to design, explore, and prototype these projects online. Some projects support real-time simulation. Click "Open Project" to start designing instantly!
Image of TPMS: A project utilizing Blood Pressure Sensor in a practical application
Arduino BMP180 Tire Pressure Monitoring System with LCD Display and NRF24L01 Wireless Transmission
This circuit is designed for a Tire Pressure Monitoring System using an ATmega328P microcontroller. It reads temperature and pressure data from BMP180 sensors, displays the readings on a 16x2 LCD, and transmits the data wirelessly via an NRF24L01 module. The circuit is powered by a 5V battery, with a 3.3V battery specifically for the NRF24L01, and includes a resistor for the LCD backlight.
Cirkit Designer LogoOpen Project in Cirkit Designer
Image of automatic water leak detection: A project utilizing Blood Pressure Sensor in a practical application
Arduino UNO and ESP8266-Based Smart Water Monitoring System with Wi-Fi Connectivity
This circuit monitors water pressure and flow using a Gravity Analog Water Pressure Sensor and a water flow sensor, interfaced with an Arduino UNO. The Arduino UNO processes the sensor data and communicates with an ESP8266 module for potential wireless data transmission, all powered by a 5V adapter.
Cirkit Designer LogoOpen Project in Cirkit Designer
Image of Copy of automatic water leak detection: A project utilizing Blood Pressure Sensor in a practical application
Wi-Fi Enabled Water Monitoring System with ESP8266
This circuit monitors water pressure and flow using a Gravity analog water pressure sensor and a water flow sensor, respectively. The sensors are powered by a 5V adapter and their signals are read by an ESP8266 microcontroller, which can process and transmit the data for further use.
Cirkit Designer LogoOpen Project in Cirkit Designer
Image of automatic water leak detection: A project utilizing Blood Pressure Sensor in a practical application
Wi-Fi Enabled Water Monitoring System with ESP8266
This circuit monitors water pressure and flow using a Gravity analog water pressure sensor and a water flow sensor, respectively. The sensors are powered by a 5V adapter and their signals are read by an ESP8266 microcontroller, which can process and transmit the data for further use.
Cirkit Designer LogoOpen Project in Cirkit Designer

Common Applications and Use Cases

  • Medical devices for blood pressure monitoring
  • Wearable health monitoring systems
  • Research and development in biomedical engineering
  • Home healthcare devices
  • IoT-based health monitoring solutions

Technical Specifications

The following table outlines the key technical details of the Sunrom 1437 Blood Pressure Sensor:

Parameter Value
Operating Voltage 5V DC
Output Signal Analog voltage (0-5V)
Pressure Range 0 to 300 mmHg
Accuracy ±3 mmHg
Operating Temperature 10°C to 50°C
Interface Type Analog
Dimensions 50mm x 30mm x 15mm

Pin Configuration and Descriptions

The Sunrom 1437 Blood Pressure Sensor has a 3-pin interface. The pin configuration is as follows:

Pin Name Description
1 VCC Power supply input (5V DC)
2 GND Ground connection
3 OUT Analog output signal proportional to blood pressure

Usage Instructions

How to Use the Component in a Circuit

  1. Power the Sensor: Connect the VCC pin to a 5V DC power supply and the GND pin to the ground of your circuit.
  2. Read the Output: Connect the OUT pin to an analog input pin of a microcontroller (e.g., Arduino UNO) to read the sensor's output voltage.
  3. Calibrate the Sensor: Use a known reference to calibrate the sensor for accurate blood pressure readings. The output voltage corresponds to the measured pressure in mmHg.
  4. Process the Data: Use the microcontroller to convert the analog signal into meaningful blood pressure values using the sensor's specifications.

Important Considerations and Best Practices

  • Ensure the sensor is powered with a stable 5V DC supply to avoid inaccurate readings.
  • Avoid exposing the sensor to temperatures outside the operating range (10°C to 50°C).
  • Use proper shielding and grounding to minimize noise in the analog output signal.
  • Regularly calibrate the sensor to maintain accuracy over time.
  • Handle the sensor carefully to avoid physical damage to the sensitive components.

Example Code for Arduino UNO

Below is an example code snippet to interface the Sunrom 1437 Blood Pressure Sensor with an Arduino UNO:

// Define the analog pin connected to the sensor's OUT pin
const int sensorPin = A0;

// Variable to store the sensor's analog output
int sensorValue = 0;

void setup() {
  // Initialize serial communication for debugging
  Serial.begin(9600);
}

void loop() {
  // Read the analog value from the sensor
  sensorValue = analogRead(sensorPin);

  // Convert the analog value (0-1023) to voltage (0-5V)
  float voltage = sensorValue * (5.0 / 1023.0);

  // Convert the voltage to blood pressure in mmHg
  // Assuming a linear relationship: 0V = 0 mmHg, 5V = 300 mmHg
  float bloodPressure = (voltage / 5.0) * 300.0;

  // Print the blood pressure value to the Serial Monitor
  Serial.print("Blood Pressure: ");
  Serial.print(bloodPressure);
  Serial.println(" mmHg");

  // Wait for 1 second before the next reading
  delay(1000);
}

Troubleshooting and FAQs

Common Issues Users Might Face

  1. No Output Signal:

    • Cause: Incorrect wiring or insufficient power supply.
    • Solution: Verify the connections and ensure the sensor is powered with 5V DC.
  2. Inaccurate Readings:

    • Cause: Sensor not calibrated or exposed to electrical noise.
    • Solution: Calibrate the sensor using a known reference and ensure proper grounding.
  3. Fluctuating Output:

    • Cause: Unstable power supply or environmental interference.
    • Solution: Use a regulated power supply and minimize external noise sources.
  4. Sensor Not Responding:

    • Cause: Operating outside the specified temperature range.
    • Solution: Ensure the sensor is used within the 10°C to 50°C range.

Solutions and Tips for Troubleshooting

  • Double-check all connections and ensure the sensor is properly interfaced with the microcontroller.
  • Use a multimeter to measure the output voltage directly from the sensor to verify its functionality.
  • If the sensor is not working as expected, consult the manufacturer's datasheet for additional details and troubleshooting steps.

By following this documentation, users can effectively integrate the Sunrom 1437 Blood Pressure Sensor into their projects and achieve accurate blood pressure monitoring.