How to Use A-Star 32UA Mini LV: Examples, Pinouts, and Specs

Introduction
The A-Star 32U4 Mini LV is a compact, high-performance microcontroller board designed and manufactured by Pololu. It is based on the ATmega32U4 microcontroller, which features built-in USB functionality, making it ideal for a wide range of embedded applications. The board is equipped with multiple I/O pins, supports a variety of sensors and actuators, and operates at low voltages, making it particularly suitable for robotics, IoT devices, and other low-power projects.
Explore Projects Built with A-Star 32UA Mini LV

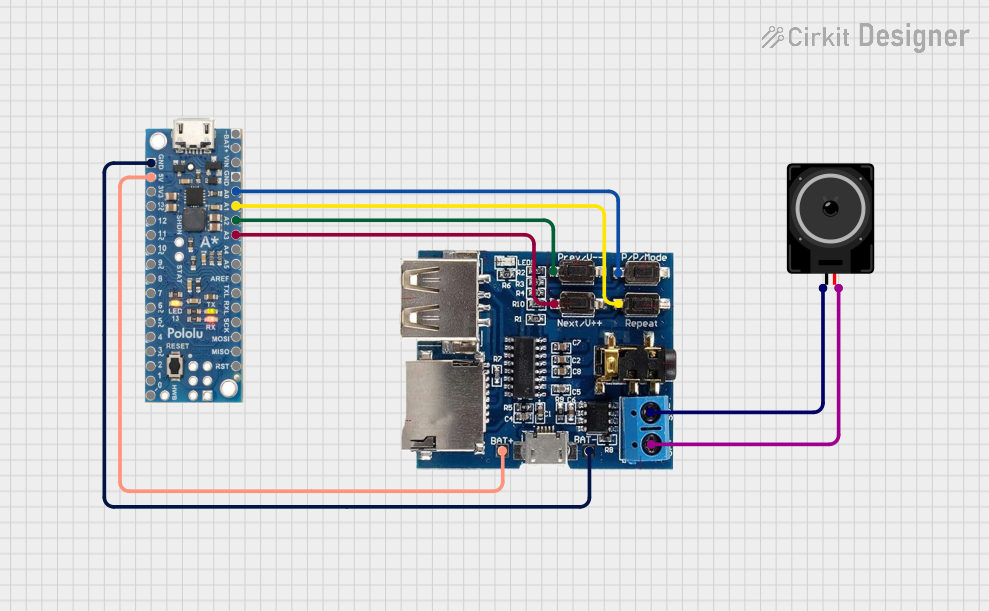
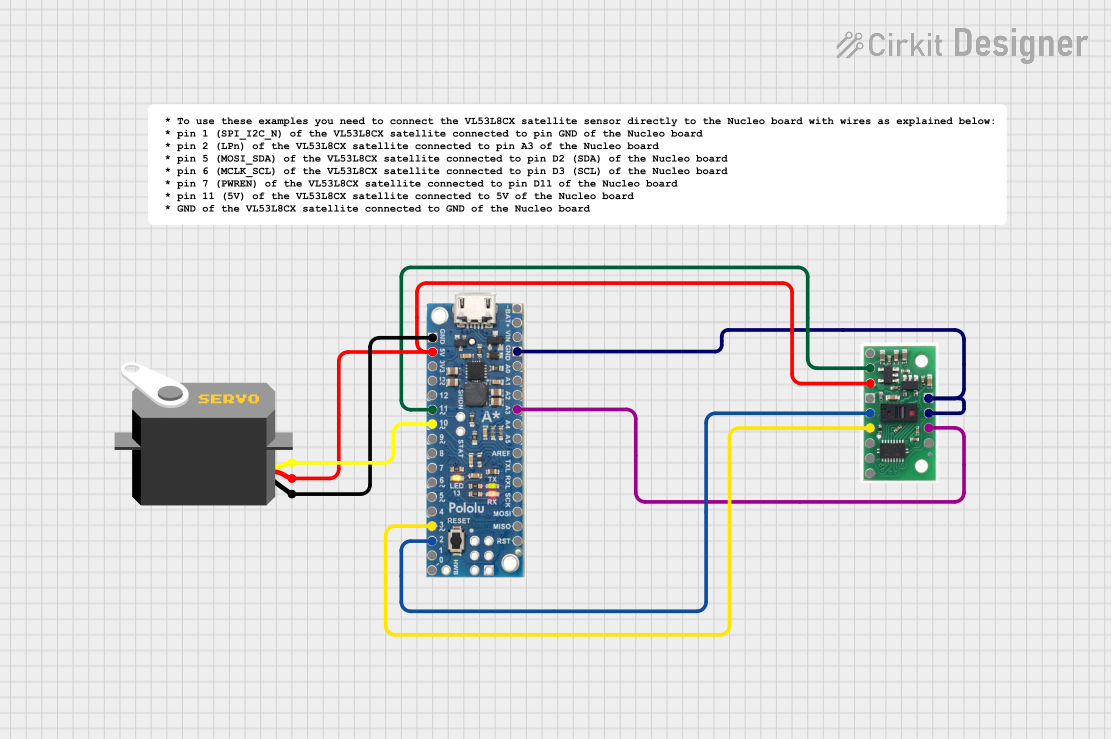
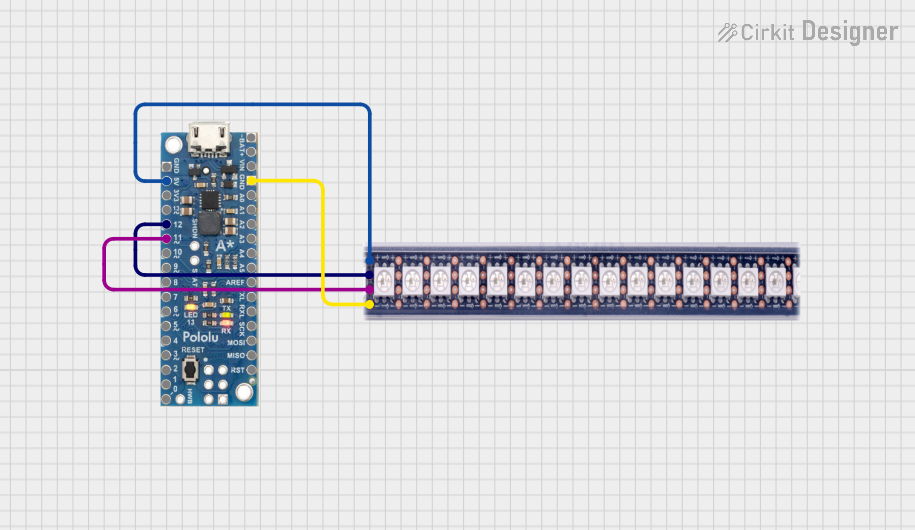
Explore Projects Built with A-Star 32UA Mini LV
Common Applications and Use Cases
- Robotics and automation systems
- IoT (Internet of Things) devices
- Sensor data acquisition and processing
- Motor control and actuator interfacing
- Prototyping and educational projects
Technical Specifications
The following table outlines the key technical details of the A-Star 32U4 Mini LV:
| Parameter | Specification |
|---|---|
| Microcontroller | ATmega32U4 |
| Operating Voltage | 2.7 V to 5.5 V |
| Clock Speed | 16 MHz |
| Flash Memory | 32 KB (4 KB used by bootloader) |
| SRAM | 2.5 KB |
| EEPROM | 1 KB |
| Digital I/O Pins | 26 (7 can be used as PWM outputs) |
| Analog Input Pins | 12 (10-bit resolution) |
| USB Connectivity | Native USB (micro-USB connector) |
| Communication Interfaces | UART, I2C, SPI |
| Dimensions | 1.2" × 0.6" (30.5 mm × 15.2 mm) |
| Weight | 1.2 g |
Pin Configuration and Descriptions
The A-Star 32U4 Mini LV features a total of 26 I/O pins. The table below provides a detailed description of the pin functions:
| Pin | Function | Description |
|---|---|---|
| VIN | Power Input | Input voltage (2.7 V to 11.8 V) for powering the board. |
| GND | Ground | Ground connection. |
| VCC | Regulated Power Output | 5 V or 3.3 V regulated output, depending on the operating voltage. |
| A0–A11 | Analog Inputs | 12 analog input pins with 10-bit resolution. |
| D0–D13 | Digital I/O | 14 digital I/O pins, 7 of which support PWM output. |
| TX/RX | UART Communication | Serial communication pins (TX = transmit, RX = receive). |
| SDA/SCL | I2C Communication | I2C data (SDA) and clock (SCL) pins. |
| MISO | SPI Communication | SPI Master-In-Slave-Out pin. |
| MOSI | SPI Communication | SPI Master-Out-Slave-In pin. |
| SCK | SPI Communication | SPI clock pin. |
| RST | Reset | Resets the microcontroller. |
Usage Instructions
How to Use the A-Star 32U4 Mini LV in a Circuit
Powering the Board:
- Connect a power source to the VIN pin (2.7 V to 11.8 V) or supply regulated power to the VCC pin.
- Ensure the power source is within the specified voltage range to avoid damaging the board.
Connecting to a Computer:
- Use a micro-USB cable to connect the A-Star 32U4 Mini LV to your computer. The board will appear as a USB device, allowing you to program it using the Arduino IDE or other compatible software.
Programming the Board:
- Install the Pololu A-Star drivers and libraries (available on the Pololu website).
- Select "Arduino Leonardo" as the board type in the Arduino IDE, as the A-Star 32U4 Mini LV is based on the ATmega32U4.
Interfacing with Sensors and Actuators:
- Use the digital and analog I/O pins to connect sensors, motors, LEDs, and other peripherals.
- For communication with other devices, use the UART, I2C, or SPI interfaces.
Important Considerations and Best Practices
- Voltage Levels: Ensure that all connected devices operate within the board's voltage range (2.7 V to 5.5 V).
- Pin Current Limits: Do not exceed the maximum current rating of 40 mA per I/O pin to prevent damage.
- USB Power: When powering the board via USB, ensure that the total current draw of connected devices does not exceed the USB port's limit (typically 500 mA).
Example Code for Arduino UNO
The following example demonstrates how to blink an LED connected to pin 13 of the A-Star 32U4 Mini LV:
// Blink an LED connected to pin 13
const int ledPin = 13; // Define the LED pin

void setup() {
  pinMode(ledPin, OUTPUT); // Set pin 13 as an output
}

void loop() {
  digitalWrite(ledPin, HIGH); // Turn the LED on
  delay(1000);                // Wait for 1 second
  digitalWrite(ledPin, LOW);  // Turn the LED off
  delay(1000);                // Wait for 1 second
}
Troubleshooting and FAQs
Common Issues and Solutions
The board is not recognized by the computer:
- Ensure the USB cable is properly connected and functional.
- Install the required Pololu A-Star drivers.
- Check if the board is in bootloader mode by double-tapping the reset button.
The board is not powering on:
- Verify that the input voltage is within the specified range (2.7 V to 11.8 V).
- Check all power connections and ensure there are no loose wires.
Unable to upload code:
- Ensure the correct board type ("Arduino Leonardo") is selected in the Arduino IDE.
- Verify that the correct COM port is selected.
- Reset the board by pressing the reset button before uploading.
Connected devices are not functioning properly:
- Check the wiring and ensure all connections are secure.
- Verify that the devices are compatible with the board's voltage and current ratings.
FAQs
Q: Can the A-Star 32U4 Mini LV be powered directly from a LiPo battery?
A: Yes, the board can be powered directly from a single-cell LiPo battery (nominal voltage of 3.7 V) via the VIN pin.
Q: Is the A-Star 32U4 Mini LV compatible with Arduino libraries?
A: Yes, the board is fully compatible with most Arduino libraries, as it is based on the ATmega32U4 microcontroller.
Q: How do I reset the board to factory settings?
A: Double-tap the reset button to enter bootloader mode, then re-upload the desired firmware using the Arduino IDE.
Q: Can I use the board for low-power applications?
A: Yes, the A-Star 32U4 Mini LV is designed for low-power operation and can run on voltages as low as 2.7 V.