
How to Use XH-M401: Examples, Pinouts, and Specs
 Design with XH-M401 in Cirkit Designer
Introduction
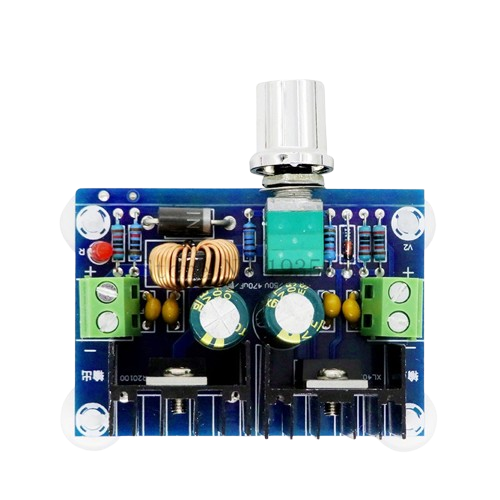
The XH-M401 is a DC-DC buck converter module designed to step down voltage from a higher input level to a lower, stable output level. This module is highly efficient and widely used in power supply circuits for various electronic applications. It is ideal for projects requiring a reliable and adjustable power source, such as powering microcontrollers, sensors, and other low-voltage devices.
Explore Projects Built with XH-M401
 Open Project in Cirkit Designer
 Open Project in Cirkit Designer
 Open Project in Cirkit Designer
 Open Project in Cirkit Designer
Explore Projects Built with XH-M401
Open Project in Cirkit DesignerOpen Project in Cirkit DesignerOpen Project in Cirkit DesignerOpen Project in Cirkit DesignerCommon Applications
- Powering microcontrollers (e.g., Arduino, Raspberry Pi)
- Battery-powered systems
- LED lighting systems
- Robotics and automation
- General-purpose voltage regulation in electronic circuits
Technical Specifications
The XH-M401 module is built for efficiency and flexibility. Below are its key technical details:
Key Specifications
| Parameter | Value |
|---|---|
| Input Voltage Range | 4V to 38V DC |
| Output Voltage Range | 1.25V to 36V DC (adjustable) |
| Maximum Output Current | 5A (with proper heat dissipation) |
| Efficiency | Up to 96% |
| Switching Frequency | 180 kHz |
| Load Regulation | ±0.5% |
| Voltage Regulation | ±0.5% |
| Module Dimensions | 60mm x 26mm x 20mm |
Pin Configuration
The XH-M401 module has four main connection points for input and output. Below is the pin configuration:
| Pin Name | Description |
|---|---|
| VIN+ | Positive input voltage terminal (4V to 38V DC) |
| VIN- | Negative input voltage terminal (GND) |
| VOUT+ | Positive output voltage terminal (1.25V to 36V) |
| VOUT- | Negative output voltage terminal (GND) |
Usage Instructions
How to Use the XH-M401 in a Circuit
Connect the Input Voltage:
- Connect the positive terminal of your power source to the
VIN+pin. - Connect the negative terminal of your power source to the
VIN-pin.
- Connect the positive terminal of your power source to the
Connect the Output Load:
- Connect the positive terminal of your load to the
VOUT+pin. - Connect the negative terminal of your load to the
VOUT-pin.
- Connect the positive terminal of your load to the
Adjust the Output Voltage:
- Use the onboard potentiometer to adjust the output voltage.
- Turn the potentiometer clockwise to increase the output voltage and counterclockwise to decrease it.
- Use a multimeter to measure the output voltage while adjusting.
Ensure Proper Heat Dissipation:
- If the module is operating at high currents (above 2A), attach a heatsink to the onboard regulator to prevent overheating.
Important Considerations
- Input Voltage: Ensure the input voltage is at least 1.5V higher than the desired output voltage for proper operation.
- Current Limit: Do not exceed the maximum output current of 5A. Use a heatsink for high-current applications.
- Polarity: Double-check the polarity of the input and output connections to avoid damaging the module.
- Load Testing: Test the module with a dummy load before connecting sensitive devices.
Example: Using XH-M401 with Arduino UNO
The XH-M401 can be used to power an Arduino UNO by stepping down a 12V input to 5V. Below is an example setup:
- Connect a 12V DC power source to the
VIN+andVIN-pins of the XH-M401. - Adjust the output voltage to 5V using the potentiometer.
- Connect the
VOUT+pin to the Arduino's5Vpin and theVOUT-pin to the Arduino'sGNDpin.
// Example Arduino code to blink an LED using power from the XH-M401 module
// Ensure the XH-M401 output is set to 5V before connecting to the Arduino

int ledPin = 13; // Pin connected to the onboard LED

void setup() {
  pinMode(ledPin, OUTPUT); // Set the LED pin as an output
}

void loop() {
  digitalWrite(ledPin, HIGH); // Turn the LED on
  delay(1000);               // Wait for 1 second
  digitalWrite(ledPin, LOW);  // Turn the LED off
  delay(1000);               // Wait for 1 second
}
Troubleshooting and FAQs
Common Issues and Solutions
No Output Voltage:
- Cause: Incorrect input connections or insufficient input voltage.
- Solution: Verify the polarity of the input connections and ensure the input voltage is within the specified range.
Output Voltage Not Adjustable:
- Cause: Faulty potentiometer or incorrect adjustment.
- Solution: Turn the potentiometer slowly and check the output voltage with a multimeter.
Overheating:
- Cause: High current draw or insufficient heat dissipation.
- Solution: Attach a heatsink to the regulator and ensure proper ventilation.
Load Not Powering On:
- Cause: Output voltage too low or load requires more current than the module can provide.
- Solution: Adjust the output voltage to the required level and ensure the load's current requirement is within the module's capacity.
FAQs
Q1: Can the XH-M401 be used to charge batteries?
A1: Yes, but ensure the output voltage is set to the appropriate charging voltage for the battery type. Use a current-limiting circuit if necessary.
Q2: What is the maximum input voltage for the XH-M401?
A2: The maximum input voltage is 38V DC. Exceeding this limit may damage the module.
Q3: Can I use the XH-M401 to power a Raspberry Pi?
A3: Yes, set the output voltage to 5V and ensure the module can supply at least 2.5A for stable operation.
Q4: Is the XH-M401 isolated?
A4: No, the XH-M401 is a non-isolated buck converter, meaning the input and output share a common ground.
By following this documentation, you can effectively use the XH-M401 module in your projects while avoiding common pitfalls.