Cirkit Designer Logo
Cirkit Designer
Your all-in-one circuit design IDE
Home / 
Component Documentation

How to Use GY-MCU90640: Examples, Pinouts, and Specs

Image of GY-MCU90640
Cirkit Designer LogoDesign with GY-MCU90640 in Cirkit Designer

Introduction

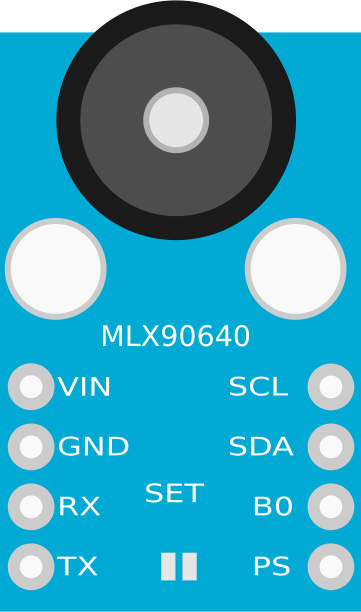
The GY-MCU90640 is a sophisticated thermal imaging sensor module that incorporates the Melexis MLX90640 Far Infrared (FIR) sensor. This module is capable of detecting and measuring temperature variations, which makes it an invaluable tool for a wide range of applications. It is commonly used in thermal imaging cameras, human presence detection, and non-contact temperature measurement systems.

Explore Projects Built with GY-MCU90640

Use Cirkit Designer to design, explore, and prototype these projects online. Some projects support real-time simulation. Click "Open Project" to start designing instantly!
ESP32 and Nextion Touch LCD-Based Thermal Imaging System with GY-MCU90640
Image of Thermal Camera: A project utilizing GY-MCU90640 in a practical application
This circuit integrates an ESP32 microcontroller with a GY-MCU90640 thermal camera and a Nextion Touch LCD display. The ESP32 collects thermal data from the GY-MCU90640 and communicates it to the Nextion display for visualization. Power and ground connections are appropriately managed to ensure proper operation of all components.
Cirkit Designer LogoOpen Project in Cirkit Designer
Battery-Powered Arduino Nano IoT Device with SIM800L and MPU6050
Image of Accedent Detection System: A project utilizing GY-MCU90640 in a practical application
This circuit integrates an Arduino Nano with an MPU6050 accelerometer and gyroscope sensor and a SIM800L GSM module. The Arduino reads sensor data from the MPU6050 via I2C and communicates with the SIM800L for GSM functionalities. Power is managed through a 7805 voltage regulator, converting 3.7V battery input to 5V for the components.
Cirkit Designer LogoOpen Project in Cirkit Designer
Arduino Nano Based GPS Tracker with GSM Communication and Accelerometer
Image of Circuit Aayush: A project utilizing GY-MCU90640 in a practical application
This circuit is designed for communication and location tracking purposes. It features an Arduino Nano interfaced with a SIM800L GSM module for cellular connectivity, a GPS NEO 6M module for obtaining geographical coordinates, and an AITrip ADXL335 GY-61 accelerometer for motion sensing. The LM2596 Step Down Module is used to regulate the power supply to the components.
Cirkit Designer LogoOpen Project in Cirkit Designer
Arduino Nano-Based Wireless Joystick and Motion Controller
Image of hand gesture: A project utilizing GY-MCU90640 in a practical application
This circuit features an Arduino Nano microcontroller interfaced with an HC-05 Bluetooth module, an MPU-6050 accelerometer/gyroscope, and a KY-023 Dual Axis Joystick Module. The Arduino Nano is powered by a 9V battery through a rocker switch and communicates with the HC-05 for Bluetooth connectivity, reads joystick positions from the KY-023 module via analog inputs, and communicates with the MPU-6050 over I2C to capture motion data. The circuit is likely designed for wireless control and motion sensing applications, such as a remote-controlled robot or a game controller.
Cirkit Designer LogoOpen Project in Cirkit Designer

Explore Projects Built with GY-MCU90640

Use Cirkit Designer to design, explore, and prototype these projects online. Some projects support real-time simulation. Click "Open Project" to start designing instantly!
Image of Thermal Camera: A project utilizing GY-MCU90640 in a practical application
ESP32 and Nextion Touch LCD-Based Thermal Imaging System with GY-MCU90640
This circuit integrates an ESP32 microcontroller with a GY-MCU90640 thermal camera and a Nextion Touch LCD display. The ESP32 collects thermal data from the GY-MCU90640 and communicates it to the Nextion display for visualization. Power and ground connections are appropriately managed to ensure proper operation of all components.
Cirkit Designer LogoOpen Project in Cirkit Designer
Image of Accedent Detection System: A project utilizing GY-MCU90640 in a practical application
Battery-Powered Arduino Nano IoT Device with SIM800L and MPU6050
This circuit integrates an Arduino Nano with an MPU6050 accelerometer and gyroscope sensor and a SIM800L GSM module. The Arduino reads sensor data from the MPU6050 via I2C and communicates with the SIM800L for GSM functionalities. Power is managed through a 7805 voltage regulator, converting 3.7V battery input to 5V for the components.
Cirkit Designer LogoOpen Project in Cirkit Designer
Image of Circuit Aayush: A project utilizing GY-MCU90640 in a practical application
Arduino Nano Based GPS Tracker with GSM Communication and Accelerometer
This circuit is designed for communication and location tracking purposes. It features an Arduino Nano interfaced with a SIM800L GSM module for cellular connectivity, a GPS NEO 6M module for obtaining geographical coordinates, and an AITrip ADXL335 GY-61 accelerometer for motion sensing. The LM2596 Step Down Module is used to regulate the power supply to the components.
Cirkit Designer LogoOpen Project in Cirkit Designer
Image of hand gesture: A project utilizing GY-MCU90640 in a practical application
Arduino Nano-Based Wireless Joystick and Motion Controller
This circuit features an Arduino Nano microcontroller interfaced with an HC-05 Bluetooth module, an MPU-6050 accelerometer/gyroscope, and a KY-023 Dual Axis Joystick Module. The Arduino Nano is powered by a 9V battery through a rocker switch and communicates with the HC-05 for Bluetooth connectivity, reads joystick positions from the KY-023 module via analog inputs, and communicates with the MPU-6050 over I2C to capture motion data. The circuit is likely designed for wireless control and motion sensing applications, such as a remote-controlled robot or a game controller.
Cirkit Designer LogoOpen Project in Cirkit Designer

Common Applications and Use Cases

  • Thermal imaging for night vision and heat leakage detection
  • Human presence and movement detection for smart home systems
  • Temperature measurement for industrial process monitoring
  • Overheating detection in electrical circuits and machinery
  • Contactless temperature checks in healthcare applications

Technical Specifications

Key Technical Details

  • Sensor: Melexis MLX90640 FIR Sensor
  • Operating Voltage: 3.3V - 5V
  • Current Consumption: ~23mA (typical)
  • Field of View (FoV): 55° x 35° or 110° x 75° (depending on the model)
  • Measurement Range: -40°C to 300°C
  • Resolution: 0.1°C
  • Interface: I2C
  • Frame Rate: 0.5Hz to 64Hz (configurable)

Pin Configuration and Descriptions

Pin Number Pin Name Description
1 VCC Power supply (3.3V - 5V)
2 GND Ground
3 SCL Serial Clock Line for I2C communication
4 SDA Serial Data Line for I2C communication
5 RX UART Receive (unused for I2C mode)
6 TX UART Transmit (unused for I2C mode)

Usage Instructions

How to Use the Component in a Circuit

  1. Power Supply: Connect the VCC pin to a 3.3V or 5V power source and the GND pin to the ground.
  2. I2C Communication: Connect the SCL and SDA pins to the corresponding I2C clock and data lines on your microcontroller (e.g., Arduino UNO).
  3. Addressing: The default I2C address of the MLX90640 sensor is 0x33. Ensure no address conflicts with other I2C devices on the same bus.

Important Considerations and Best Practices

  • Avoid exposing the sensor to extreme temperatures that exceed its measurement range.
  • Prevent physical contact with the sensor element to avoid damage.
  • Ensure that the power supply is stable and within the specified voltage range.
  • Use pull-up resistors on the I2C lines if they are not already present on the microcontroller board.

Example Code for Arduino UNO

#include <Wire.h>
#include <Adafruit_MLX90640.h>

Adafruit_MLX90640 mlx;

void setup() {
  Serial.begin(9600);
  Wire.begin();
  mlx.begin(MLX90640_I2CADDR_DEFAULT, &Wire);
  mlx.setMode(MLX90640_INTERLEAVED);
  mlx.setResolution(MLX90640_ADC_16BIT);
  mlx.setRefreshRate(MLX90640_2_HZ);
}

void loop() {
  float temp[32 * 24]; // Array to store temperature for each pixel
  mlx.getFrame(temp);
  
  for (int i = 0; i < 24; i++) {
    for (int j = 0; j < 32; j++) {
      Serial.print(temp[j + i * 32], 1);
      Serial.print(", ");
    }
    Serial.println();
  }
  delay(500);
}

Note: The above code uses the Adafruit MLX90640 library, which simplifies the interaction with the sensor. Make sure to install the library before compiling the code.

Troubleshooting and FAQs

Common Issues Users Might Face

  • No Data on I2C: Check connections and ensure that the correct I2C address is used. Also, verify that the power supply is within the specified range.
  • Inaccurate Temperature Readings: Ensure that the sensor is not exposed to rapid temperature changes and that there is no obstruction in front of the sensor's field of view.
  • Sensor Not Detected: Make sure that the sensor is correctly powered and that the SDA and SCL lines are connected properly.

Solutions and Tips for Troubleshooting

  • Use I2C scanner code to confirm the sensor's address and connectivity.
  • Ensure that the ambient temperature is stable for accurate readings.
  • Check for soldering issues or loose connections if the sensor is not detected.

FAQs:

Q: Can the GY-MCU90640 be used with 5V microcontrollers like Arduino UNO? A: Yes, the module can be interfaced with 5V systems as it is 5V tolerant.

Q: How can I change the I2C address of the sensor? A: The I2C address is fixed and cannot be changed.

Q: What is the maximum frame rate of the GY-MCU90640? A: The maximum frame rate is 64Hz, but it can be configured to lower rates to suit the application.

Q: Is it necessary to calibrate the sensor? A: The sensor comes factory-calibrated, but for precise applications, additional calibration may be required.

For further assistance, consult the manufacturer's datasheet and the community forums dedicated to the GY-MCU90640 module.