How to Use 3A Fuse: Examples, Pinouts, and Specs
Introduction
A 3A fuse is a safety device designed to protect electrical circuits by interrupting the flow of current when it exceeds 3 amperes. This prevents damage to sensitive components, reduces the risk of overheating, and minimizes the chance of electrical fires. Fuses are essential in a wide range of applications, from household appliances to automotive systems and industrial equipment.
Explore Projects Built with 3A Fuse


Explore Projects Built with 3A Fuse
Common Applications and Use Cases
- Household Electronics: Protecting devices like chargers, lamps, and small appliances.
- Automotive Systems: Safeguarding circuits in vehicles, such as lighting and infotainment systems.
- Industrial Equipment: Ensuring the safety of control panels and machinery.
- DIY Electronics Projects: Preventing damage to components in custom circuits.
Technical Specifications
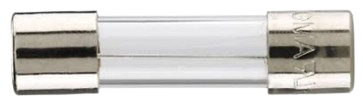
The 3A fuse is available in various types, such as glass tube, ceramic, and blade fuses. Below are the general specifications:
| Parameter | Value |
|---|---|
| Rated Current | 3 Amperes |
| Rated Voltage | Typically 250V AC or 32V DC |
| Breaking Capacity | Varies (e.g., 35A, 100A) |
| Fuse Type | Fast-blow or slow-blow |
| Material | Glass, ceramic, or plastic |
| Dimensions | Depends on type (e.g., 5x20mm for glass fuses) |
Pin Configuration and Descriptions
Fuses do not have traditional pins like ICs or transistors. Instead, they have two terminals for connection. Below is a description of the terminals:
| Terminal | Description |
|---|---|
| Terminal 1 | Connects to the power source or input side of the circuit. |
| Terminal 2 | Connects to the load or output side of the circuit. |
Usage Instructions
How to Use the 3A Fuse in a Circuit
- Determine the Fuse Type: Choose between fast-blow (for sensitive electronics) or slow-blow (for circuits with inrush currents).
- Select the Fuse Holder: Use a compatible fuse holder or clip for secure installation.
- Insert the Fuse: Place the fuse in series with the circuit's power line. Ensure proper contact with the terminals.
- Verify the Circuit: Double-check the connections and ensure the fuse rating matches the circuit's requirements.
Important Considerations and Best Practices
- Voltage Rating: Ensure the fuse's voltage rating exceeds the circuit's operating voltage.
- Current Rating: The fuse should be rated slightly above the circuit's normal operating current but below the maximum current the circuit can handle.
- Environment: Use ceramic fuses for high-temperature or high-vibration environments.
- Testing: Regularly inspect and test fuses to ensure they are functioning correctly.
- Replacement: Always replace a blown fuse with one of the same type and rating.
Example: Using a 3A Fuse with an Arduino UNO
When connecting an Arduino UNO to a power supply, a 3A fuse can protect the board from overcurrent. Below is an example circuit:
- Connect the positive terminal of the power supply to one terminal of the 3A fuse.
- Connect the other terminal of the fuse to the VIN pin of the Arduino UNO.
- Connect the negative terminal of the power supply to the GND pin of the Arduino UNO.
Here is a simple Arduino sketch to demonstrate a basic setup:
// Example Arduino code to blink an LED
// Ensure a 3A fuse is connected in series with the power supply for protection.

const int ledPin = 13; // Pin connected to the onboard LED

void setup() {
  pinMode(ledPin, OUTPUT); // Set the LED pin as an output
}

void loop() {
  digitalWrite(ledPin, HIGH); // Turn the LED on
  delay(1000);                // Wait for 1 second
  digitalWrite(ledPin, LOW);  // Turn the LED off
  delay(1000);                // Wait for 1 second
}
Troubleshooting and FAQs
Common Issues
Fuse Blows Frequently:
- Cause: The circuit's current exceeds the fuse's rating.
- Solution: Check for short circuits or reduce the load on the circuit. Use a higher-rated fuse if appropriate.
Fuse Does Not Blow When Expected:
- Cause: The fuse rating is too high for the circuit.
- Solution: Replace the fuse with one that matches the circuit's requirements.
Fuse Holder Overheats:
- Cause: Poor contact between the fuse and holder.
- Solution: Ensure the fuse is securely seated and the holder is clean and undamaged.
FAQs
Q: Can I use a 3A fuse in a 5A circuit?
A: No, the fuse will blow if the current exceeds 3A, which may not be suitable for a 5A circuit. Use a fuse rated for 5A instead.Q: What is the difference between fast-blow and slow-blow fuses?
A: Fast-blow fuses respond quickly to overcurrent, while slow-blow fuses tolerate short surges before blowing.Q: How do I test if a fuse is blown?
A: Use a multimeter in continuity mode. If the fuse is intact, the multimeter will beep or show a low resistance value. If blown, it will show no continuity.
By following this documentation, you can safely and effectively use a 3A fuse in your circuits.