Cirkit Designer Logo
Cirkit Designer
Your all-in-one circuit design IDE
Home / 
Component Documentation

How to Use lilypad battery holder: Examples, Pinouts, and Specs

Image of lilypad battery holder
Cirkit Designer LogoDesign with lilypad battery holder in Cirkit Designer

Introduction

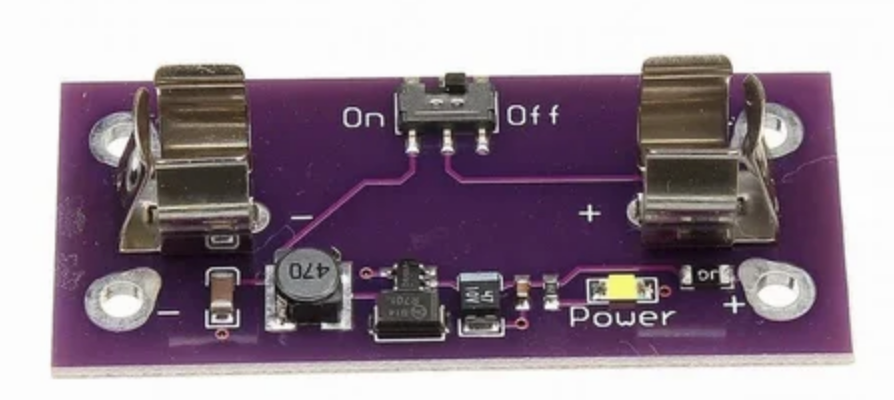
The LilyPad Battery Holder is a specialized component designed to securely hold and connect a battery to a LilyPad Arduino board. This component ensures a stable power supply to your wearable electronics projects, making it an essential part of any LilyPad-based circuit. Its compact and lightweight design makes it ideal for e-textiles and wearable technology applications.

Explore Projects Built with lilypad battery holder

Use Cirkit Designer to design, explore, and prototype these projects online. Some projects support real-time simulation. Click "Open Project" to start designing instantly!
ESP32-WROOM Bluetooth-Enabled Battery-Powered Button Interface with OLED Display
Image of Bluetooth Page Turner: A project utilizing lilypad battery holder in a practical application
This circuit is a Bluetooth-enabled battery monitoring and control system using an ESP32 microcontroller. It features multiple push buttons for user input, an OLED display for showing battery voltage and percentage, and a blue LED for status indication. The system also includes a LiPo charger/booster and a USB Type C power delivery module for power management.
Cirkit Designer LogoOpen Project in Cirkit Designer
Battery-Powered Li-ion Charger with Digital Volt/Ammeter and Buzzer Alert
Image of multimeter: A project utilizing lilypad battery holder in a practical application
This circuit is a battery charging and monitoring system for a Li-ion battery using a TP4056 charger module. It includes a digital volt/ammeter to display the battery voltage and current, and features LEDs and a piezo buzzer for status indication. The circuit also incorporates switches for controlling the power and monitoring functions.
Cirkit Designer LogoOpen Project in Cirkit Designer
ESP32 Mini Battery-Powered OLED Display with RTC and Potentiometer Control
Image of copy ulit nya: A project utilizing lilypad battery holder in a practical application
This circuit is a battery-powered IoT device featuring an ESP32 microcontroller, an OLED display, and an RTC module for timekeeping. It includes a TP4056 for battery charging, a potentiometer for user input, and a pushbutton for resetting the ESP32. The circuit is designed to display information on the OLED and maintain accurate time using the RTC, with power management handled by the TP4056 and voltage regulation by the LM2596 and AMS1117.
Cirkit Designer LogoOpen Project in Cirkit Designer
Battery-Powered Pixhawk Power Module with Rocker Switch Control
Image of power: A project utilizing lilypad battery holder in a practical application
This circuit is designed to power a Pixhawk module using a LiPo battery. The circuit includes a rocker switch to control the power flow from the battery to a power distribution board (PDB), which then supplies 12V to the Pixhawk module.
Cirkit Designer LogoOpen Project in Cirkit Designer

Explore Projects Built with lilypad battery holder

Use Cirkit Designer to design, explore, and prototype these projects online. Some projects support real-time simulation. Click "Open Project" to start designing instantly!
Image of Bluetooth Page Turner: A project utilizing lilypad battery holder in a practical application
ESP32-WROOM Bluetooth-Enabled Battery-Powered Button Interface with OLED Display
This circuit is a Bluetooth-enabled battery monitoring and control system using an ESP32 microcontroller. It features multiple push buttons for user input, an OLED display for showing battery voltage and percentage, and a blue LED for status indication. The system also includes a LiPo charger/booster and a USB Type C power delivery module for power management.
Cirkit Designer LogoOpen Project in Cirkit Designer
Image of multimeter: A project utilizing lilypad battery holder in a practical application
Battery-Powered Li-ion Charger with Digital Volt/Ammeter and Buzzer Alert
This circuit is a battery charging and monitoring system for a Li-ion battery using a TP4056 charger module. It includes a digital volt/ammeter to display the battery voltage and current, and features LEDs and a piezo buzzer for status indication. The circuit also incorporates switches for controlling the power and monitoring functions.
Cirkit Designer LogoOpen Project in Cirkit Designer
Image of copy ulit nya: A project utilizing lilypad battery holder in a practical application
ESP32 Mini Battery-Powered OLED Display with RTC and Potentiometer Control
This circuit is a battery-powered IoT device featuring an ESP32 microcontroller, an OLED display, and an RTC module for timekeeping. It includes a TP4056 for battery charging, a potentiometer for user input, and a pushbutton for resetting the ESP32. The circuit is designed to display information on the OLED and maintain accurate time using the RTC, with power management handled by the TP4056 and voltage regulation by the LM2596 and AMS1117.
Cirkit Designer LogoOpen Project in Cirkit Designer
Image of power: A project utilizing lilypad battery holder in a practical application
Battery-Powered Pixhawk Power Module with Rocker Switch Control
This circuit is designed to power a Pixhawk module using a LiPo battery. The circuit includes a rocker switch to control the power flow from the battery to a power distribution board (PDB), which then supplies 12V to the Pixhawk module.
Cirkit Designer LogoOpen Project in Cirkit Designer

Common Applications and Use Cases

  • Wearable Electronics: Powering e-textile projects such as smart clothing and accessories.
  • Prototyping: Providing a reliable power source for testing and developing LilyPad Arduino circuits.
  • Educational Projects: Used in STEM education to teach students about electronics and wearable technology.

Technical Specifications

Key Technical Details

Specification Value
Manufacturer LilyPad
Part ID -
Battery Type Coin cell (CR2032)
Voltage 3V
Current Rating 220mAh
Dimensions 20mm x 20mm x 5mm
Weight 2g
Connector Type Sewable pads

Pin Configuration and Descriptions

Pin Number Pin Name Description
1 VCC Positive terminal of the battery
2 GND Ground terminal of the battery

Usage Instructions

How to Use the Component in a Circuit

  1. Insert the Battery:

    • Place a CR2032 coin cell battery into the holder, ensuring the positive side faces up.
  2. Connect to LilyPad Arduino:

    • Sew the VCC pad of the battery holder to the VCC pad on the LilyPad Arduino using conductive thread.
    • Sew the GND pad of the battery holder to the GND pad on the LilyPad Arduino.
  3. Powering the Circuit:

    • Once connected, the battery will provide power to the LilyPad Arduino and any connected components.

Important Considerations and Best Practices

  • Secure Connections: Ensure that the conductive thread connections are tight and secure to prevent intermittent power issues.
  • Battery Orientation: Always insert the battery with the correct orientation to avoid damaging the holder or the LilyPad Arduino.
  • Battery Life: Monitor the battery life and replace the coin cell when the voltage drops below the required level for your project.

Troubleshooting and FAQs

Common Issues Users Might Face

  1. No Power to the Circuit:

    • Solution: Check the battery orientation and ensure it is inserted correctly. Verify that the conductive thread connections are secure and not broken.
  2. Intermittent Power Loss:

    • Solution: Ensure that the conductive thread is tightly sewn and making good contact with the pads. Check for any loose connections or frayed thread.
  3. Short Battery Life:

    • Solution: Verify that the circuit is not drawing more current than the battery can supply. Consider using a fresh battery if the current one is depleted.

FAQs

Q1: Can I use a different type of battery with the LilyPad Battery Holder?

  • A1: The LilyPad Battery Holder is designed specifically for CR2032 coin cell batteries. Using a different type of battery is not recommended as it may not fit properly or provide the correct voltage.

Q2: How do I know when the battery needs to be replaced?

  • A2: If your circuit starts to behave erratically or stops working, it may be a sign that the battery voltage is too low. Use a multimeter to check the battery voltage and replace it if it is below 3V.

Q3: Can I wash my e-textile project with the battery holder attached?

  • A3: It is not recommended to wash the battery holder or any electronic components. Remove the battery and any electronic parts before washing your e-textile project.

Example Code for Arduino UNO

While the LilyPad Battery Holder is primarily used with LilyPad Arduino boards, you can also use it to power an Arduino UNO for small projects. Below is an example code to blink an LED connected to an Arduino UNO powered by a CR2032 battery through the LilyPad Battery Holder.

// Example code to blink an LED on Arduino UNO powered by LilyPad Battery Holder

const int ledPin = 13; // Pin number for the LED

void setup() {
  pinMode(ledPin, OUTPUT); // Set the LED pin as an output
}

void loop() {
  digitalWrite(ledPin, HIGH); // Turn the LED on
  delay(1000); // Wait for 1 second
  digitalWrite(ledPin, LOW); // Turn the LED off
  delay(1000); // Wait for 1 second
}

This documentation provides a comprehensive guide to using the LilyPad Battery Holder, ensuring that both beginners and experienced users can effectively integrate it into their projects.