Cirkit Designer Logo
Cirkit Designer
Your all-in-one circuit design IDE
Home / 
Component Documentation

How to Use Adafruit RA8875 Driver Board for 40-pin TFT Touch Displays: Examples, Pinouts, and Specs

Image of Adafruit RA8875 Driver Board for 40-pin TFT Touch Displays
Cirkit Designer LogoDesign with Adafruit RA8875 Driver Board for 40-pin TFT Touch Displays in Cirkit Designer

Introduction

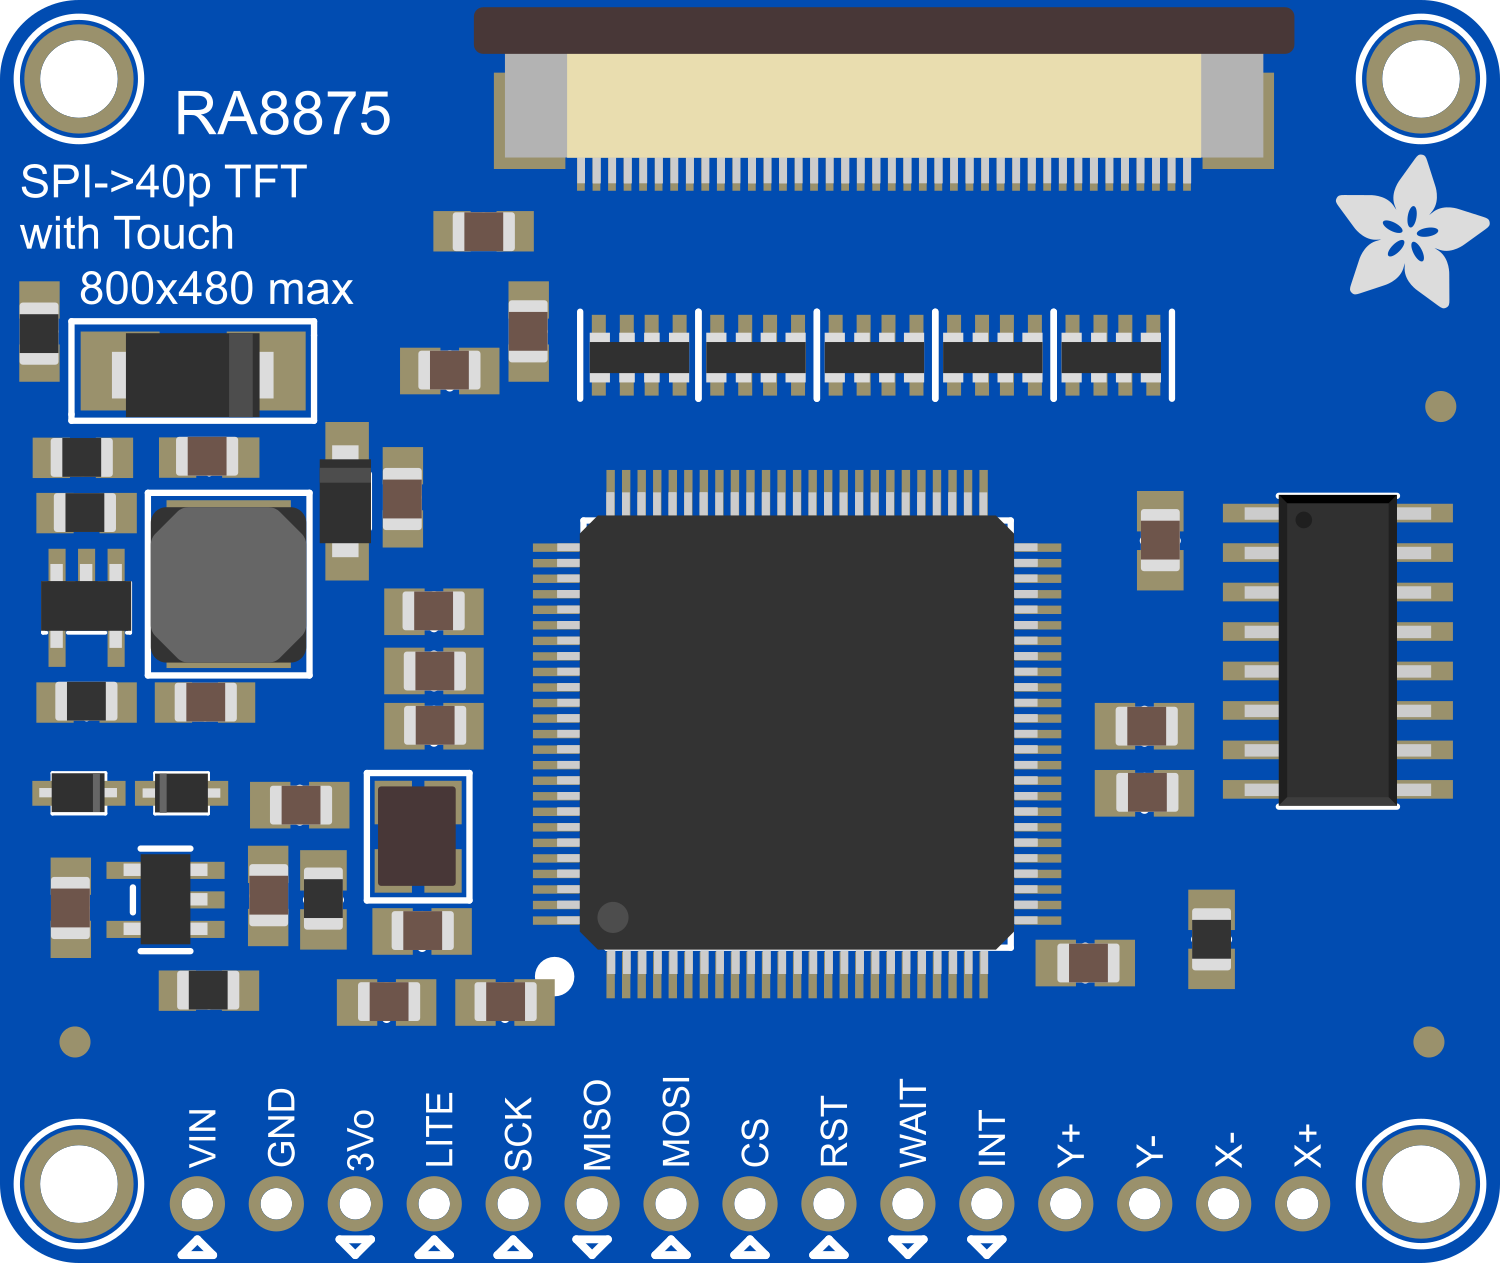
The Adafruit RA8875 Driver Board is a versatile and powerful solution for driving 40-pin TFT touch displays. This board is capable of controlling displays up to 800x480 pixels and supports various graphics functions, which makes it ideal for creating user interfaces, touch-based controls, and dynamic visual outputs. Common applications include DIY projects, interactive art installations, and custom user interfaces for devices.

Explore Projects Built with Adafruit RA8875 Driver Board for 40-pin TFT Touch Displays

Use Cirkit Designer to design, explore, and prototype these projects online. Some projects support real-time simulation. Click "Open Project" to start designing instantly!
Arduino Mega 2560 Controlled TFT Touchscreen Interface
Image of Tablero Moto: A project utilizing Adafruit RA8875 Driver Board for 40-pin TFT Touch Displays in a practical application
This circuit connects an Arduino Mega 2560 microcontroller to a 3.5-inch 480x320 TFT LCD display. The Arduino provides power, ground, and digital signals to control the display, including data lines for pixel information and control lines for reset, write, and command/data selection. The embedded code initializes the display and configures the Arduino's pins for communication, likely to create a user interface or visual output for a project.
Cirkit Designer LogoOpen Project in Cirkit Designer
Arduino Mega 2560 Controlled TFT Touchscreen Interface with 4-Channel Relay Automation
Image of Display relay: A project utilizing Adafruit RA8875 Driver Board for 40-pin TFT Touch Displays in a practical application
This circuit features an Arduino Mega 2560 microcontroller connected to an ILI9488 HD TFT LCD screen and a 4-channel relay module, powered by a 5V battery. The Arduino controls the LCD to display interactive buttons and uses digital output pins to toggle the state of the relays based on touch input. The code provided facilitates a user interface on the LCD for controlling devices connected to the relays, making it suitable for home automation or similar applications.
Cirkit Designer LogoOpen Project in Cirkit Designer
Arduino UNO and ILI9341 TFT Display Interactive Graphics Demo
Image of CE Test ili9341: A project utilizing Adafruit RA8875 Driver Board for 40-pin TFT Touch Displays in a practical application
This circuit interfaces an Arduino UNO with an ILI9341 TFT display using two bi-directional logic level converters to manage voltage differences. The Arduino runs a program to test various graphical functions on the TFT display, demonstrating its capabilities through a series of visual benchmarks.
Cirkit Designer LogoOpen Project in Cirkit Designer
Arduino Mega 2560 Controlled 4-Channel Relay with Touchscreen Interface
Image of Display relay: A project utilizing Adafruit RA8875 Driver Board for 40-pin TFT Touch Displays in a practical application
This circuit features an Arduino Mega 2560 microcontroller interfaced with a 4-channel relay module and an ILI9488 TFT LCD screen. The Arduino controls the relays via touch inputs on the LCD screen, allowing the user to toggle each relay on or off through a graphical interface.
Cirkit Designer LogoOpen Project in Cirkit Designer

Explore Projects Built with Adafruit RA8875 Driver Board for 40-pin TFT Touch Displays

Use Cirkit Designer to design, explore, and prototype these projects online. Some projects support real-time simulation. Click "Open Project" to start designing instantly!
Image of Tablero Moto: A project utilizing Adafruit RA8875 Driver Board for 40-pin TFT Touch Displays in a practical application
Arduino Mega 2560 Controlled TFT Touchscreen Interface
This circuit connects an Arduino Mega 2560 microcontroller to a 3.5-inch 480x320 TFT LCD display. The Arduino provides power, ground, and digital signals to control the display, including data lines for pixel information and control lines for reset, write, and command/data selection. The embedded code initializes the display and configures the Arduino's pins for communication, likely to create a user interface or visual output for a project.
Cirkit Designer LogoOpen Project in Cirkit Designer
Image of Display relay: A project utilizing Adafruit RA8875 Driver Board for 40-pin TFT Touch Displays in a practical application
Arduino Mega 2560 Controlled TFT Touchscreen Interface with 4-Channel Relay Automation
This circuit features an Arduino Mega 2560 microcontroller connected to an ILI9488 HD TFT LCD screen and a 4-channel relay module, powered by a 5V battery. The Arduino controls the LCD to display interactive buttons and uses digital output pins to toggle the state of the relays based on touch input. The code provided facilitates a user interface on the LCD for controlling devices connected to the relays, making it suitable for home automation or similar applications.
Cirkit Designer LogoOpen Project in Cirkit Designer
Image of CE Test ili9341: A project utilizing Adafruit RA8875 Driver Board for 40-pin TFT Touch Displays in a practical application
Arduino UNO and ILI9341 TFT Display Interactive Graphics Demo
This circuit interfaces an Arduino UNO with an ILI9341 TFT display using two bi-directional logic level converters to manage voltage differences. The Arduino runs a program to test various graphical functions on the TFT display, demonstrating its capabilities through a series of visual benchmarks.
Cirkit Designer LogoOpen Project in Cirkit Designer
Image of Display relay: A project utilizing Adafruit RA8875 Driver Board for 40-pin TFT Touch Displays in a practical application
Arduino Mega 2560 Controlled 4-Channel Relay with Touchscreen Interface
This circuit features an Arduino Mega 2560 microcontroller interfaced with a 4-channel relay module and an ILI9488 TFT LCD screen. The Arduino controls the relays via touch inputs on the LCD screen, allowing the user to toggle each relay on or off through a graphical interface.
Cirkit Designer LogoOpen Project in Cirkit Designer

Technical Specifications

Key Technical Details

  • Display Interface: 40-pin connector for TFT displays
  • Supported Display Resolutions: Up to 800x480 pixels
  • Touch Controller: Built-in touch controller for 4-wire resistive touch panels
  • Communication Interface: SPI (Serial Peripheral Interface)
  • Logic Voltage: 3.3V or 5V compatible
  • Onboard Memory: 768KB RAM for display buffering

Pin Configuration and Descriptions

Pin Number Name Description
1 GND Ground connection
2 VIN 3.3V-5V power input
3 3Vo 3.3V output from onboard regulator
4 SCK SPI clock input
5 MISO SPI Master In Slave Out
6 MOSI SPI Master Out Slave In
7 CS SPI chip select
8 RST Reset pin
9-48 D0-D39 Display data pins

Usage Instructions

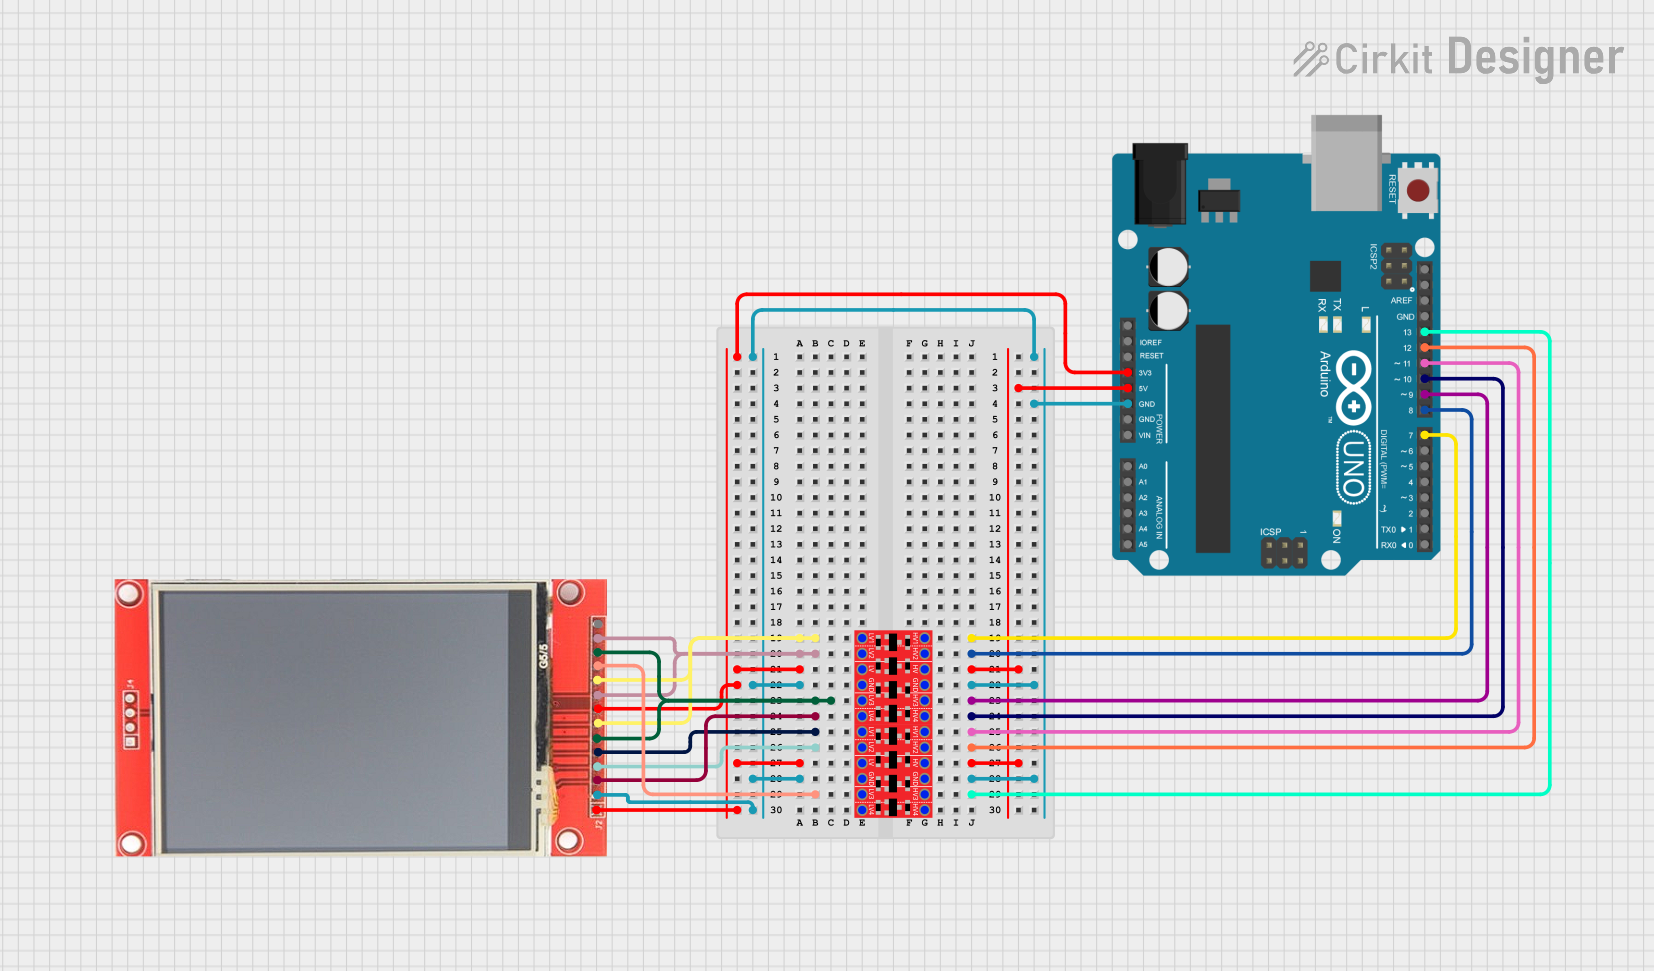
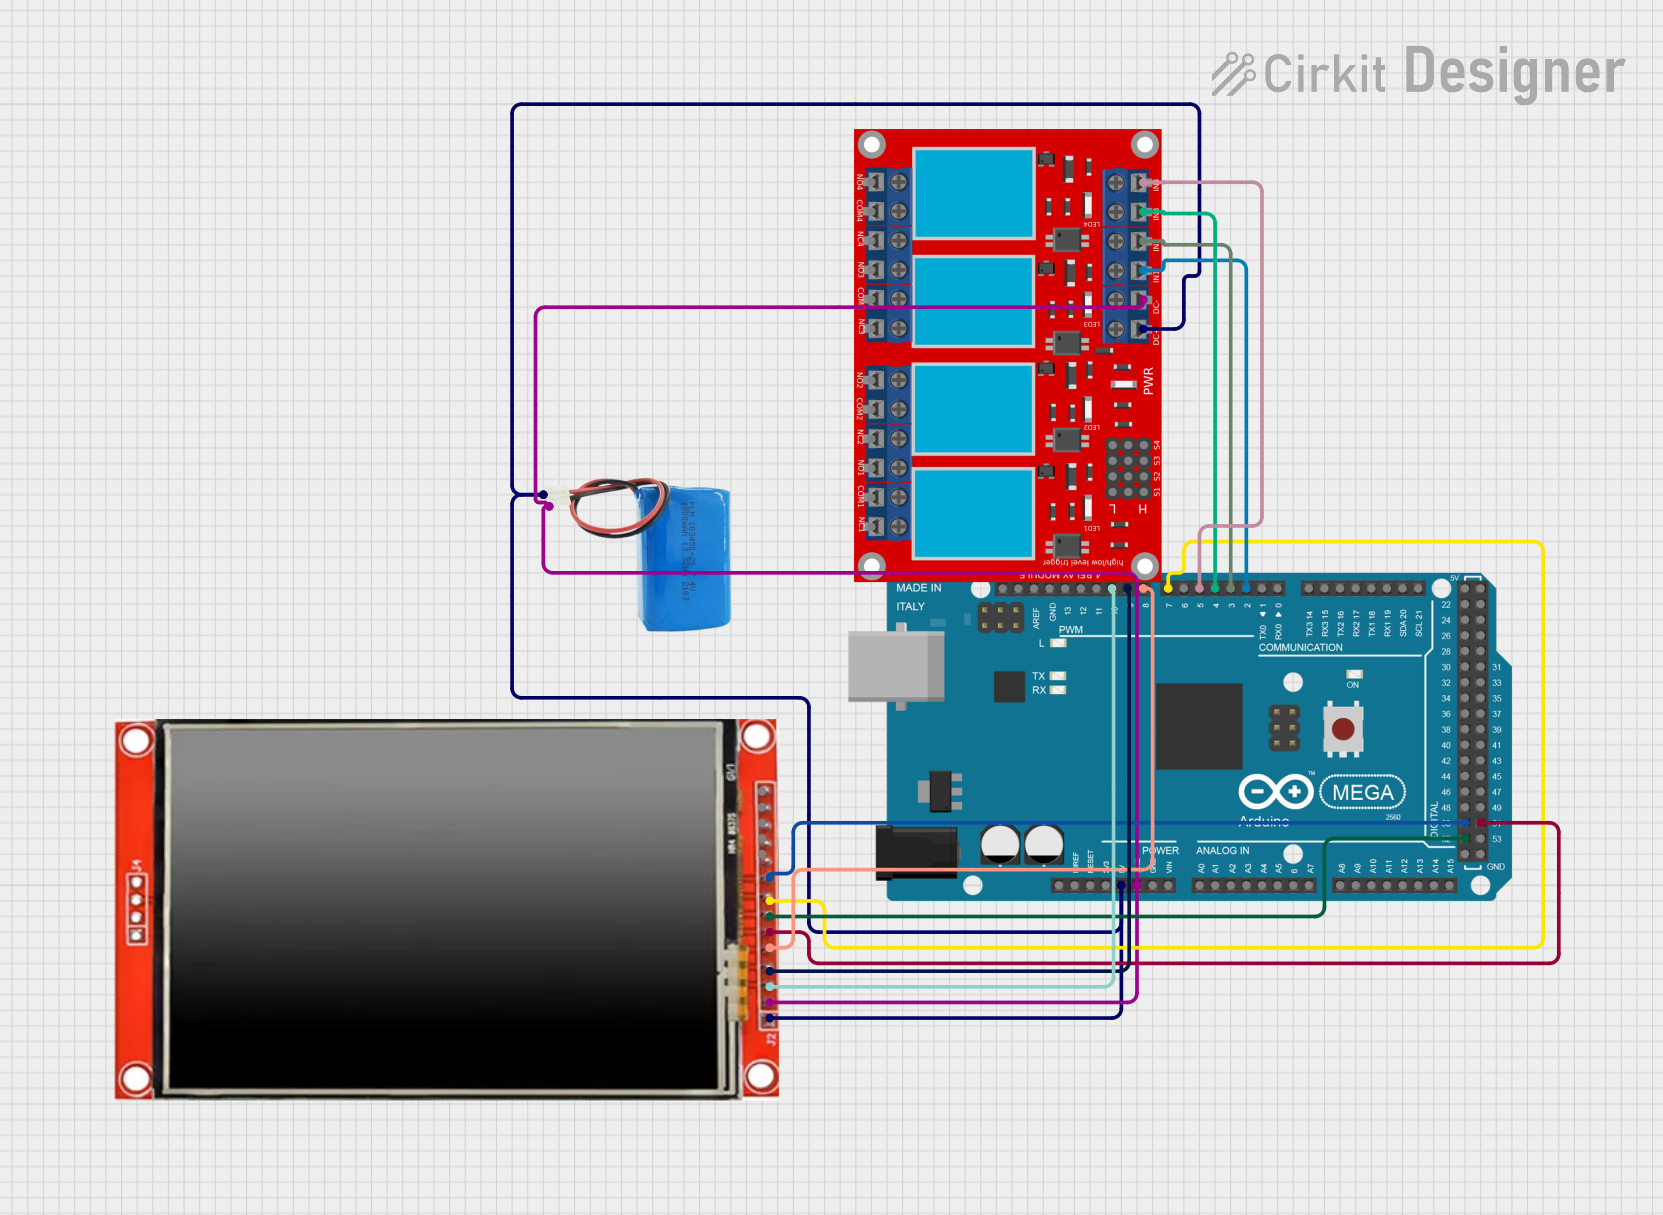
Connecting to a Circuit

  1. Power Connections: Connect the VIN pin to a 3.3V-5V power supply, and GND to the ground.
  2. SPI Connections: Connect SCK, MISO, MOSI, and CS to the corresponding SPI pins on your microcontroller.
  3. Reset Pin: Connect the RST pin to a digital pin on your microcontroller for resetting the display.
  4. Display Connection: Attach the 40-pin TFT display to the corresponding connector on the driver board.

Important Considerations and Best Practices

  • Ensure that the power supply is within the specified voltage range to prevent damage.
  • Use a level shifter if you are interfacing with a 5V microcontroller to match the logic levels.
  • Keep the SPI lines as short as possible to maintain signal integrity.
  • Use a proper decoupling capacitor close to the power pins to minimize power supply noise.

Example Code for Arduino UNO

#include <SPI.h>
#include <Adafruit_GFX.h>
#include <Adafruit_RA8875.h>

// RA8875 pin configuration
#define RA8875_CS 10
#define RA8875_RESET 9

// Create an instance of the driver board
Adafruit_RA8875 tft = Adafruit_RA8875(RA8875_CS, RA8875_RESET);

void setup() {
  Serial.begin(9600);
  // Initialize the display
  if (!tft.begin(RA8875_800x480)) {
    Serial.println("RA8875 Not Found!");
    while (1);
  }
  
  tft.displayOn(true);
  tft.GPIOX(true); // Enable TFT - display enable tied to GPIOX
  tft.PWM1config(true, RA8875_PWM_CLK_DIV1024); // PWM output for backlight
  tft.PWM1out(255);
  
  // Touchscreen calibration
  tft.touchEnable(true);
}

void loop() {
  // Your code to interact with the display
}

Troubleshooting and FAQs

Common Issues

  • Display not powering on: Check the power connections and ensure the voltage is within the specified range.
  • Touch not responding: Verify the touch panel connection and ensure the touch controller is enabled in the code.
  • Garbled or no display output: Check the SPI connections and ensure the correct display resolution is set in the code.

Solutions and Tips

  • Always double-check wiring before powering on the system.
  • Use serial output for debugging to confirm if the board is initializing correctly.
  • Update to the latest library version to ensure compatibility and bug fixes.

FAQs

Q: Can I use this driver board with any 40-pin TFT display? A: The board is designed to work with specific 40-pin TFT displays. Check the display's datasheet to ensure compatibility.

Q: What should I do if the display is not recognized by the board? A: Ensure that the display is properly connected and the SPI pins are correctly wired. Reset the board and try initializing again.

Q: How can I adjust the backlight brightness? A: Use the PWM1out function to set the backlight brightness. The value can range from 0 (off) to 255 (maximum brightness).

For further assistance, consult the Adafruit support forums or the product's official documentation.