How to Use SparkFun Clock Generator 5PV49V60: Examples, Pinouts, and Specs
Introduction
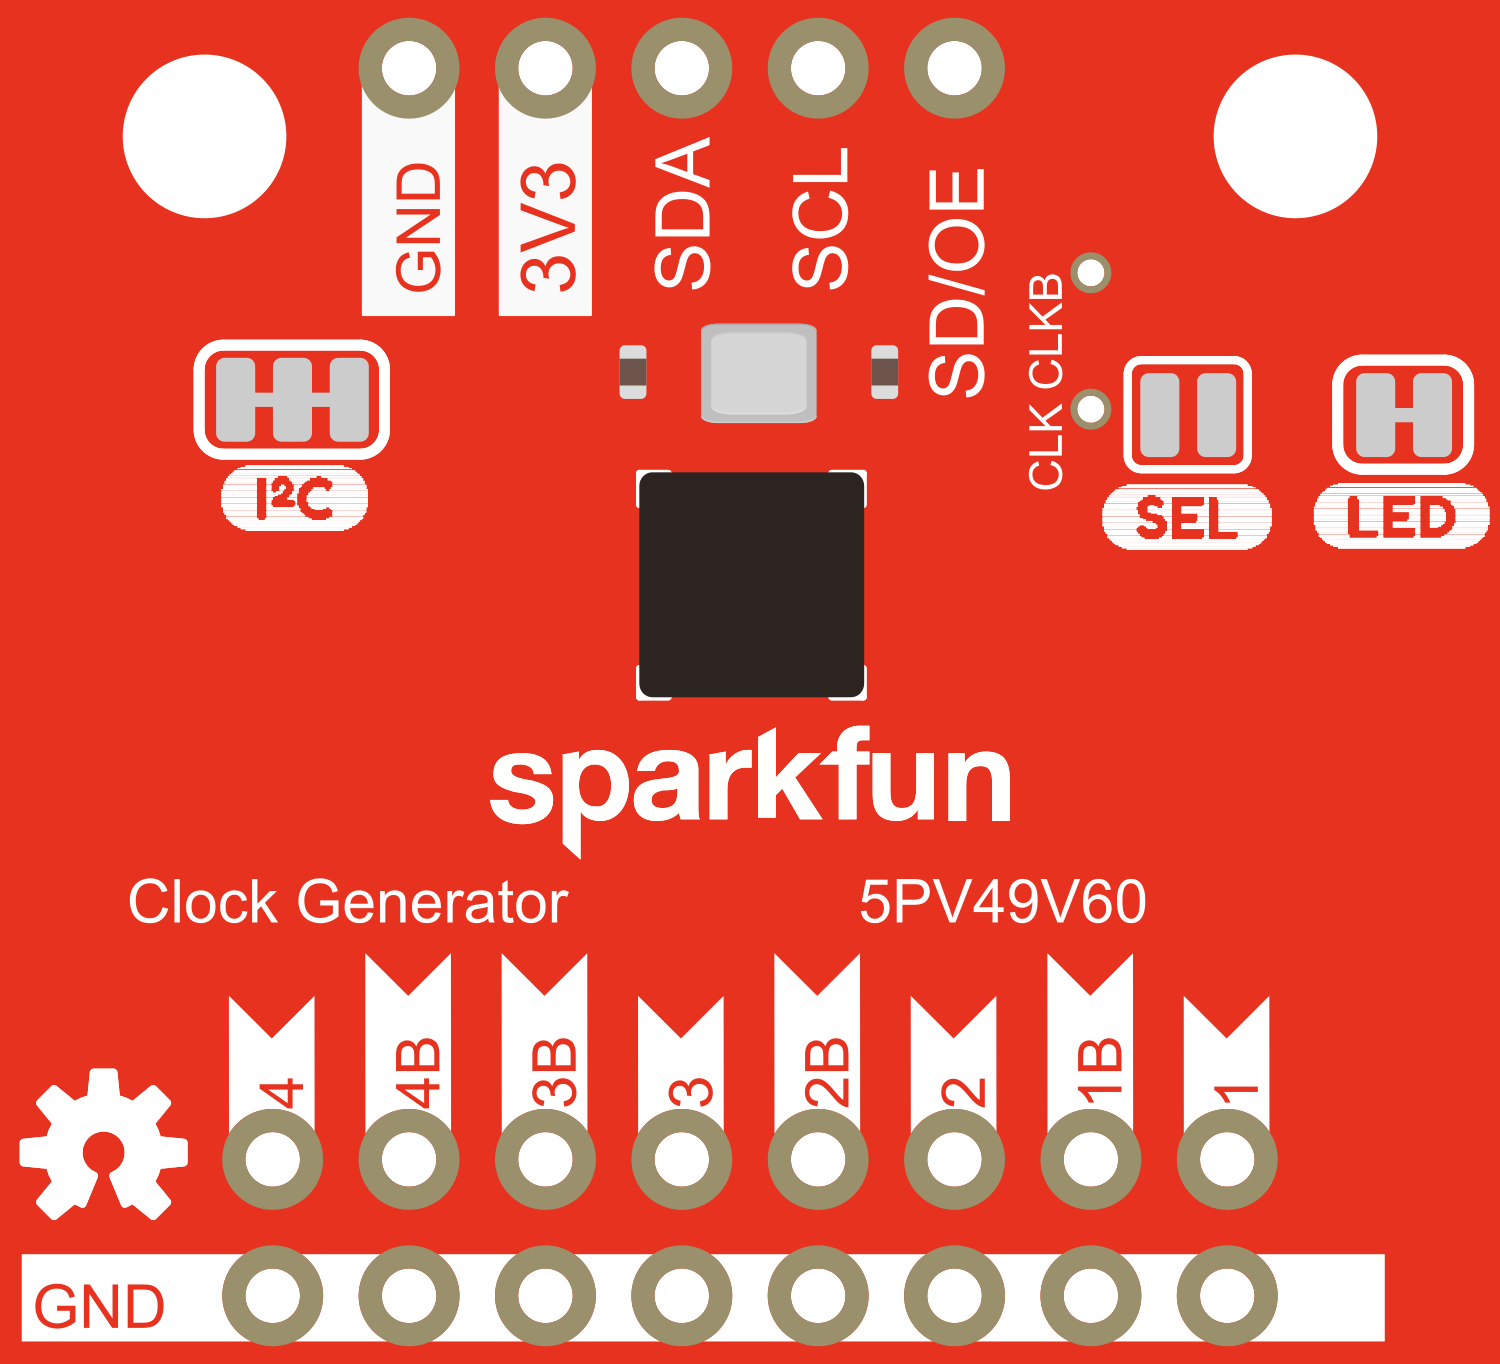
The SparkFun Clock Generator 5PV49V60 is a high-precision clock generator capable of producing clock signals with exceptional accuracy and stability. This component is essential for electronic projects and applications that demand precise timing, such as microcontroller clocking, networking, telecommunications, and data communication systems.
Explore Projects Built with SparkFun Clock Generator 5PV49V60

Explore Projects Built with SparkFun Clock Generator 5PV49V60
Common Applications and Use Cases
- Microcontroller system clocks
- Real-time clocks for timekeeping
- Networking equipment like routers and switches
- Telecommunication systems
- High-speed data communication interfaces
- Test and measurement equipment
Technical Specifications
Key Technical Details
- Supply Voltage (Vdd): 2.5V to 3.3V
- Frequency Range: 1 MHz to 200 MHz
- Output Type: LVCMOS
- Frequency Stability: ±50 ppm
- Operating Temperature Range: -40°C to +85°C
Pin Configuration and Descriptions
| Pin Number | Name | Description |
|---|---|---|
| 1 | GND | Ground connection |
| 2 | OE | Output enable (active high) |
| 3 | OUT | Clock output |
| 4 | Vdd | Supply voltage |
| 5 | NC | No connection (reserved for future use) |
Usage Instructions
How to Use the Component in a Circuit
Power Supply Connection: Connect the Vdd pin to a stable 2.5V to 3.3V power supply. Ensure that the ground pin is connected to the system ground.
Output Enable: The OE pin is used to enable or disable the clock output. Connect this pin to a logic high level to enable the clock output or to a logic low level to disable it.
Clock Output: The OUT pin provides the generated clock signal. Connect this pin to the clock input of the device that requires the clock signal.
Important Considerations and Best Practices
- Ensure that the power supply is free from noise and is stable to maintain the accuracy of the clock signal.
- Use bypass capacitors close to the Vdd pin to filter out any transient voltage spikes.
- Avoid running the clock signal line parallel to high-current traces to minimize interference.
- Keep the clock signal trace as short as possible to reduce signal degradation.
- If the clock signal needs to be distributed to multiple devices, consider using a clock buffer.
Troubleshooting and FAQs
Common Issues Users Might Face
- No Clock Output: Ensure that the OE pin is set to a high logic level and that the power supply is within the specified range.
- Inaccurate Clock Signal: Verify that the power supply is stable and that the bypass capacitors are correctly installed.
Solutions and Tips for Troubleshooting
- If the clock output is not functioning, check the power supply connections and the OE pin status.
- For signal integrity issues, shorten the clock signal trace and check for potential sources of electromagnetic interference.
FAQs
Q: Can the 5PV49V60 be used with a 5V supply? A: No, the 5PV49V60 is designed to operate with a supply voltage between 2.5V and 3.3V.
Q: Is it necessary to use bypass capacitors? A: Yes, bypass capacitors help to maintain a clean power supply by filtering out noise and transients.
Q: How can I adjust the frequency of the clock signal? A: The frequency is fixed and determined by the internal design of the chip. It is not user-adjustable.
Example Code for Arduino UNO
// Example code to demonstrate how to enable the SparkFun Clock Generator 5PV49V60
// and read the clock signal on an Arduino UNO.

#define OE_PIN 2 // Output Enable pin connected to digital pin 2 on Arduino UNO
#define CLOCK_PIN 3 // Clock signal from 5PV49V60 connected to digital pin 3

void setup() {
  pinMode(OE_PIN, OUTPUT); // Set the OE pin as an output
  pinMode(CLOCK_PIN, INPUT); // Set the CLOCK_PIN as an input
  digitalWrite(OE_PIN, HIGH); // Enable the clock output
}

void loop() {
  // Read the clock signal
  int clockSignal = digitalRead(CLOCK_PIN);
  // The clockSignal can now be used for timing or triggering events
}
Remember to ensure that the OE pin is connected to the correct pin on the Arduino and that the clock signal is within the input voltage range of the Arduino's digital pins.