Cirkit Designer Logo
Cirkit Designer
Your all-in-one circuit design IDE
Home / 
Component Documentation

How to Use Adafruit PowerBoost 1000C: Examples, Pinouts, and Specs

Image of Adafruit PowerBoost 1000C
Cirkit Designer LogoDesign with Adafruit PowerBoost 1000C in Cirkit Designer

Introduction

The Adafruit PowerBoost 1000C is a versatile power supply module designed for portable electronics. It can drive your projects with a single lithium polymer (LiPo) or lithium-ion (LiIon) rechargeable battery, providing a stable 5V output. The PowerBoost 1000C is equipped with a built-in battery charging circuit that supports USB charging with automatic switching between charging and operation modes. This makes it ideal for battery-powered projects such as wearable electronics, portable instruments, USB chargers, and any USB-powered gadget.

Explore Projects Built with Adafruit PowerBoost 1000C

Use Cirkit Designer to design, explore, and prototype these projects online. Some projects support real-time simulation. Click "Open Project" to start designing instantly!
Battery-Powered Raspberry Pi Zero with OLED Display and EmStat Pico for Portable Data Acquisition
Image of RPI Zero Prototype: A project utilizing Adafruit PowerBoost 1000C in a practical application
This circuit is a portable system powered by a 3.7V LiPo battery, which is boosted to 5V using an Adafruit PowerBoost 1000C to power a Raspberry Pi Zero and an EmStat Pico. The Raspberry Pi Zero interfaces with an OLED display via I2C and a tactile switch for user input, while the EmStat Pico communicates with the Raspberry Pi over UART for data acquisition or control purposes.
Cirkit Designer LogoOpen Project in Cirkit Designer
Battery-Powered Smart Light with Proximity Sensor and OLED Display using Adafruit QT Py RP2040
Image of lab: A project utilizing Adafruit PowerBoost 1000C in a practical application
This circuit is a portable, battery-powered system featuring an Adafruit QT Py RP2040 microcontroller that interfaces with an OLED display, a proximity sensor, an accelerometer, and an RGB LED strip. The system is powered by a lithium-ion battery with a step-up boost converter to provide 5V for the LED strip, and it includes a toggle switch for power control. The microcontroller communicates with the sensors and display via I2C.
Cirkit Designer LogoOpen Project in Cirkit Designer
Arduino Mega 2560 Based Security System with Fingerprint Authentication and SMS Alerts
Image of Door security system: A project utilizing Adafruit PowerBoost 1000C in a practical application
This circuit features an Arduino Mega 2560 microcontroller interfaced with a SIM800L GSM module, two fingerprint scanners, an I2C LCD display, an IR sensor, and a piezo buzzer. Power management is handled by a PowerBoost 1000 Basic Pad USB, a TP4056 charging module, and a Li-ion 18650 battery, with an option to use a Mini AC-DC 110V-230V to 5V 700mA module for direct power supply. The primary functionality appears to be a security system with GSM communication capabilities, biometric access control, and visual/audible feedback.
Cirkit Designer LogoOpen Project in Cirkit Designer
Battery-Powered Raspberry Pi Zero W with MPU-6050 and LCD Display
Image of Science Fair: A project utilizing Adafruit PowerBoost 1000C in a practical application
This circuit is a portable system powered by a 2000mAh battery, which is stepped up to 5V using a boost converter to power a Raspberry Pi Zero W. The Raspberry Pi interfaces with an MPU-6050 sensor for motion detection, an LCD TFT screen for display, and a vibration motor for haptic feedback.
Cirkit Designer LogoOpen Project in Cirkit Designer

Explore Projects Built with Adafruit PowerBoost 1000C

Use Cirkit Designer to design, explore, and prototype these projects online. Some projects support real-time simulation. Click "Open Project" to start designing instantly!
Image of RPI Zero Prototype: A project utilizing Adafruit PowerBoost 1000C in a practical application
Battery-Powered Raspberry Pi Zero with OLED Display and EmStat Pico for Portable Data Acquisition
This circuit is a portable system powered by a 3.7V LiPo battery, which is boosted to 5V using an Adafruit PowerBoost 1000C to power a Raspberry Pi Zero and an EmStat Pico. The Raspberry Pi Zero interfaces with an OLED display via I2C and a tactile switch for user input, while the EmStat Pico communicates with the Raspberry Pi over UART for data acquisition or control purposes.
Cirkit Designer LogoOpen Project in Cirkit Designer
Image of lab: A project utilizing Adafruit PowerBoost 1000C in a practical application
Battery-Powered Smart Light with Proximity Sensor and OLED Display using Adafruit QT Py RP2040
This circuit is a portable, battery-powered system featuring an Adafruit QT Py RP2040 microcontroller that interfaces with an OLED display, a proximity sensor, an accelerometer, and an RGB LED strip. The system is powered by a lithium-ion battery with a step-up boost converter to provide 5V for the LED strip, and it includes a toggle switch for power control. The microcontroller communicates with the sensors and display via I2C.
Cirkit Designer LogoOpen Project in Cirkit Designer
Image of Door security system: A project utilizing Adafruit PowerBoost 1000C in a practical application
Arduino Mega 2560 Based Security System with Fingerprint Authentication and SMS Alerts
This circuit features an Arduino Mega 2560 microcontroller interfaced with a SIM800L GSM module, two fingerprint scanners, an I2C LCD display, an IR sensor, and a piezo buzzer. Power management is handled by a PowerBoost 1000 Basic Pad USB, a TP4056 charging module, and a Li-ion 18650 battery, with an option to use a Mini AC-DC 110V-230V to 5V 700mA module for direct power supply. The primary functionality appears to be a security system with GSM communication capabilities, biometric access control, and visual/audible feedback.
Cirkit Designer LogoOpen Project in Cirkit Designer
Image of Science Fair: A project utilizing Adafruit PowerBoost 1000C in a practical application
Battery-Powered Raspberry Pi Zero W with MPU-6050 and LCD Display
This circuit is a portable system powered by a 2000mAh battery, which is stepped up to 5V using a boost converter to power a Raspberry Pi Zero W. The Raspberry Pi interfaces with an MPU-6050 sensor for motion detection, an LCD TFT screen for display, and a vibration motor for haptic feedback.
Cirkit Designer LogoOpen Project in Cirkit Designer

Common Applications and Use Cases

  • Portable USB chargers
  • Wearable electronics
  • Battery-powered Raspberry Pi or Arduino projects
  • DIY smartphones or gaming devices
  • Mobile robotics

Technical Specifications

Key Technical Details

  • Input Voltage (VIN): 3.7V nominal (LiPo/LiIon battery voltage)
  • Output Voltage (VOUT): 5V regulated output
  • Peak Output Current: Up to 1A
  • Charging Current: Up to 1000mA (adjustable)
  • Efficiency: 90%+
  • Quiescent Current: <5mA

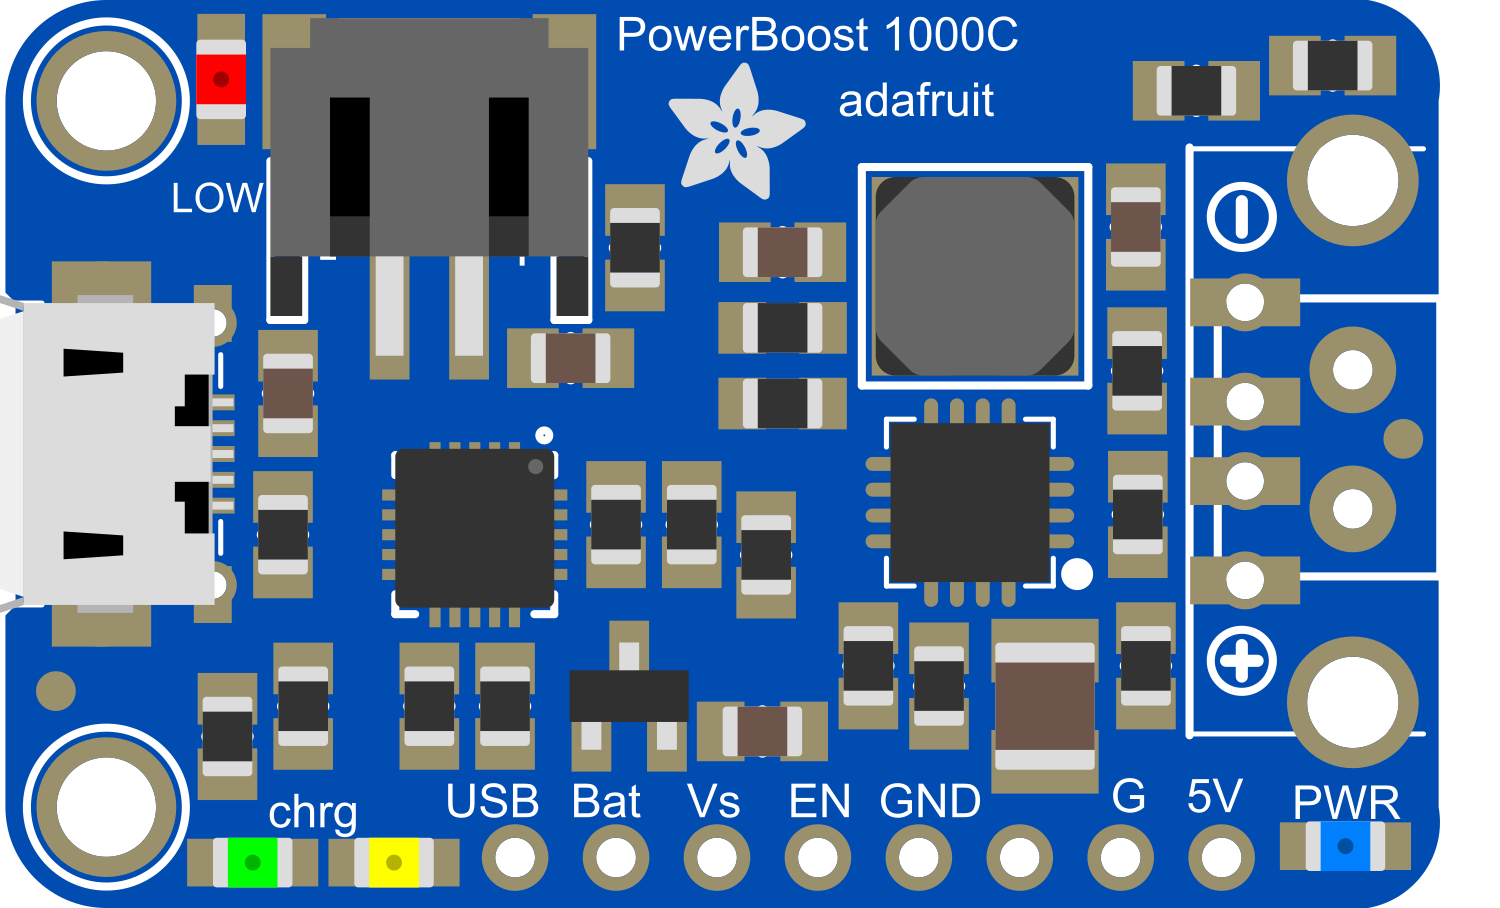
Pin Configuration and Descriptions

Pin Name Description
BAT Battery input terminal
GND Ground connection
5V Regulated 5V output
EN Enable pin (active high)
USB USB input for charging
LBO Low battery output (active low)

Usage Instructions

How to Use the Component in a Circuit

  1. Connecting the Battery:

    • Connect the positive terminal of the LiPo/LiIon battery to the BAT pin.
    • Connect the negative terminal to the GND pin.
  2. Powering Your Project:

    • Connect the 5V and GND pins to your project's power input.
  3. Charging the Battery:

    • Connect a USB cable from a power source to the USB port on the PowerBoost 1000C.
  4. Enabling/Disabling the Output:

    • To enable the 5V output, connect the EN pin to GND. To disable, leave it floating or connect it to 5V.

Important Considerations and Best Practices

  • Do not exceed the recommended input voltage as it may damage the board.
  • Ensure the polarity of the battery is correct to prevent damage.
  • Avoid drawing more than 1A from the 5V output to maintain stable operation.
  • Use a quality USB cable for charging to ensure proper current flow.

Troubleshooting and FAQs

Common Issues

  • Battery not charging: Check the USB cable and power source. Ensure the battery is properly connected with correct polarity.
  • No output voltage: Ensure the EN pin is connected to GND to enable the output.
  • Output voltage drops under load: This may occur if the load exceeds 1A. Reduce the load to within the specified limits.

Solutions and Tips for Troubleshooting

  • Double-check all connections, especially the battery and enable pin.
  • Use a multimeter to verify the battery voltage and output voltage.
  • If the LBO pin is active (low), the battery is under-voltage. Recharge the battery.

FAQs

Q: Can I use the PowerBoost 1000C with a battery that has a higher capacity? A: Yes, as long as the battery voltage is within the range of 3.7V nominal.

Q: Is it possible to adjust the charging current? A: Yes, the charging current can be adjusted by changing the resistor on the charging circuit.

Q: What should I do if the PowerBoost 1000C gets hot during use? A: Ensure that the current draw is within the specified limits and that there is adequate ventilation around the board.

Example Code for Arduino UNO

// This example demonstrates how to use the Adafruit PowerBoost 1000C
// with an Arduino UNO to power the Arduino from a LiPo battery.

void setup() {
  pinMode(13, OUTPUT); // Use the onboard LED as an indicator
}

void loop() {
  digitalWrite(13, HIGH);   // Turn the LED on
  delay(1000);              // Wait for a second
  digitalWrite(13, LOW);    // Turn the LED off
  delay(1000);              // Wait for a second
}

// Note: The PowerBoost 1000C does not require specific code to operate.
// It simply provides power to the Arduino. This example is to show that
// the Arduino can run on battery power through the PowerBoost 1000C.

Remember to keep the code comments concise and within the 80 character line length limit. The example provided is a simple blink sketch that demonstrates the Arduino running on battery power supplied by the PowerBoost 1000C.