Cirkit Designer Logo
Cirkit Designer
Your all-in-one circuit design IDE
Home / 
Component Documentation

How to Use Mini Power Hub: Examples, Pinouts, and Specs

Image of Mini Power Hub
Cirkit Designer LogoDesign with Mini Power Hub in Cirkit Designer

Introduction

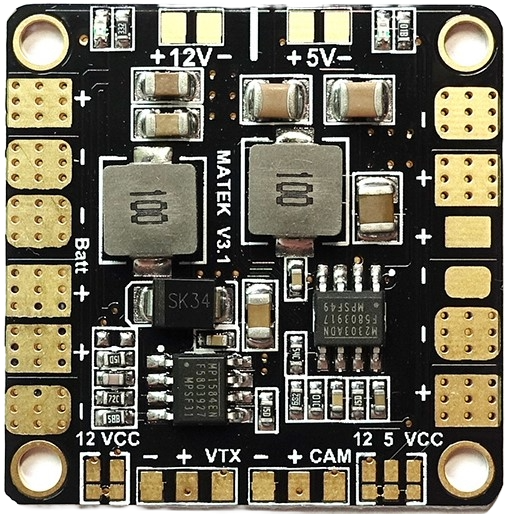
The Mini Power Hub, manufactured by Matek, is a compact power distribution board designed primarily for use in small unmanned aerial vehicles (UAVs), such as quadcopters and other multirotors. It efficiently distributes power from a single battery source to multiple electronic components, such as flight controllers, ESCs (Electronic Speed Controllers), motors, and auxiliary devices. Its small footprint and lightweight design make it ideal for space-constrained applications where efficient power distribution is crucial.

Explore Projects Built with Mini Power Hub

Use Cirkit Designer to design, explore, and prototype these projects online. Some projects support real-time simulation. Click "Open Project" to start designing instantly!
ESP32C3 Supermini-Based Smart Environment Monitor and Lighting Control System
Image of Bedside RGB and Lamp: A project utilizing Mini Power Hub in a practical application
This is a smart control system featuring an ESP32C3 Supermini microcontroller for interfacing with various sensors and actuators. It includes temperature and humidity sensing, RGB LED strip control, user input via a pushbutton and rotary encoder, and AC power control through a two-channel relay. The system is powered by an AC source converted to DC by the HLK-PM12 module.
Cirkit Designer LogoOpen Project in Cirkit Designer
Battery-Powered LED Control with Pushbutton and Relay
Image of EXP.3 E: A project utilizing Mini Power Hub in a practical application
This circuit uses a pushbutton to control a 5V relay, which in turn powers a red LED. The MAHIR 1.mini module provides the necessary 3.7V power supply, and the relay switches the LED on and off based on the pushbutton input.
Cirkit Designer LogoOpen Project in Cirkit Designer
Dual Hub Motor Control System with USB to TTL Interface and Relay Switching
Image of Hub Motor & servo motor Connection: A project utilizing Mini Power Hub in a practical application
This circuit is designed to control two hub motors using a HUB driver, powered by a DC-DC converter and a power module. The USB to TTL converter allows for communication with the HUB driver, and a 5V relay module is used to switch the motors on and off.
Cirkit Designer LogoOpen Project in Cirkit Designer
Wemos D1 Mini Based Environmental Monitoring System with Solar Charging
Image of Generator Shed Voltage & Temperature Monitor: A project utilizing Mini Power Hub in a practical application
This circuit features a Wemos D1 Mini microcontroller interfaced with a pushbutton, a voltage sensor, an AHT21 temperature and humidity sensor, and an L298N motor driver controlling a linear actuator. The Wemos D1 Mini is powered by a 5V supply from an XL4015 DC-DC buck converter, which steps down the voltage from a 12V AGM battery charged by a solar panel through an MPPT charge controller. The microcontroller reads the voltage sensor data and controls the actuator based on programmed logic, while the pushbutton provides user input and the AHT21 sensor monitors environmental conditions.
Cirkit Designer LogoOpen Project in Cirkit Designer

Explore Projects Built with Mini Power Hub

Use Cirkit Designer to design, explore, and prototype these projects online. Some projects support real-time simulation. Click "Open Project" to start designing instantly!
Image of Bedside RGB and Lamp: A project utilizing Mini Power Hub in a practical application
ESP32C3 Supermini-Based Smart Environment Monitor and Lighting Control System
This is a smart control system featuring an ESP32C3 Supermini microcontroller for interfacing with various sensors and actuators. It includes temperature and humidity sensing, RGB LED strip control, user input via a pushbutton and rotary encoder, and AC power control through a two-channel relay. The system is powered by an AC source converted to DC by the HLK-PM12 module.
Cirkit Designer LogoOpen Project in Cirkit Designer
Image of EXP.3 E: A project utilizing Mini Power Hub in a practical application
Battery-Powered LED Control with Pushbutton and Relay
This circuit uses a pushbutton to control a 5V relay, which in turn powers a red LED. The MAHIR 1.mini module provides the necessary 3.7V power supply, and the relay switches the LED on and off based on the pushbutton input.
Cirkit Designer LogoOpen Project in Cirkit Designer
Image of Hub Motor & servo motor Connection: A project utilizing Mini Power Hub in a practical application
Dual Hub Motor Control System with USB to TTL Interface and Relay Switching
This circuit is designed to control two hub motors using a HUB driver, powered by a DC-DC converter and a power module. The USB to TTL converter allows for communication with the HUB driver, and a 5V relay module is used to switch the motors on and off.
Cirkit Designer LogoOpen Project in Cirkit Designer
Image of Generator Shed Voltage & Temperature Monitor: A project utilizing Mini Power Hub in a practical application
Wemos D1 Mini Based Environmental Monitoring System with Solar Charging
This circuit features a Wemos D1 Mini microcontroller interfaced with a pushbutton, a voltage sensor, an AHT21 temperature and humidity sensor, and an L298N motor driver controlling a linear actuator. The Wemos D1 Mini is powered by a 5V supply from an XL4015 DC-DC buck converter, which steps down the voltage from a 12V AGM battery charged by a solar panel through an MPPT charge controller. The microcontroller reads the voltage sensor data and controls the actuator based on programmed logic, while the pushbutton provides user input and the AHT21 sensor monitors environmental conditions.
Cirkit Designer LogoOpen Project in Cirkit Designer

Common Applications and Use Cases

  • Power distribution for multirotor aircraft
  • Powering FPV (First Person View) systems
  • Supplying power to LED lighting systems on drones
  • Robotics and DIY electronics projects requiring multiple power connections

Technical Specifications

Key Technical Details

  • Input Voltage Range: 2-6S LiPo (7.4V - 22.2V)
  • Max Current: 30A per output, with a total maximum combined current of 100A
  • BEC Output: 5V & 12V (BEC stands for Battery Eliminator Circuit)
  • BEC Output Current: 2A (Max)
  • Dimensions: 36 x 36mm
  • Mounting Holes: 30.5mm square spacing, Φ3mm
  • Weight: Approximately 6g

Pin Configuration and Descriptions

Pin Number Description Voltage/Signal Notes
1 Battery Input (+) 7.4V - 22.2V Connect to positive battery terminal
2 Battery Input (-) Ground Connect to negative battery terminal
3-6 ESC/Motor Outputs (+) 7.4V - 22.2V Connect to ESCs or motors
7-10 ESC/Motor Outputs (-) Ground Connect to ESCs or motors
11 BEC 5V Output (+) 5V Regulated output for electronics
12 BEC 5V Output (-) Ground Ground for 5V BEC
13 BEC 12V Output (+) 12V Regulated output for FPV gear
14 BEC 12V Output (-) Ground Ground for 12V BEC

Usage Instructions

How to Use the Mini Power Hub in a Circuit

  1. Power Input Connection: Connect the battery's positive and negative terminals to the respective battery input pads on the Mini Power Hub.
  2. ESC/Motor Connections: Connect each ESC's power leads to the corresponding positive and negative output pads. Ensure that the polarity is correct to prevent damage.
  3. BEC Connections: Utilize the 5V BEC output to power electronic components such as flight controllers, and the 12V BEC output for FPV equipment or other 12V accessories.
  4. Mounting: Secure the Mini Power Hub to your frame using the mounting holes provided. Ensure it is mounted away from high-vibration areas and propeller strike zones.

Important Considerations and Best Practices

  • Always verify the polarity of all connections to avoid short circuits.
  • Do not exceed the maximum current ratings for the board and BEC outputs.
  • Use appropriate gauge wires for the current draw of your components.
  • Insulate exposed solder joints with heat shrink tubing to prevent shorts.
  • Check for any signs of damage or wear before each use, and replace if necessary.

Troubleshooting and FAQs

Common Issues

  • Power Hub Overheating: Ensure that the current draw does not exceed the specified limits and that there is adequate airflow around the board.
  • Voltage Irregularities: Check all solder joints and connections for shorts or poor contacts.
  • Components Not Powering On: Verify that all devices are correctly connected with the right polarity and that the input voltage is within the specified range.

Solutions and Tips for Troubleshooting

  • If a component is not working, disconnect it and test with a multimeter to ensure it is receiving the correct voltage.
  • In case of a short circuit, immediately disconnect the battery and inspect the board for solder bridges or exposed wires.
  • For persistent issues, consult the manufacturer's support resources or community forums for assistance.

FAQs

Q: Can I use the Mini Power Hub with a 6S LiPo battery? A: Yes, the Mini Power Hub supports a voltage range from 2S to 6S LiPo batteries.

Q: What should I do if the BEC is not outputting the correct voltage? A: Check the input voltage and solder joints. If the problem persists, the BEC may be damaged and the board might need replacement.

Q: Is it possible to use the 12V BEC output for 5V devices? A: No, you should only connect 12V rated devices to the 12V BEC output. Using it for 5V devices can damage them.

Q: How do I ensure the longevity of my Mini Power Hub? A: Avoid overloading the board, ensure proper soldering, and protect it from physical damage and moisture.

For any further assistance or detailed queries, please refer to the Matek official website or contact their customer support.

(Note: This documentation is a generic guide and should be adapted to the specific Mini Power Hub model you are using. Always refer to the manufacturer's datasheet for precise information.)