How to Use W1209 : Examples, Pinouts, and Specs
Introduction
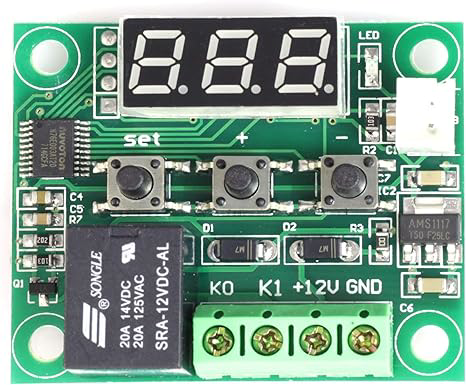
The W1209 is a compact and cost-effective digital temperature control module that is widely used in temperature control applications. It comes with an integrated temperature sensor and a relay, which can be used to automatically switch heating or cooling devices on or off based on the temperature. This module is popular among hobbyists and is often used in DIY projects, incubators, aquariums, and climate control systems.
Explore Projects Built with W1209


Explore Projects Built with W1209
Technical Specifications
Key Technical Details
- Supply Voltage: 12V DC
- Control Precision: 0.1 degree Celsius
- Measuring Inputs: NTC (10K 0.5%) Waterproof Sensor
- Output: Relay Output, Capacity 240V AC 10A / 12V DC 10A
- Temperature Control Range: -50 to +110 degrees Celsius
- Measurement Accuracy: ±0.1 degrees Celsius
- Control Accuracy: 0.1 degrees Celsius
- Refresh Rate: 0.5 Seconds
- Operating Temperature: -10 to +60 degrees Celsius
- Operating Humidity: 20-85%
Pin Configuration and Descriptions
| Pin Number | Description | Notes |
|---|---|---|
| 1 | Relay Normally Open (NO) | Connect to the load to be controlled |
| 2 | Relay Common (COM) | Connect to power supply for the load |
| 3 | Relay Normally Closed (NC) | Connect if needed for specific applications |
| 4 | 12V+ (VCC) | Supply voltage positive |
| 5 | 12V- (GND) | Supply voltage negative |
| 6 | Sensor Input | Connect to the provided NTC sensor |
Usage Instructions
How to Use the W1209 in a Circuit
- Power Supply Connection: Connect a 12V DC power supply to the VCC and GND pins of the W1209 module.
- Load Connection: Connect the load (heating or cooling device) to the relay terminals. Use the NO or NC terminals based on whether the load should be powered when the relay is activated or deactivated, respectively.
- Sensor Placement: Place the NTC sensor in the environment where temperature control is required.
- Setting Temperature: Use the onboard buttons to set the desired temperature threshold.
- Operation: The W1209 will turn the relay on or off to maintain the set temperature within the control range.
Important Considerations and Best Practices
- Ensure that the power supply voltage matches the module's requirements (12V DC).
- Do not exceed the relay's maximum current rating to avoid damage.
- Place the temperature sensor away from heat sources like the relay to avoid false readings.
- Use appropriate wiring for the current that the load will draw.
- Protect the module from moisture and extreme temperatures.
Troubleshooting and FAQs
Common Issues
- Module Does Not Power On: Check the power supply connections and voltage.
- Relay Does Not Switch: Verify the load current does not exceed the relay rating and check the connections.
- Inaccurate Temperature Readings: Ensure the sensor is placed correctly and not influenced by external heat sources.
Solutions and Tips
- If the relay does not switch, ensure that the temperature set point is correctly configured.
- For inaccurate readings, recalibrate the module if necessary or replace the sensor.
- If the module behaves erratically, check for any signs of damage or loose connections.
FAQs
Q: Can I use the W1209 with a different temperature sensor? A: The W1209 is designed to work with the included NTC sensor. Using a different sensor may require recalibration and could lead to inaccurate readings.
Q: How do I change the temperature set point? A: Use the onboard buttons to enter the setting mode and adjust the temperature set point.
Q: What is the maximum load the relay can handle? A: The relay can handle up to 240V AC at 10A or 12V DC at 10A.
Q: Can the W1209 be used for both heating and cooling? A: Yes, the W1209 can control either a heating or cooling device, depending on how it's configured.
Q: Is the temperature sensor waterproof? A: Yes, the included NTC sensor is waterproof and can be used in moist environments.
Example Code for Arduino UNO
Below is an example code snippet for simulating the W1209 functionality using an Arduino UNO. This code reads temperature from a hypothetical sensor and controls a relay based on the temperature reading.
// Define the pins
const int tempSensorPin = A0; // Analog pin for temperature sensor
const int relayPin = 2;       // Digital pin for relay module

// Set the desired temperature threshold
const float tempThreshold = 25.0; // Temperature threshold in Celsius

void setup() {
  pinMode(relayPin, OUTPUT);      // Set the relay pin as an output
  Serial.begin(9600);             // Start serial communication
}

void loop() {
  int sensorValue = analogRead(tempSensorPin); // Read the temperature sensor
  float temperature = sensorValue * (5.0 / 1023.0) * 100.0; // Convert to temperature

  // Print the temperature to the Serial Monitor
  Serial.print("Temperature: ");
  Serial.print(temperature);
  Serial.println(" C");

  // Control the relay based on the temperature
  if (temperature < tempThreshold) {
    digitalWrite(relayPin, HIGH); // Turn on the relay (heating)
  } else {
    digitalWrite(relayPin, LOW);  // Turn off the relay (cooling)
  }

  delay(1000); // Wait for a second before reading again
}
Remember to replace the temperature reading logic with actual code suitable for the sensor you are using. The above code is for illustrative purposes only and assumes a linear relationship between the analog reading and temperature, which is not the case with the NTC sensor that comes with the W1209.