How to Use ESP32S3: Examples, Pinouts, and Specs
Introduction
The ESP32S3, manufactured by D'lithe, is a powerful and versatile system-on-chip (SoC) designed for Internet of Things (IoT) applications. It combines integrated Wi-Fi and Bluetooth capabilities with a dual-core processor, making it suitable for a wide range of smart devices and wireless connectivity solutions. The ESP32S3 is optimized for low power consumption, ensuring efficient operation in battery-powered devices. With its ample GPIO pins and support for various peripherals, it is a popular choice for developers building IoT systems, smart home devices, wearables, and industrial automation solutions.
Explore Projects Built with ESP32S3


Explore Projects Built with ESP32S3
Common Applications and Use Cases
- Smart home devices (e.g., smart lights, thermostats, and security systems)
- Wearable technology
- Industrial IoT and automation
- Wireless sensor networks
- Robotics and drones
- Real-time data monitoring and logging
- Bluetooth Low Energy (BLE) beacons and gateways
Technical Specifications
The ESP32S3 is packed with features that make it a robust and flexible solution for IoT development. Below are its key technical specifications:
Key Technical Details
- Processor: Dual-core Xtensa LX7, up to 240 MHz
- Memory: 512 KB SRAM, support for external PSRAM
- Wireless Connectivity:
- Wi-Fi: 802.11 b/g/n (2.4 GHz)
- Bluetooth: Bluetooth 5.0 (LE and Classic)
- GPIO Pins: 45 (multiplexed for various functions)
- Operating Voltage: 3.0V to 3.6V
- Power Consumption:
- Active mode: ~240 mA (Wi-Fi active)
- Deep sleep mode: ~10 µA
- Peripherals:
- SPI, I2C, I2S, UART, PWM, ADC, DAC
- USB OTG support
- Operating Temperature: -40°C to +85°C
- Package: QFN48
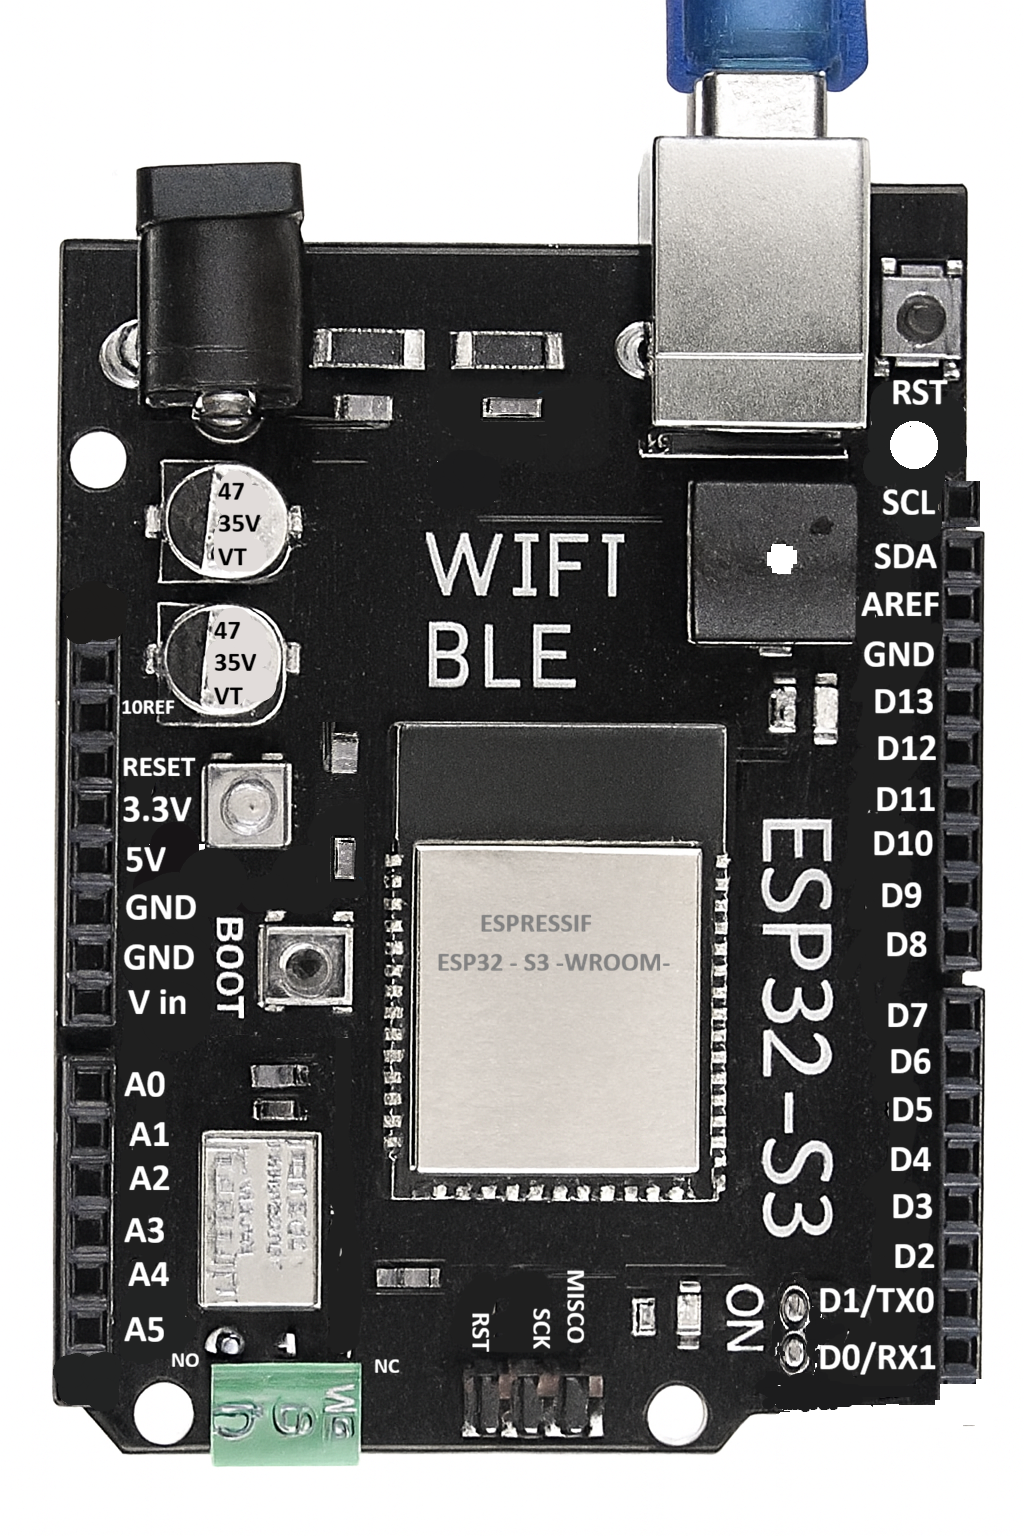
Pin Configuration and Descriptions
The ESP32S3 has a total of 45 GPIO pins, which can be configured for various functions. Below is a table summarizing the key pins and their default functions:
| Pin Number | Pin Name | Default Function | Description |
|---|---|---|---|
| 1 | GPIO0 | Boot Mode Selection | Used for boot mode selection during reset. |
| 2 | GPIO1 | UART TXD0 | UART transmit pin. |
| 3 | GPIO2 | UART RXD0 | UART receive pin. |
| 4 | GPIO3 | General Purpose I/O | Configurable GPIO pin. |
| 5 | GPIO4 | ADC1_CH0 | Analog-to-digital converter channel 0. |
| 6 | GPIO5 | PWM Output | Pulse-width modulation output. |
| ... | ... | ... | ... |
| 45 | GPIO44 | General Purpose I/O | Configurable GPIO pin. |
Note: Refer to the full datasheet for a complete pinout and alternate functions.
Usage Instructions
The ESP32S3 can be used in a variety of circuits and applications. Below are the steps and best practices for using the component effectively.
How to Use the ESP32S3 in a Circuit
- Power Supply: Ensure the ESP32S3 is powered with a stable voltage between 3.0V and 3.6V. Use a low-noise power source for optimal performance.
- Boot Mode: Connect GPIO0 to ground during reset to enter bootloader mode for programming.
- Programming: Use a USB-to-serial adapter or a development board with built-in USB support to upload firmware.
- Peripherals: Configure the GPIO pins for the desired peripherals (e.g., SPI, I2C, UART) in your firmware.
- Antenna: Ensure proper placement of the onboard antenna for optimal Wi-Fi and Bluetooth performance. Avoid placing metal objects near the antenna.
Important Considerations and Best Practices
- Use decoupling capacitors near the power pins to reduce noise and improve stability.
- Avoid using GPIO pins that are reserved for internal functions unless absolutely necessary.
- For battery-powered applications, leverage the deep sleep mode to minimize power consumption.
- Ensure proper grounding and shielding in your PCB design to reduce interference.
Example: Connecting the ESP32S3 to an Arduino UNO
The ESP32S3 can communicate with an Arduino UNO via UART. Below is an example of how to send data from the Arduino to the ESP32S3:
Arduino Code
// Example: Sending data from Arduino UNO to ESP32S3 via UART
void setup() {
  Serial.begin(9600); // Initialize Arduino's serial communication
  delay(1000);        // Wait for the serial connection to stabilize
}

void loop() {
  Serial.println("Hello, ESP32S3!"); // Send a message to the ESP32S3
  delay(1000);                       // Wait 1 second before sending again
}
ESP32S3 Code (Arduino IDE)
// Example: Receiving data on ESP32S3 from Arduino UNO via UART
void setup() {
  Serial.begin(9600); // Initialize ESP32S3's serial communication
  Serial.println("ESP32S3 ready to receive data."); // Debug message
}

void loop() {
  if (Serial.available() > 0) { // Check if data is available
    String receivedData = Serial.readString(); // Read the incoming data
    Serial.print("Received: "); // Print the received data
    Serial.println(receivedData);
  }
}
Note: Ensure the TX pin of the Arduino is connected to the RX pin of the ESP32S3, and vice versa. Also, connect their grounds.
Troubleshooting and FAQs
Common Issues and Solutions
ESP32S3 Not Responding to Commands:
- Cause: Incorrect boot mode.
- Solution: Ensure GPIO0 is connected to ground during reset for bootloader mode.
Wi-Fi Connection Fails:
- Cause: Weak signal or incorrect credentials.
- Solution: Verify the Wi-Fi credentials and ensure the antenna is unobstructed.
High Power Consumption:
- Cause: Device not entering deep sleep mode.
- Solution: Check the firmware to ensure deep sleep mode is properly configured.
Serial Communication Issues:
- Cause: Mismatched baud rates.
- Solution: Ensure the baud rate in the code matches the hardware configuration.
FAQs
Q: Can the ESP32S3 operate on 5V?
- A: No, the ESP32S3 operates on 3.0V to 3.6V. Use a voltage regulator if your power source is 5V.
Q: How do I update the firmware on the ESP32S3?
- A: Use the ESP-IDF toolchain or the Arduino IDE to upload firmware via the USB interface.
Q: Can I use the ESP32S3 for audio applications?
- A: Yes, the ESP32S3 supports I2S for audio input/output, making it suitable for audio processing.
Q: What is the maximum range of the ESP32S3's Wi-Fi?
- A: The range depends on environmental factors but typically extends up to 100 meters in open space.
By following this documentation, you can effectively integrate the ESP32S3 into your projects and troubleshoot common issues. For more advanced configurations, refer to the official datasheet and programming guides provided by D'lithe.