Cirkit Designer Logo
Cirkit Designer
Your all-in-one circuit design IDE
Home / 
Component Documentation

How to Use Ludus ProtoShield: Examples, Pinouts, and Specs

Image of Ludus ProtoShield
Cirkit Designer LogoDesign with Ludus ProtoShield in Cirkit Designer

Introduction

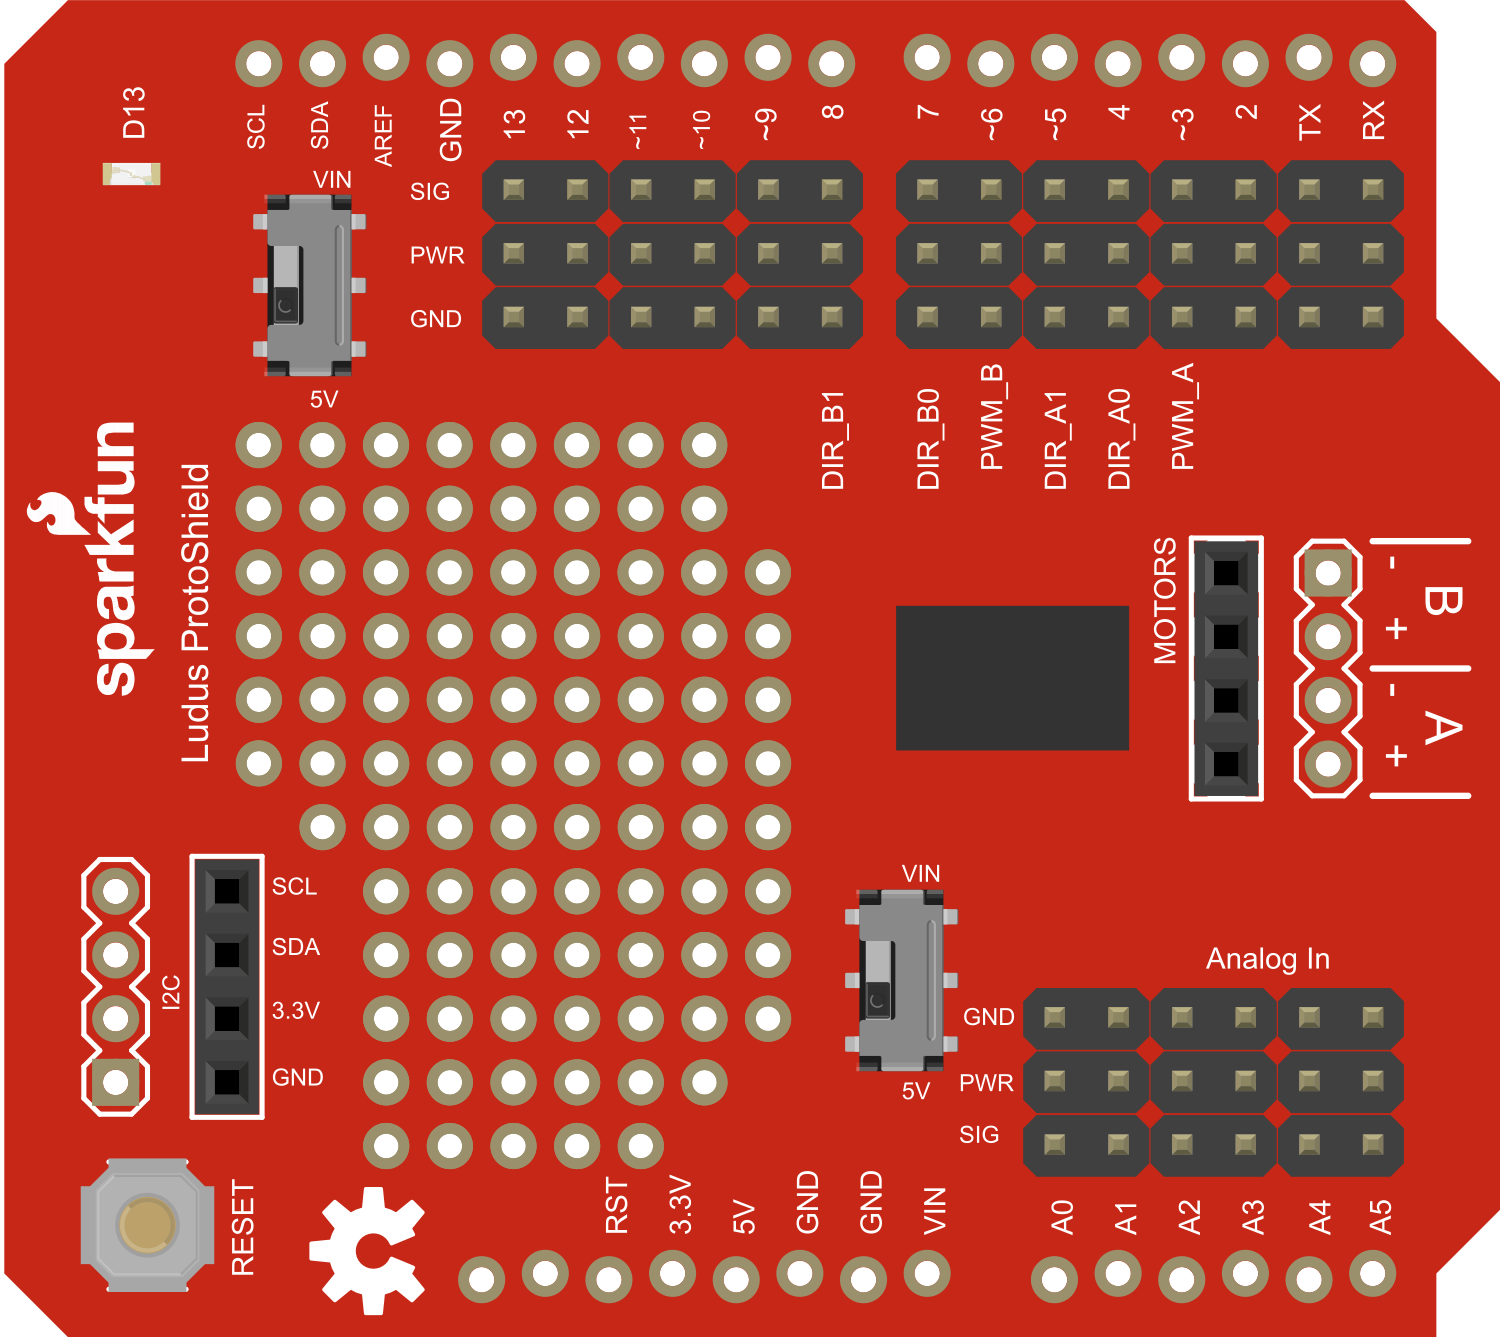
The Ludus ProtoShield is an Arduino-compatible prototyping shield designed to facilitate the easy development and testing of electronic circuits. It is an invaluable tool for hobbyists, educators, and professionals who need a quick and reliable way to connect various electronic components to an Arduino board. The ProtoShield fits directly onto an Arduino UNO or similar boards, providing a solderable breadboard-like area and additional connectivity options.

Explore Projects Built with Ludus ProtoShield

Use Cirkit Designer to design, explore, and prototype these projects online. Some projects support real-time simulation. Click "Open Project" to start designing instantly!
Arduino-Based Temperature Monitoring System with RGB LED Feedback and I2C LCD Display
Image of wemos custom shield: A project utilizing Ludus ProtoShield in a practical application
This circuit features an Adafruit Proto Shield R3 configured with a DS18B20 temperature sensor, a WS2812 RGB LED matrix, and an LCD I2C display. The microcontroller on the Proto Shield reads the temperature from the DS18B20 sensor and displays it on the LCD. It also controls the LED matrix to show random colors and indicates temperature status with onboard LEDs.
Cirkit Designer LogoOpen Project in Cirkit Designer
Arduino-Controlled Obstacle Avoiding Robot with Ultrasonic Sensor and L298N Motor Driver
Image of مشروع مركبة ذاتية تتفادى الحواجز: A project utilizing Ludus ProtoShield in a practical application
This is a mobile robot platform controlled by an Arduino UNO with a sensor shield. It uses an HC-SR04 ultrasonic sensor for obstacle detection and a servo motor for directional control. The robot's movement is powered by gearmotors controlled by an L298N motor driver, and it is designed to navigate by avoiding obstacles detected by the ultrasonic sensor.
Cirkit Designer LogoOpen Project in Cirkit Designer
Arduino Sensor Shield with I2C LCD and Bluetooth Interface
Image of wallE: A project utilizing Ludus ProtoShield in a practical application
This circuit features an Arduino Sensor Shield v5.0 interfaced with an I2C LCD Display and an HC-05 Bluetooth Module. The LCD Display is connected for power, ground, and I2C communication, allowing it to display data or messages. The HC-05 Bluetooth Module is wired for serial communication with the Arduino Sensor Shield, enabling wireless data exchange with other Bluetooth-enabled devices.
Cirkit Designer LogoOpen Project in Cirkit Designer
Arduino Mega 2560 Based Security System with Fingerprint Authentication and SMS Alerts
Image of Door security system: A project utilizing Ludus ProtoShield in a practical application
This circuit features an Arduino Mega 2560 microcontroller interfaced with a SIM800L GSM module, two fingerprint scanners, an I2C LCD display, an IR sensor, and a piezo buzzer. Power management is handled by a PowerBoost 1000 Basic Pad USB, a TP4056 charging module, and a Li-ion 18650 battery, with an option to use a Mini AC-DC 110V-230V to 5V 700mA module for direct power supply. The primary functionality appears to be a security system with GSM communication capabilities, biometric access control, and visual/audible feedback.
Cirkit Designer LogoOpen Project in Cirkit Designer

Explore Projects Built with Ludus ProtoShield

Use Cirkit Designer to design, explore, and prototype these projects online. Some projects support real-time simulation. Click "Open Project" to start designing instantly!
Image of wemos custom shield: A project utilizing Ludus ProtoShield in a practical application
Arduino-Based Temperature Monitoring System with RGB LED Feedback and I2C LCD Display
This circuit features an Adafruit Proto Shield R3 configured with a DS18B20 temperature sensor, a WS2812 RGB LED matrix, and an LCD I2C display. The microcontroller on the Proto Shield reads the temperature from the DS18B20 sensor and displays it on the LCD. It also controls the LED matrix to show random colors and indicates temperature status with onboard LEDs.
Cirkit Designer LogoOpen Project in Cirkit Designer
Image of مشروع مركبة ذاتية تتفادى الحواجز: A project utilizing Ludus ProtoShield in a practical application
Arduino-Controlled Obstacle Avoiding Robot with Ultrasonic Sensor and L298N Motor Driver
This is a mobile robot platform controlled by an Arduino UNO with a sensor shield. It uses an HC-SR04 ultrasonic sensor for obstacle detection and a servo motor for directional control. The robot's movement is powered by gearmotors controlled by an L298N motor driver, and it is designed to navigate by avoiding obstacles detected by the ultrasonic sensor.
Cirkit Designer LogoOpen Project in Cirkit Designer
Image of wallE: A project utilizing Ludus ProtoShield in a practical application
Arduino Sensor Shield with I2C LCD and Bluetooth Interface
This circuit features an Arduino Sensor Shield v5.0 interfaced with an I2C LCD Display and an HC-05 Bluetooth Module. The LCD Display is connected for power, ground, and I2C communication, allowing it to display data or messages. The HC-05 Bluetooth Module is wired for serial communication with the Arduino Sensor Shield, enabling wireless data exchange with other Bluetooth-enabled devices.
Cirkit Designer LogoOpen Project in Cirkit Designer
Image of Door security system: A project utilizing Ludus ProtoShield in a practical application
Arduino Mega 2560 Based Security System with Fingerprint Authentication and SMS Alerts
This circuit features an Arduino Mega 2560 microcontroller interfaced with a SIM800L GSM module, two fingerprint scanners, an I2C LCD display, an IR sensor, and a piezo buzzer. Power management is handled by a PowerBoost 1000 Basic Pad USB, a TP4056 charging module, and a Li-ion 18650 battery, with an option to use a Mini AC-DC 110V-230V to 5V 700mA module for direct power supply. The primary functionality appears to be a security system with GSM communication capabilities, biometric access control, and visual/audible feedback.
Cirkit Designer LogoOpen Project in Cirkit Designer

Common Applications and Use Cases

  • Rapid prototyping of electronic circuits
  • Educational projects and learning platforms for electronics
  • Testing and debugging Arduino-based designs
  • Building custom shields and modules for Arduino

Technical Specifications

Key Technical Details

  • Operating Voltage: Compatible with Arduino board operating voltage
  • Current Rating: Dependent on the connected circuitry
  • Power Ratings: Follows Arduino board specifications

Pin Configuration and Descriptions

Pin Number Description
N/A Not applicable to this product

Note: The Ludus ProtoShield does not have a specific pin configuration as it is a prototyping platform. The pin connections will depend on the user's design.

Usage Instructions

How to Use the Component in a Circuit

  1. Mounting the ProtoShield: Carefully align the ProtoShield's pins with the headers on the Arduino UNO and press down gently to ensure a secure connection.
  2. Prototyping Area: Use the provided prototyping area to place and solder your electronic components. This area is similar to a breadboard but allows for a more permanent setup.
  3. Connectivity: Utilize the additional headers and sockets on the ProtoShield to connect other shields or components. Ensure that any additional shields are compatible with the ProtoShield's layout.

Important Considerations and Best Practices

  • Power Limits: Be mindful of the power limits of the Arduino board and the ProtoShield. Do not exceed the recommended current and voltage ratings.
  • Short Circuits: Avoid creating short circuits when placing components on the prototyping area. Double-check connections before powering up the circuit.
  • Static Discharge: Handle the ProtoShield with care to prevent static discharge from damaging sensitive components.
  • Shield Stacking: If stacking multiple shields, verify pin compatibility and ensure that no pins are shorted together.

Troubleshooting and FAQs

Common Issues Users Might Face

  • Loose Connections: If the ProtoShield is not functioning as expected, check for loose connections between the ProtoShield and the Arduino board.
  • Shorts on the Prototyping Area: Inspect the soldered components for potential shorts that could cause malfunctions or damage.

Solutions and Tips for Troubleshooting

  • Re-seat the ProtoShield: Disconnect and reconnect the ProtoShield to ensure all pins are properly seated.
  • Visual Inspection: Perform a thorough visual inspection of the prototyping area to identify any solder bridges or misplaced components.
  • Continuity Testing: Use a multimeter to test for continuity and ensure that connections are made where expected.

FAQs

Q: Can the Ludus ProtoShield be used with Arduino Mega or other boards? A: The ProtoShield is designed for the Arduino UNO form factor. It may be compatible with other boards that share the same pin layout, but this should be verified for each specific case.

Q: Is it necessary to solder components onto the ProtoShield? A: Yes, to create a permanent and reliable circuit, soldering components onto the ProtoShield is recommended.

Q: Can I stack another shield on top of the Ludus ProtoShield? A: Yes, as long as the other shield is compatible with the pin layout and there are no conflicts between the shields' functionalities.

Example Arduino Code

Below is a simple example of how to use the Ludus ProtoShield with an Arduino UNO to blink an LED:

// Define the LED pin
const int ledPin = 13; // Use pin 13, which has an LED on most Arduino boards

void setup() {
  // Set the LED pin as an output
  pinMode(ledPin, OUTPUT);
}

void loop() {
  digitalWrite(ledPin, HIGH);   // Turn the LED on
  delay(1000);                  // Wait for a second
  digitalWrite(ledPin, LOW);    // Turn the LED off
  delay(1000);                  // Wait for a second
}

Note: This code assumes that an LED is connected to pin 13 on the ProtoShield with a suitable current-limiting resistor.

Remember to adjust the ledPin variable if you connect the LED to a different pin on the ProtoShield.