
How to Use lipo 3.7v 100mAh: Examples, Pinouts, and Specs
 Design with lipo 3.7v 100mAh in Cirkit Designer
Introduction
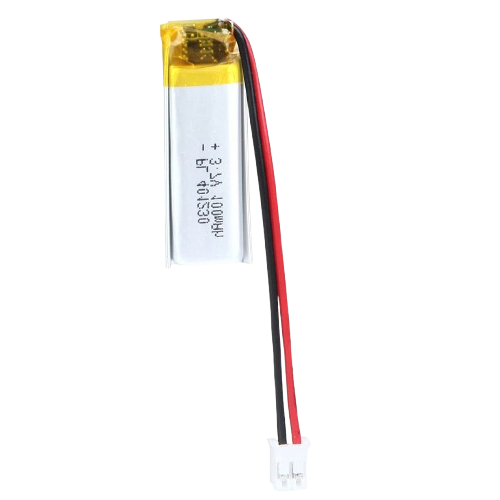
The LiPo 3.7V 100mAh battery is a lightweight and compact lithium polymer battery with a nominal voltage of 3.7 volts and a capacity of 100 milliamp-hours (mAh). Known for its high energy density and slim form factor, this battery is widely used in portable electronic devices, such as wearables, small IoT devices, and miniature robotics. Its rechargeable nature and stable performance make it an ideal choice for applications requiring reliable power in a small package.
Explore Projects Built with lipo 3.7v 100mAh
 Open Project in Cirkit Designer
 Open Project in Cirkit Designer
 Open Project in Cirkit Designer
 Open Project in Cirkit Designer
Explore Projects Built with lipo 3.7v 100mAh
Open Project in Cirkit DesignerOpen Project in Cirkit DesignerOpen Project in Cirkit DesignerOpen Project in Cirkit DesignerCommon Applications
- Wearable devices (e.g., fitness trackers, smartwatches)
- IoT sensors and modules
- Miniature robotics and drones
- Portable medical devices
- Small-scale prototyping projects
Technical Specifications
Below are the key technical details of the LiPo 3.7V 100mAh battery:
| Parameter | Value |
|---|---|
| Nominal Voltage | 3.7V |
| Capacity | 100mAh |
| Maximum Charging Voltage | 4.2V |
| Minimum Discharge Voltage | 3.0V |
| Standard Charge Current | 0.5C (50mA) |
| Maximum Charge Current | 1C (100mA) |
| Standard Discharge Current | 0.5C (50mA) |
| Maximum Discharge Current | 1C (100mA) |
| Dimensions | Varies (typically ~20x15x4mm) |
| Weight | ~2 grams |
| Connector Type | JST-PH or bare leads |
Pin Configuration
The LiPo 3.7V 100mAh battery typically has two leads or pins:
| Pin | Description | Color |
|---|---|---|
| Positive (+) | Battery positive terminal | Red |
| Negative (-) | Battery negative terminal | Black |
Usage Instructions
How to Use the LiPo 3.7V 100mAh in a Circuit
- Connection: Connect the red wire (positive terminal) to the positive input of your circuit and the black wire (negative terminal) to the ground (GND).
- Charging: Use a LiPo-compatible charger to recharge the battery. Ensure the charger supports a 3.7V LiPo battery and does not exceed the maximum charging current of 100mA.
- Voltage Monitoring: To prevent over-discharge, use a voltage monitoring circuit or a microcontroller to ensure the battery voltage does not drop below 3.0V.
- Protection Circuit: Many LiPo batteries include a built-in protection circuit module (PCM) to prevent overcharging, over-discharging, and short circuits. If your battery lacks this feature, consider adding an external protection circuit.
Important Considerations and Best Practices
- Avoid Overcharging: Never charge the battery above 4.2V, as this can damage the battery or cause safety hazards.
- Avoid Over-Discharging: Discharging below 3.0V can permanently damage the battery.
- Temperature Range: Operate the battery within the recommended temperature range (typically 0°C to 45°C for charging and -20°C to 60°C for discharging).
- Storage: Store the battery at ~50% charge in a cool, dry place if not in use for extended periods.
- Handling: Avoid puncturing, bending, or exposing the battery to water or fire.
Example: Connecting to an Arduino UNO
To power an Arduino UNO with the LiPo 3.7V 100mAh battery, you will need a step-up voltage regulator (e.g., a boost converter) to increase the voltage to 5V. Below is an example circuit and code for monitoring the battery voltage using the Arduino's analog input.
Circuit Diagram
- Connect the battery's positive terminal to the input of the boost converter.
- Connect the boost converter's output to the Arduino's 5V and GND pins.
- Use a voltage divider circuit to measure the battery voltage and connect it to an analog pin on the Arduino.
Arduino Code
// LiPo Battery Voltage Monitoring with Arduino UNO
// This code reads the battery voltage using a voltage divider connected to A0.

const int voltagePin = A0; // Analog pin connected to the voltage divider
const float resistorRatio = 2.0; // Ratio of the voltage divider resistors
const float referenceVoltage = 5.0; // Arduino reference voltage (5V)

void setup() {
  Serial.begin(9600); // Initialize serial communication
}

void loop() {
  int rawValue = analogRead(voltagePin); // Read the analog value
  float batteryVoltage = (rawValue / 1023.0) * referenceVoltage * resistorRatio;

  // Print the battery voltage to the Serial Monitor
  Serial.print("Battery Voltage: ");
  Serial.print(batteryVoltage);
  Serial.println(" V");

  delay(1000); // Wait for 1 second before the next reading
}
Troubleshooting and FAQs
Common Issues
Battery Not Charging
- Cause: Charger not compatible or faulty.
- Solution: Ensure the charger is designed for 3.7V LiPo batteries and check the connections.
Battery Drains Quickly
- Cause: Excessive load or battery degradation.
- Solution: Reduce the load current or replace the battery if it has reached the end of its life cycle.
Battery Swelling
- Cause: Overcharging, over-discharging, or physical damage.
- Solution: Stop using the battery immediately and dispose of it safely.
Arduino Not Powering On
- Cause: Insufficient voltage or current from the battery.
- Solution: Use a boost converter to step up the voltage to 5V and ensure the load does not exceed 100mA.
FAQs
Q: Can I use this battery to power a high-current device?
A: No, the maximum discharge current is 100mA. For higher current requirements, consider a battery with a larger capacity.
Q: How long will this battery last on a single charge?
A: The runtime depends on the load current. For example, at a 50mA load, the battery will last approximately 2 hours (100mAh ÷ 50mA).
Q: Is it safe to leave the battery connected to the charger?
A: Only if the charger has overcharge protection. Otherwise, disconnect the battery once fully charged.
Q: Can I connect multiple LiPo batteries in series or parallel?
A: Yes, but ensure proper balancing and use a battery management system (BMS) to avoid safety risks.