Cirkit Designer Logo
Cirkit Designer
Your all-in-one circuit design IDE
Home / 
Component Documentation

How to Use Snail horn: Examples, Pinouts, and Specs

Image of Snail horn
Cirkit Designer LogoDesign with Snail horn in Cirkit Designer

Introduction

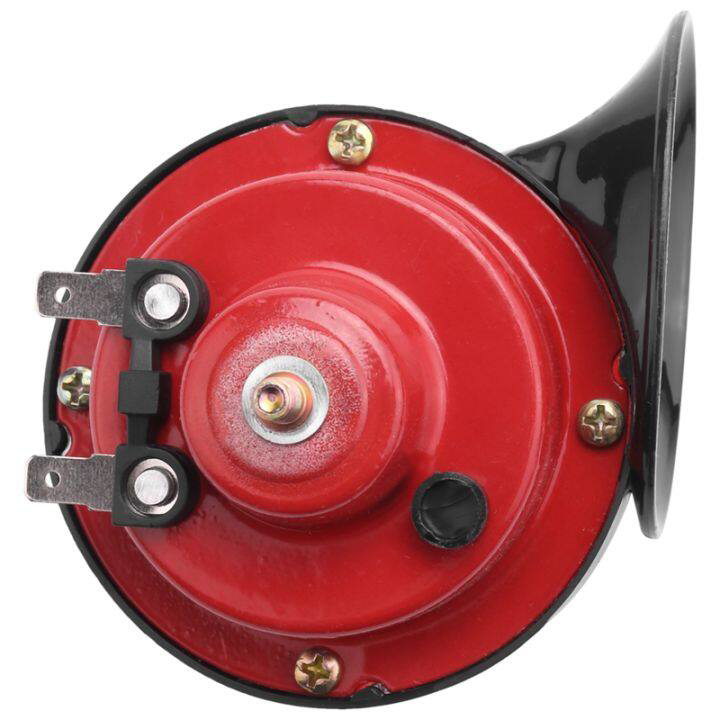
A snail horn is a type of acoustic signaling device designed to produce a loud and attention-grabbing sound. Its unique coiled structure amplifies the sound generated by a vibrating diaphragm, making it highly effective for signaling purposes. Snail horns are commonly used in vehicles such as cars, motorcycles, and trucks to alert other drivers or pedestrians. They are also used in novelty applications, such as custom sound systems or alarm devices.

Explore Projects Built with Snail horn

Use Cirkit Designer to design, explore, and prototype these projects online. Some projects support real-time simulation. Click "Open Project" to start designing instantly!
Arduino UNO and ESP32-CAM Animal Deterrence System with GSM Alerts
Image of PROJECT: A project utilizing Snail horn in a practical application
This circuit is an animal deterrence system that uses an Arduino UNO to interface with a PIR sensor, an ultrasonic sensor, a GSM module, and a buzzer. The system detects animals using the sensors, triggers an alarm via the buzzer, and sends an SMS alert through the GSM module. Additionally, an ESP32-CAM captures images when an animal is detected and sends them to a predefined server or saves them to an SD card.
Cirkit Designer LogoOpen Project in Cirkit Designer
Arduino CNC Shield-Based Ultrasonic Distance Measurement with Buzzer Alert
Image of Theremin: A project utilizing Snail horn in a practical application
This circuit features an Arduino CNC shield interfaced with an HC-SR04 Ultrasonic Sensor and a buzzer, powered by a 5V supply from the shield. The ultrasonic sensor's TRIG and ECHO pins are connected to the CNC shield's Y-STEP and X-STEP pins, respectively, which are likely used to trigger the sensor and read the echo for distance measurement. A rotary potentiometer is connected to provide an adjustable voltage input, possibly for setting a threshold or calibration, and the buzzer is connected to the wiper of the potentiometer, indicating its activation may be dependent on the potentiometer's position.
Cirkit Designer LogoOpen Project in Cirkit Designer
Arduino UNO Gesture-Controlled Snake Game with OLED Display
Image of Arduino: A project utilizing Snail horn in a practical application
This circuit is a gesture-controlled snake game using an Arduino UNO, a PAJ7620 gesture recognition sensor, and a 0.96" OLED display. The Arduino UNO processes gesture inputs from the PAJ7620 sensor to control the snake's movement, and the game is displayed on the OLED screen.
Cirkit Designer LogoOpen Project in Cirkit Designer
Toggle Switch Controlled Lamp Circuit with Banana Sockets
Image of STAIRCASE: A project utilizing Snail horn in a practical application
This circuit consists of two toggle switches and a red lamp connected to panel mount banana sockets. The switches control the connection between the red and black banana sockets, allowing the lamp to be turned on or off depending on the switch positions.
Cirkit Designer LogoOpen Project in Cirkit Designer

Explore Projects Built with Snail horn

Use Cirkit Designer to design, explore, and prototype these projects online. Some projects support real-time simulation. Click "Open Project" to start designing instantly!
Image of PROJECT: A project utilizing Snail horn in a practical application
Arduino UNO and ESP32-CAM Animal Deterrence System with GSM Alerts
This circuit is an animal deterrence system that uses an Arduino UNO to interface with a PIR sensor, an ultrasonic sensor, a GSM module, and a buzzer. The system detects animals using the sensors, triggers an alarm via the buzzer, and sends an SMS alert through the GSM module. Additionally, an ESP32-CAM captures images when an animal is detected and sends them to a predefined server or saves them to an SD card.
Cirkit Designer LogoOpen Project in Cirkit Designer
Image of Theremin: A project utilizing Snail horn in a practical application
Arduino CNC Shield-Based Ultrasonic Distance Measurement with Buzzer Alert
This circuit features an Arduino CNC shield interfaced with an HC-SR04 Ultrasonic Sensor and a buzzer, powered by a 5V supply from the shield. The ultrasonic sensor's TRIG and ECHO pins are connected to the CNC shield's Y-STEP and X-STEP pins, respectively, which are likely used to trigger the sensor and read the echo for distance measurement. A rotary potentiometer is connected to provide an adjustable voltage input, possibly for setting a threshold or calibration, and the buzzer is connected to the wiper of the potentiometer, indicating its activation may be dependent on the potentiometer's position.
Cirkit Designer LogoOpen Project in Cirkit Designer
Image of Arduino: A project utilizing Snail horn in a practical application
Arduino UNO Gesture-Controlled Snake Game with OLED Display
This circuit is a gesture-controlled snake game using an Arduino UNO, a PAJ7620 gesture recognition sensor, and a 0.96" OLED display. The Arduino UNO processes gesture inputs from the PAJ7620 sensor to control the snake's movement, and the game is displayed on the OLED screen.
Cirkit Designer LogoOpen Project in Cirkit Designer
Image of STAIRCASE: A project utilizing Snail horn in a practical application
Toggle Switch Controlled Lamp Circuit with Banana Sockets
This circuit consists of two toggle switches and a red lamp connected to panel mount banana sockets. The switches control the connection between the red and black banana sockets, allowing the lamp to be turned on or off depending on the switch positions.
Cirkit Designer LogoOpen Project in Cirkit Designer

Common Applications:

  • Automotive signaling (cars, motorcycles, trucks)
  • Alarm systems
  • Novelty sound devices
  • Industrial signaling in noisy environments

Technical Specifications

Key Technical Details:

  • Operating Voltage: 12V DC (common for automotive applications)
  • Current Draw: 3A to 5A (depending on the model)
  • Sound Output: 110dB to 130dB at 2 meters
  • Frequency Range: 400Hz to 500Hz (varies by model)
  • Material: Plastic or metal housing with a coiled design
  • Mounting: Typically includes a bracket for secure installation

Pin Configuration and Descriptions:

Snail horns typically have two terminals for electrical connections. Below is a table describing the terminals:

Pin/Terminal Description
Positive (+) Connects to the positive terminal of the power source (12V DC).
Negative (-) Connects to the ground or negative terminal of the power source.

Usage Instructions

How to Use the Snail Horn in a Circuit:

  1. Power Source: Ensure the power source is 12V DC, as most snail horns are designed for this voltage. Using a higher voltage may damage the horn.
  2. Relay Usage: Due to the high current draw (3A to 5A), it is recommended to use a relay to control the horn. This prevents overloading the control switch or microcontroller.
  3. Wiring Diagram:
    • Connect the positive terminal of the horn to the relay's normally open (NO) contact.
    • Connect the relay's common (COM) contact to the 12V DC power source.
    • Connect the negative terminal of the horn to the ground.
    • Use a control switch or microcontroller to activate the relay coil.

Example: Connecting a Snail Horn to an Arduino UNO

Below is an example of how to control a snail horn using an Arduino UNO and a relay module.

Components Required:

  • Snail horn
  • 12V DC power supply
  • Relay module
  • Arduino UNO
  • Push button
  • Connecting wires

Circuit Diagram:

[Arduino UNO] --- [Relay Module] --- [Snail Horn]

Arduino Code:

// Snail Horn Control with Arduino UNO
// This code activates the snail horn when a button is pressed.

const int buttonPin = 2;  // Pin connected to the push button
const int relayPin = 8;   // Pin connected to the relay module

void setup() {
  pinMode(buttonPin, INPUT_PULLUP); // Configure button pin as input with pull-up
  pinMode(relayPin, OUTPUT);       // Configure relay pin as output
  digitalWrite(relayPin, LOW);     // Ensure relay is off at startup
}

void loop() {
  int buttonState = digitalRead(buttonPin); // Read the button state

  if (buttonState == LOW) { // Button pressed (active low)
    digitalWrite(relayPin, HIGH); // Activate the relay (turn on horn)
  } else {
    digitalWrite(relayPin, LOW);  // Deactivate the relay (turn off horn)
  }
}

Important Considerations:

  • Current Handling: Ensure the relay and wiring can handle the high current draw of the horn.
  • Polarity: Double-check the polarity of the connections to avoid damage.
  • Mounting: Securely mount the horn to prevent vibrations or movement during operation.
  • Safety: Avoid prolonged use of the horn, as it can cause hearing damage or disturb others.

Troubleshooting and FAQs

Common Issues and Solutions:

  1. Horn Does Not Sound:

    • Cause: Loose or incorrect wiring.
    • Solution: Verify all connections, especially the power and ground terminals.
  2. Horn Sounds Weak or Distorted:

    • Cause: Insufficient power supply or poor ground connection.
    • Solution: Check the power source voltage and ensure a solid ground connection.
  3. Relay Clicking but Horn Not Working:

    • Cause: Faulty relay or horn.
    • Solution: Test the relay and horn separately to identify the faulty component.
  4. Horn Activates Randomly:

    • Cause: Electrical noise or faulty control circuit.
    • Solution: Add a pull-down resistor to the control pin or use a debounce circuit for the button.

FAQs:

  • Q: Can I use a snail horn with a 24V system?
    A: No, most snail horns are designed for 12V systems. Using 24V may damage the horn. Look for a 24V-compatible model if needed.

  • Q: Is a relay necessary for the horn?
    A: Yes, due to the high current draw, a relay is recommended to protect the control circuit and ensure reliable operation.

  • Q: How loud is a snail horn?
    A: Snail horns typically produce sound levels between 110dB and 130dB, which is very loud and suitable for signaling purposes.

  • Q: Can I use the horn continuously?
    A: No, prolonged use can overheat the horn and reduce its lifespan. Use it in short bursts as intended.

By following this documentation, you can effectively integrate and troubleshoot a snail horn in your projects or vehicles.