How to Use Haptic Motor Controller: Examples, Pinouts, and Specs
Introduction
The Haptic Motor Controller is a device designed to regulate and control the operation of haptic motors, which provide tactile feedback through vibrations or motions. This component is widely used in applications where user interaction is enhanced by physical feedback, such as touchscreens, gaming controllers, wearable devices, and automotive interfaces. By precisely controlling the intensity, duration, and pattern of vibrations, the Haptic Motor Controller enables a more immersive and responsive user experience.
Explore Projects Built with Haptic Motor Controller

Explore Projects Built with Haptic Motor Controller
Common Applications:
- Smartphones and tablets for touch feedback
- Gaming controllers for immersive gameplay
- Wearable devices for notifications and alerts
- Automotive touch interfaces
- Medical devices for tactile feedback
Technical Specifications
The following table outlines the key technical specifications of a typical Haptic Motor Controller:
| Parameter | Value |
|---|---|
| Operating Voltage | 2.5V to 5.5V |
| Output Current | Up to 500mA |
| Control Interface | PWM, I2C, or GPIO |
| Supported Motors | ERM (Eccentric Rotating Mass) and LRA (Linear Resonant Actuator) |
| Operating Temperature | -40°C to 85°C |
| Frequency Range | 10Hz to 300Hz |
| Package Type | QFN, TSSOP, or similar |
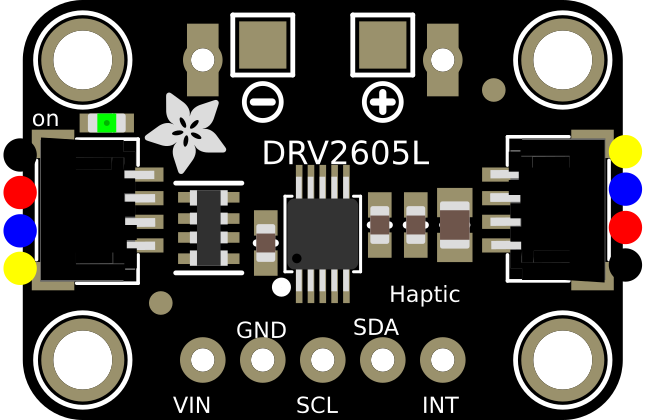
Pin Configuration and Descriptions
Below is a typical pinout for a Haptic Motor Controller:
| Pin | Name | Description |
|---|---|---|
| 1 | VDD | Power supply input (2.5V to 5.5V). Connect to a stable voltage source. |
| 2 | GND | Ground connection. Connect to the circuit ground. |
| 3 | IN | Control input (PWM or analog signal). Used to set vibration intensity or pattern. |
| 4 | OUT+ | Positive output terminal for the haptic motor. |
| 5 | OUT- | Negative output terminal for the haptic motor. |
| 6 | EN | Enable pin. High to enable the controller, low to disable. |
| 7 | SDA | I2C data line (if applicable). |
| 8 | SCL | I2C clock line (if applicable). |
Usage Instructions
How to Use the Haptic Motor Controller in a Circuit
- Power Supply: Connect the VDD pin to a stable power source within the operating voltage range (2.5V to 5.5V). Connect the GND pin to the circuit ground.
- Motor Connection: Attach the haptic motor's terminals to the OUT+ and OUT- pins. Ensure the motor type (ERM or LRA) is compatible with the controller.
- Control Signal: Provide a control signal to the IN pin. This can be a PWM signal for intensity control or an analog signal for simpler applications.
- Enable the Controller: Set the EN pin high to activate the controller. Pull it low to disable the controller when not in use.
- Optional I2C Control: If the controller supports I2C, connect the SDA and SCL pins to the corresponding lines on your microcontroller for advanced control.
Important Considerations and Best Practices
- Decoupling Capacitors: Place a decoupling capacitor (e.g., 0.1µF) close to the VDD pin to reduce noise and ensure stable operation.
- Motor Selection: Verify that the motor's voltage and current ratings are within the controller's supported range.
- Thermal Management: Ensure adequate ventilation or heat dissipation if the controller operates at high currents for extended periods.
- Signal Integrity: Use short and well-routed traces for the control and motor connections to minimize noise and interference.
Example: Using the Haptic Motor Controller with an Arduino UNO
Below is an example of how to control a Haptic Motor Controller using an Arduino UNO and a PWM signal:
// Define the pin connected to the IN pin of the Haptic Motor Controller
const int hapticControlPin = 9; // PWM-capable pin on Arduino UNO

void setup() {
  // Set the haptic control pin as an output
  pinMode(hapticControlPin, OUTPUT);
}

void loop() {
  // Generate a vibration pattern by varying the PWM duty cycle
  for (int intensity = 0; intensity <= 255; intensity += 5) {
    analogWrite(hapticControlPin, intensity); // Increase vibration intensity
    delay(50); // Wait 50ms
  }
  for (int intensity = 255; intensity >= 0; intensity -= 5) {
    analogWrite(hapticControlPin, intensity); // Decrease vibration intensity
    delay(50); // Wait 50ms
  }
}
Troubleshooting and FAQs
Common Issues and Solutions
Motor Does Not Vibrate:
Cause: The EN pin is not set high.
Solution: Ensure the EN pin is connected to a high logic level.
Cause: Incorrect motor connection.
Solution: Verify that the motor is properly connected to the OUT+ and OUT- pins.
Weak or No Vibration:
Cause: Insufficient control signal.
Solution: Check the PWM or analog signal provided to the IN pin. Ensure it is within the expected range.
Cause: Motor not compatible.
Solution: Confirm that the motor type (ERM or LRA) matches the controller's specifications.
Overheating:
- Cause: Excessive current draw.
- Solution: Ensure the motor's current rating does not exceed the controller's maximum output current.
I2C Communication Fails:
- Cause: Incorrect wiring or address.
- Solution: Verify the SDA and SCL connections and ensure the correct I2C address is used.
FAQs
Q: Can I use this controller with both ERM and LRA motors?
A: Yes, most Haptic Motor Controllers support both types of motors. Check the datasheet for specific compatibility.Q: What is the advantage of using PWM for control?
A: PWM allows precise control of vibration intensity and enables dynamic feedback patterns.Q: Can I power the controller directly from a 3.3V microcontroller?
A: Yes, as long as the controller's operating voltage range includes 3.3V.Q: How do I create custom vibration patterns?
A: Use a microcontroller to generate varying PWM signals or program specific patterns via I2C if supported.
This documentation provides a comprehensive guide to understanding, using, and troubleshooting the Haptic Motor Controller.