
How to Use TMC5160T: Examples, Pinouts, and Specs
 Design with TMC5160T in Cirkit Designer
Introduction
The TMC5160T by BigTreeTech (Manufacturer Part ID: TMC5160T V1.0) is a high-performance stepper motor driver designed for precise and efficient control of stepper motors. It integrates advanced features such as microstepping, integrated current sensing, and programmable settings, making it a versatile solution for demanding motion control applications. The TMC5160T supports multiple communication interfaces, including SPI, and is ideal for use in robotics, 3D printing, CNC machinery, and other automation systems.
Explore Projects Built with TMC5160T
 Open Project in Cirkit Designer
 Open Project in Cirkit Designer
 Open Project in Cirkit Designer
 Open Project in Cirkit Designer
Explore Projects Built with TMC5160T
Open Project in Cirkit DesignerOpen Project in Cirkit DesignerOpen Project in Cirkit DesignerOpen Project in Cirkit DesignerCommon Applications
- 3D Printers: For smooth and precise motor control in extruders and axes.
- CNC Machines: To ensure accurate positioning and motion control.
- Robotics: For precise movement in robotic arms and mobile platforms.
- Industrial Automation: In conveyor systems and other automated machinery.
Technical Specifications
Key Technical Details
| Parameter | Value |
|---|---|
| Supply Voltage (VM) | 8V to 60V |
| Logic Voltage (VIO) | 3.3V or 5V |
| Maximum Motor Current (RMS) | Up to 3A (configurable via SPI) |
| Microstepping Resolution | Up to 256 microsteps per full step |
| Communication Interface | SPI (Serial Peripheral Interface) |
| Integrated Features | Current sensing, stall detection, and diagnostics |
| Operating Temperature | -40°C to +125°C |
| Package Type | QFN48 (7mm x 7mm) |
Pin Configuration and Descriptions
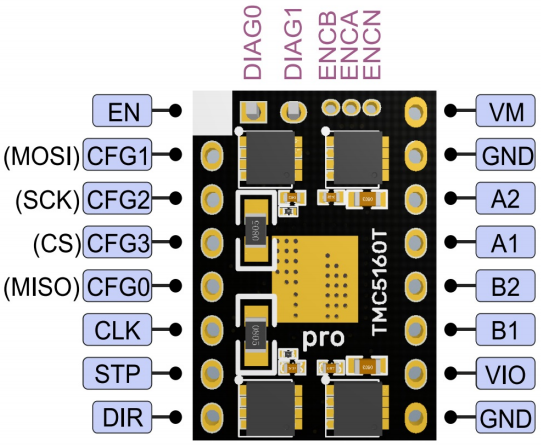
The TMC5160T comes in a QFN48 package with the following pin configuration:
| Pin Number | Pin Name | Description |
|---|---|---|
| 1 | VM | Motor power supply (8V to 60V) |
| 2 | GND | Ground connection |
| 3 | VIO | Logic voltage input (3.3V or 5V) |
| 4 | SPI_MOSI | SPI Master Out Slave In |
| 5 | SPI_MISO | SPI Master In Slave Out |
| 6 | SPI_SCK | SPI Clock |
| 7 | SPI_CS | SPI Chip Select |
| 8 | ENN | Enable input (active low) |
| 9 | STEP | Step pulse input |
| 10 | DIR | Direction control input |
| 11 | DIAG0 | Diagnostic output 0 |
| 12 | DIAG1 | Diagnostic output 1 |
| 13-48 | Various | Motor phase outputs, configuration pins, and additional control signals |
Refer to the manufacturer's datasheet for a complete pinout and detailed descriptions.
Usage Instructions
How to Use the TMC5160T in a Circuit
- Power Supply: Connect the motor power supply (VM) to a voltage source between 8V and 60V. Ensure the logic voltage (VIO) matches your microcontroller's logic level (3.3V or 5V).
- SPI Communication: Connect the SPI pins (MOSI, MISO, SCK, CS) to your microcontroller for configuration and control.
- Motor Connections: Connect the stepper motor's coils to the appropriate motor phase output pins.
- Control Signals: Use the STEP and DIR pins to control the motor's movement and direction.
- Enable Pin: Pull the ENN pin low to enable the driver.
- Configuration: Use SPI commands to configure parameters such as current limits, microstepping resolution, and stall detection.
Important Considerations
- Heat Dissipation: The TMC5160T can generate significant heat during operation. Use a heatsink or active cooling to maintain safe operating temperatures.
- Current Settings: Configure the motor current via SPI to avoid exceeding the motor's rated current.
- Decoupling Capacitors: Place appropriate decoupling capacitors near the VM and VIO pins to ensure stable operation.
- Fault Handling: Monitor the DIAG0 and DIAG1 pins for fault conditions such as overtemperature or short circuits.
Example Code for Arduino UNO
Below is an example of how to configure and control the TMC5160T using an Arduino UNO via SPI:
#include <SPI.h>

// Define SPI pins
const int CS_PIN = 10; // Chip Select pin for TMC5160T

void setup() {
  // Initialize SPI
  SPI.begin();
  pinMode(CS_PIN, OUTPUT);
  digitalWrite(CS_PIN, HIGH); // Set CS pin high (inactive)

  // Configure TMC5160T via SPI
  configureTMC5160();
}

void loop() {
  // Example: Send step pulses to move the motor
  digitalWrite(CS_PIN, LOW); // Select TMC5160T
  sendStepPulse();
  digitalWrite(CS_PIN, HIGH); // Deselect TMC5160T
  delay(10); // Delay between steps
}

void configureTMC5160() {
  digitalWrite(CS_PIN, LOW); // Select TMC5160T

  // Example SPI command to configure the driver
  SPI.transfer(0x80); // Write command to register 0x00
  SPI.transfer(0x00); // Data byte 1
  SPI.transfer(0x00); // Data byte 2
  SPI.transfer(0x00); // Data byte 3
  SPI.transfer(0x00); // Data byte 4

  digitalWrite(CS_PIN, HIGH); // Deselect TMC5160T
}

void sendStepPulse() {
  // Send a single step pulse
  digitalWrite(9, HIGH); // STEP pin high
  delayMicroseconds(10); // Pulse width
  digitalWrite(9, LOW);  // STEP pin low
}
Note: Replace the SPI commands with the appropriate configuration values for your application. Refer to the TMC5160T datasheet for register details.
Troubleshooting and FAQs
Common Issues and Solutions
Motor Not Moving:
- Ensure the ENN pin is pulled low to enable the driver.
- Verify the STEP and DIR signals are being sent correctly.
- Check the motor connections and ensure the motor is powered.
Overheating:
- Use a heatsink or active cooling to dissipate heat.
- Reduce the motor current via SPI configuration.
Fault Conditions:
- Monitor the DIAG0 and DIAG1 pins for diagnostic information.
- Check for short circuits or overvoltage conditions.
SPI Communication Issues:
- Verify the SPI connections and ensure the correct logic voltage (3.3V or 5V).
- Check the SPI clock speed and ensure it is within the TMC5160T's specifications.
FAQs
Can the TMC5160T operate without SPI?
- No, SPI is required for initial configuration and advanced features.
What is the maximum microstepping resolution?
- The TMC5160T supports up to 256 microsteps per full step.
How do I set the motor current?
- Use SPI commands to configure the current limit registers. Refer to the datasheet for details.
Is the TMC5160T compatible with 12V motors?
- Yes, the TMC5160T supports motor supply voltages from 8V to 60V, including 12V.
This concludes the documentation for the TMC5160T. For further details, refer to the official datasheet and application notes provided by BigTreeTech.