Cirkit Designer Logo
Cirkit Designer
Your all-in-one circuit design IDE
Home / 
Component Documentation

How to Use Adafruit TCA4307: Examples, Pinouts, and Specs

Image of Adafruit TCA4307
Cirkit Designer LogoDesign with Adafruit TCA4307 in Cirkit Designer

Introduction

The Adafruit TCA4307 is a versatile and efficient bidirectional I2C voltage-level translator designed to facilitate communication between I2C devices that operate at different voltage levels. This component is essential in mixed-voltage systems where 5V and 3.3V devices need to communicate over the I2C bus without risking damage due to incompatible voltage levels. The TCA4307 is particularly useful in applications such as microcontroller interfacing, sensor integration, and data acquisition systems where devices with varying logic levels must interact seamlessly.

Explore Projects Built with Adafruit TCA4307

Use Cirkit Designer to design, explore, and prototype these projects online. Some projects support real-time simulation. Click "Open Project" to start designing instantly!
Teensy 4.1-Based Multi-Channel Potentiometer Interface with 74HC4051 Mux and AMS1117 3.3V Regulator
Image of redrum: A project utilizing Adafruit TCA4307 in a practical application
This circuit features a Teensy 4.1 microcontroller interfaced with a SparkFun 74HC4051 8-channel multiplexer to read multiple rotary potentiometers. The AMS1117 3.3V voltage regulator provides a stable 3.3V supply to the multiplexer and potentiometers, while electrolytic and ceramic capacitors are used for power supply filtering and stabilization.
Cirkit Designer LogoOpen Project in Cirkit Designer
Battery-Powered Arduino UNO Smart Light with NeoPixel and ADXL345
Image of Cubagick: A project utilizing Adafruit TCA4307 in a practical application
This circuit is a battery-powered system featuring an Arduino UNO that controls an Adafruit NeoPixel Stick and interfaces with an ADXL345 accelerometer and an ILI9341 TFT display. The TP4056 module charges a 18650 battery, which powers the system through a DC-DC converter. The Arduino code drives the NeoPixel Stick to display a red light sequence.
Cirkit Designer LogoOpen Project in Cirkit Designer
Arduino UNO Based Temperature Monitoring System with MAX6675 and RTC
Image of Labby Mark1: A project utilizing Adafruit TCA4307 in a practical application
This circuit features an Arduino UNO microcontroller interfaced with a MAX6675 thermocouple module, a ph4502c sensor module, an Adafruit DS1307 real-time clock (RTC) module, and an I2C LCD 16x2 display. The Arduino reads temperature data from the MAX6675, pH and temperature from the ph4502c, and time from the RTC, displaying this information on the LCD. A pushbutton is connected to the Arduino for potential user input, and all modules are powered by the Arduino's 5V output.
Cirkit Designer LogoOpen Project in Cirkit Designer
Arduino Mega 2560 Based Multi-Channel Thermocouple Reader
Image of thermostat-test: A project utilizing Adafruit TCA4307 in a practical application
This circuit is designed to interface with multiple MAX6675 thermocouple-to-digital converter modules using an Arduino Mega 2560 as the central processing unit. The Arduino reads temperature data from the MAX6675 modules over a shared SPI bus, with individual chip select (CS) lines for each module to enable multiplexing. The circuit is likely used for monitoring multiple temperature points, possibly in an industrial setting where precise temperature control and monitoring are critical.
Cirkit Designer LogoOpen Project in Cirkit Designer

Explore Projects Built with Adafruit TCA4307

Use Cirkit Designer to design, explore, and prototype these projects online. Some projects support real-time simulation. Click "Open Project" to start designing instantly!
Image of redrum: A project utilizing Adafruit TCA4307 in a practical application
Teensy 4.1-Based Multi-Channel Potentiometer Interface with 74HC4051 Mux and AMS1117 3.3V Regulator
This circuit features a Teensy 4.1 microcontroller interfaced with a SparkFun 74HC4051 8-channel multiplexer to read multiple rotary potentiometers. The AMS1117 3.3V voltage regulator provides a stable 3.3V supply to the multiplexer and potentiometers, while electrolytic and ceramic capacitors are used for power supply filtering and stabilization.
Cirkit Designer LogoOpen Project in Cirkit Designer
Image of Cubagick: A project utilizing Adafruit TCA4307 in a practical application
Battery-Powered Arduino UNO Smart Light with NeoPixel and ADXL345
This circuit is a battery-powered system featuring an Arduino UNO that controls an Adafruit NeoPixel Stick and interfaces with an ADXL345 accelerometer and an ILI9341 TFT display. The TP4056 module charges a 18650 battery, which powers the system through a DC-DC converter. The Arduino code drives the NeoPixel Stick to display a red light sequence.
Cirkit Designer LogoOpen Project in Cirkit Designer
Image of Labby Mark1: A project utilizing Adafruit TCA4307 in a practical application
Arduino UNO Based Temperature Monitoring System with MAX6675 and RTC
This circuit features an Arduino UNO microcontroller interfaced with a MAX6675 thermocouple module, a ph4502c sensor module, an Adafruit DS1307 real-time clock (RTC) module, and an I2C LCD 16x2 display. The Arduino reads temperature data from the MAX6675, pH and temperature from the ph4502c, and time from the RTC, displaying this information on the LCD. A pushbutton is connected to the Arduino for potential user input, and all modules are powered by the Arduino's 5V output.
Cirkit Designer LogoOpen Project in Cirkit Designer
Image of thermostat-test: A project utilizing Adafruit TCA4307 in a practical application
Arduino Mega 2560 Based Multi-Channel Thermocouple Reader
This circuit is designed to interface with multiple MAX6675 thermocouple-to-digital converter modules using an Arduino Mega 2560 as the central processing unit. The Arduino reads temperature data from the MAX6675 modules over a shared SPI bus, with individual chip select (CS) lines for each module to enable multiplexing. The circuit is likely used for monitoring multiple temperature points, possibly in an industrial setting where precise temperature control and monitoring are critical.
Cirkit Designer LogoOpen Project in Cirkit Designer

Technical Specifications

Key Technical Details

  • Operating Voltage (VCCA side): 1.2V to 3.6V
  • Operating Voltage (VCCB side): 1.65V to 5.5V
  • I2C Bus Speed: Up to 400kHz
  • Channels: 4 bidirectional channels
  • Logic Level Translation: Bidirectional
  • Operating Temperature Range: -40°C to +85°C

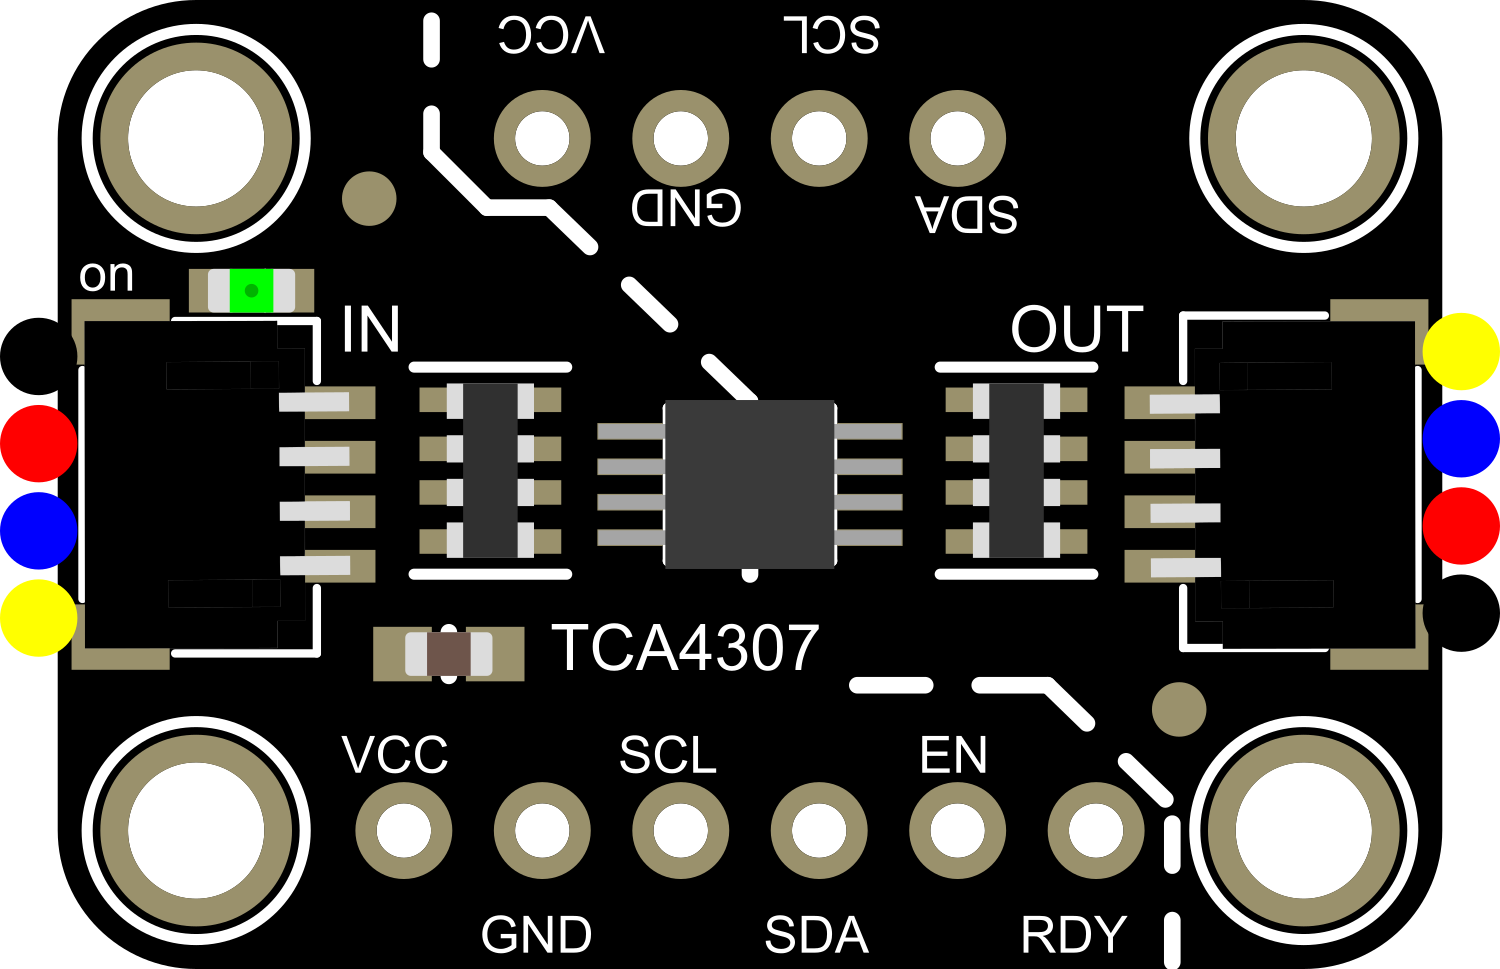
Pin Configuration and Descriptions

Pin Number Pin Name Description
1 VCCA Voltage supply for lower-voltage side (1.2V to 3.6V)
2 GND Ground reference for both voltage levels
3 SDA1 I2C data line for lower-voltage side
4 SCL1 I2C clock line for lower-voltage side
5 EN Enable pin (active high)
6 SCL2 I2C clock line for higher-voltage side
7 SDA2 I2C data line for higher-voltage side
8 VCCB Voltage supply for higher-voltage side (1.65V to 5.5V)

Usage Instructions

Interfacing with a Circuit

To use the Adafruit TCA4307 in a circuit:

  1. Connect VCCA to the lower-voltage power supply (e.g., 3.3V).
  2. Connect VCCB to the higher-voltage power supply (e.g., 5V).
  3. Connect GND to the common ground of both power supplies.
  4. Connect SDA1 and SCL1 to the I2C data and clock lines of the lower-voltage device.
  5. Connect SDA2 and SCL2 to the I2C data and clock lines of the higher-voltage device.
  6. Connect the EN pin to a logic high level to enable the device.

Important Considerations and Best Practices

  • Ensure that the power supplies are stable and within the specified voltage ranges for VCCA and VCCB.
  • The EN pin must be set high to enable the voltage translation function. If left unconnected, the device will not operate.
  • Keep the I2C bus lines as short as possible to minimize signal degradation, especially at higher speeds.
  • Use pull-up resistors on the SDA and SCL lines as required by the I2C specification. The value of these resistors may vary depending on the bus capacitance and speed.

Troubleshooting and FAQs

Common Issues

  • I2C Communication Failure: Ensure that the EN pin is set high and that the voltage levels on both sides are within the specified range.
  • Device Not Responding: Check the pull-up resistors on the SDA and SCL lines. Incorrect resistor values can cause communication issues.

Solutions and Tips

  • If the device is not functioning, verify that all connections are secure and that there are no shorts on the I2C bus.
  • Use an oscilloscope to check the integrity of the I2C signals. Look for clean transitions and correct logic levels.

FAQs

Q: Can the TCA4307 be used with a 5V Arduino and a 3.3V sensor?

A: Yes, the TCA4307 is ideal for interfacing a 5V Arduino with a 3.3V sensor over the I2C bus.

Q: What happens if the EN pin is left floating?

A: The EN pin should not be left floating as it may result in unpredictable behavior. It should be tied to a logic high level to enable the device.

Q: Is external power required for the TCA4307?

A: The TCA4307 requires two external power supplies corresponding to the two voltage levels it is translating between.

Example Arduino Code

Below is an example of how to use the Adafruit TCA4307 with an Arduino UNO to interface with a 3.3V I2C sensor.

#include <Wire.h>

void setup() {
  Wire.begin(); // Initialize I2C
  pinMode(2, OUTPUT); // Assuming EN pin is connected to Arduino pin 2
  digitalWrite(2, HIGH); // Enable the TCA4307
  Serial.begin(9600); // Start serial communication for debugging
}

void loop() {
  // Code to communicate with the 3.3V I2C sensor
  // This will depend on the specific sensor being used
}

Remember to replace the placeholder code in the loop() function with the actual code required to communicate with your specific I2C sensor.