Cirkit Designer Logo
Cirkit Designer
Your all-in-one circuit design IDE
Home / 
Component Documentation

How to Use China ST7735S 160x128: Examples, Pinouts, and Specs

Image of China ST7735S 160x128
Cirkit Designer LogoDesign with China ST7735S 160x128 in Cirkit Designer

Introduction

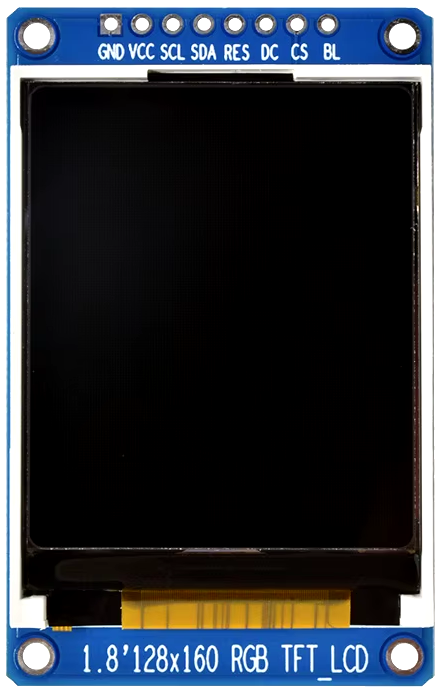
The China ST7735S 160x128 is a compact 1.8-inch TFT LCD display module that offers a resolution of 160x128 pixels. It is capable of displaying a wide range of colors, making it suitable for a variety of applications, including smartwatches, handheld gaming devices, and other portable electronic gadgets. Its small form factor and low power consumption make it an ideal choice for battery-powered devices.

Explore Projects Built with China ST7735S 160x128

Use Cirkit Designer to design, explore, and prototype these projects online. Some projects support real-time simulation. Click "Open Project" to start designing instantly!
ESP32-C6 and ST7735S Display: Wi-Fi Controlled TFT Display Module
Image of ESP32-C6sm-ST7735: A project utilizing China ST7735S 160x128 in a practical application
This circuit features an ESP32-C6 microcontroller interfaced with a China ST7735S 160x128 TFT display. The ESP32-C6 controls the display via SPI communication, providing power, ground, and control signals to render graphics and text on the screen.
Cirkit Designer LogoOpen Project in Cirkit Designer
STM32F103C8T6-Based Spectral Sensor with ST7735S Display and Pushbutton Control
Image of ColorSensor: A project utilizing China ST7735S 160x128 in a practical application
This circuit features an STM32F103C8T6 microcontroller interfaced with a China ST7735S 160x128 display and two spectral sensors (Adafruit AS7262 and AS7261). It also includes two pushbuttons for user input, with the microcontroller managing the display and sensor data processing.
Cirkit Designer LogoOpen Project in Cirkit Designer
RTL8720DN-Based Interactive Button-Controlled TFT Display
Image of coba-coba: A project utilizing China ST7735S 160x128 in a practical application
This circuit features an RTL8720DN microcontroller interfaced with a China ST7735S 160x128 TFT LCD display and four pushbuttons. The microcontroller reads the states of the pushbuttons and displays their statuses on the TFT LCD, providing a visual feedback system for button presses.
Cirkit Designer LogoOpen Project in Cirkit Designer
Raspberry Pi Pico Controlled ST7735S Display Module
Image of PICO_ST7735_TEST: A project utilizing China ST7735S 160x128 in a practical application
This circuit connects a Raspberry Pi Pico microcontroller to a China ST7735S 160x128 pixel display. The Pico is configured to provide power (VCC and BL), grounding (GND), and control signals (CS, DC, RES) to the display, as well as SPI communication via SCL and SDA pins for data transfer. The purpose of this circuit is to enable the Raspberry Pi Pico to control and display graphics or text on the ST7735S LCD screen.
Cirkit Designer LogoOpen Project in Cirkit Designer

Explore Projects Built with China ST7735S 160x128

Use Cirkit Designer to design, explore, and prototype these projects online. Some projects support real-time simulation. Click "Open Project" to start designing instantly!
Image of ESP32-C6sm-ST7735: A project utilizing China ST7735S 160x128 in a practical application
ESP32-C6 and ST7735S Display: Wi-Fi Controlled TFT Display Module
This circuit features an ESP32-C6 microcontroller interfaced with a China ST7735S 160x128 TFT display. The ESP32-C6 controls the display via SPI communication, providing power, ground, and control signals to render graphics and text on the screen.
Cirkit Designer LogoOpen Project in Cirkit Designer
Image of ColorSensor: A project utilizing China ST7735S 160x128 in a practical application
STM32F103C8T6-Based Spectral Sensor with ST7735S Display and Pushbutton Control
This circuit features an STM32F103C8T6 microcontroller interfaced with a China ST7735S 160x128 display and two spectral sensors (Adafruit AS7262 and AS7261). It also includes two pushbuttons for user input, with the microcontroller managing the display and sensor data processing.
Cirkit Designer LogoOpen Project in Cirkit Designer
Image of coba-coba: A project utilizing China ST7735S 160x128 in a practical application
RTL8720DN-Based Interactive Button-Controlled TFT Display
This circuit features an RTL8720DN microcontroller interfaced with a China ST7735S 160x128 TFT LCD display and four pushbuttons. The microcontroller reads the states of the pushbuttons and displays their statuses on the TFT LCD, providing a visual feedback system for button presses.
Cirkit Designer LogoOpen Project in Cirkit Designer
Image of PICO_ST7735_TEST: A project utilizing China ST7735S 160x128 in a practical application
Raspberry Pi Pico Controlled ST7735S Display Module
This circuit connects a Raspberry Pi Pico microcontroller to a China ST7735S 160x128 pixel display. The Pico is configured to provide power (VCC and BL), grounding (GND), and control signals (CS, DC, RES) to the display, as well as SPI communication via SCL and SDA pins for data transfer. The purpose of this circuit is to enable the Raspberry Pi Pico to control and display graphics or text on the ST7735S LCD screen.
Cirkit Designer LogoOpen Project in Cirkit Designer

Common Applications and Use Cases

  • Smartwatches and fitness trackers
  • Portable gaming systems
  • Home automation displays
  • DIY electronics projects with microcontrollers (e.g., Arduino, Raspberry Pi)
  • Educational tools for teaching electronics and programming

Technical Specifications

Key Technical Details

  • Display Size: 1.8 inches
  • Resolution: 160x128 pixels
  • Interface: SPI (Serial Peripheral Interface)
  • Color Depth: 18-bit (262K colors)
  • Operating Voltage: 3.3V - 5V
  • Logic Level: 3.3V (5V tolerant with level shifter)
  • Driver IC: ST7735S

Pin Configuration and Descriptions

Pin Number Pin Name Description
1 GND Ground
2 VCC Power supply (3.3V - 5V)
3 SCL Serial Clock Line
4 SDA Serial Data Line
5 RES Reset
6 DC Data/Command control
7 CS Chip Select
8 BL Backlight control (optional PWM dimming)

Usage Instructions

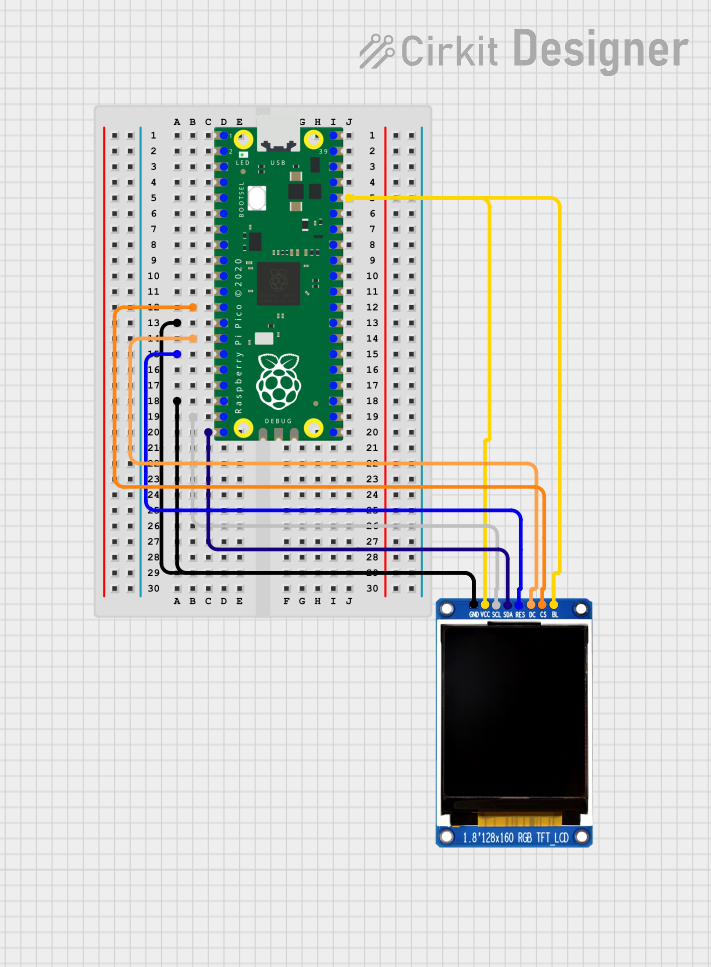
How to Use the Component in a Circuit

  1. Power Connections: Connect the VCC pin to a 3.3V or 5V power supply, and the GND pin to the ground.
  2. Data Connections: Connect the SCL and SDA pins to the corresponding SPI clock and data lines on your microcontroller.
  3. Control Connections: Connect the RES, DC, and CS pins to available digital I/O pins on your microcontroller.
  4. Backlight: Optionally, connect the BL pin to a PWM-capable pin for backlight control.

Important Considerations and Best Practices

  • Always ensure that the power supply voltage matches the specifications to prevent damage.
  • Use a level shifter if your microcontroller operates at a different logic level than the display.
  • Avoid exposing the display to direct sunlight or high temperatures to prevent damage.
  • When handling the display, take precautions against electrostatic discharge (ESD).

Example Code for Arduino UNO

#include <Adafruit_GFX.h>    // Core graphics library
#include <Adafruit_ST7735.h> // Hardware-specific library for ST7735

// Pin definitions
#define TFT_CS     10
#define TFT_RST    9
#define TFT_DC     8

// Initialize Adafruit ST7735S
Adafruit_ST7735 tft = Adafruit_ST7735(TFT_CS, TFT_DC, TFT_RST);

void setup() {
  tft.initR(INITR_BLACKTAB);      // Initialize display with black tab
  tft.fillScreen(ST7735_BLACK);   // Fill screen with black color
}

void loop() {
  tft.setCursor(0, 0);            // Set cursor at top-left corner
  tft.setTextColor(ST7735_WHITE); // Set text color to white
  tft.setTextWrap(true);          // Set text to wrap at end of line
  tft.print("Hello, World!");     // Print a message to the screen
}

Ensure you have installed the Adafruit_GFX and Adafruit_ST7735 libraries before uploading this code to your Arduino UNO.

Troubleshooting and FAQs

Common Issues

  • Display not powering on: Check the power connections and ensure the voltage is within the specified range.
  • No image or incorrect colors: Verify that the SPI connections are correct and that the correct pins are defined in your code.
  • Dim or flickering backlight: Ensure that the BL pin is connected properly and that the PWM signal is within the correct range.

Solutions and Tips for Troubleshooting

  • Double-check all wiring against the pin configuration table.
  • Use example code to test the display functionality before integrating it into your project.
  • If using a 5V microcontroller, incorporate a level shifter for the data lines to prevent damage to the display.

FAQs

Q: Can I use this display with a 5V microcontroller? A: Yes, but you will need to use a level shifter for the data lines to convert the logic level to 3.3V.

Q: How can I control the brightness of the backlight? A: You can control the brightness by applying a PWM signal to the BL pin.

Q: What library should I use with this display? A: The Adafruit_GFX and Adafruit_ST7735 libraries are recommended for use with this display.

Q: Is it possible to display images or animations? A: Yes, the display is capable of showing images and animations. You will need to use the appropriate functions provided by the library to do so.