Cirkit Designer Logo
Cirkit Designer
Your all-in-one circuit design IDE
Home / 
Component Documentation

How to Use Adafruit 40-pin TFT Friend: Examples, Pinouts, and Specs

Image of Adafruit 40-pin TFT Friend
Cirkit Designer LogoDesign with Adafruit 40-pin TFT Friend in Cirkit Designer

Introduction

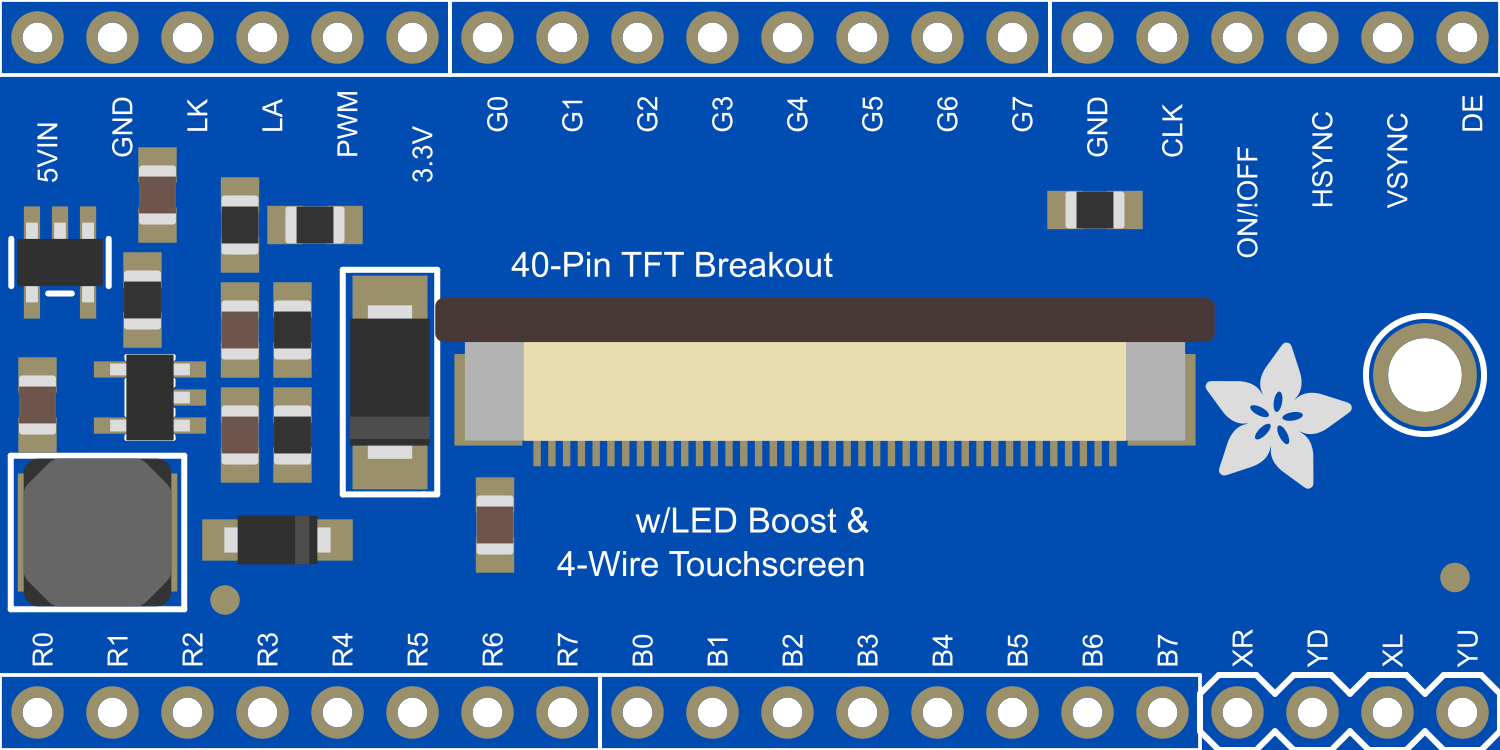
The Adafruit 40-pin TFT Friend is a breakout board designed to make working with TFT displays easier and more flexible. It is equipped with a 40-pin connector that is compatible with a wide range of TFT displays, making it an ideal choice for projects that require a color display for graphics, text, or user interfaces. Common applications include handheld instruments, touch interfaces, gaming devices, and other projects where visual output is necessary.

Explore Projects Built with Adafruit 40-pin TFT Friend

Use Cirkit Designer to design, explore, and prototype these projects online. Some projects support real-time simulation. Click "Open Project" to start designing instantly!
Arduino Mega 2560 Controlled TFT Touchscreen Interface
Image of Tablero Moto: A project utilizing Adafruit 40-pin TFT Friend in a practical application
This circuit connects an Arduino Mega 2560 microcontroller to a 3.5-inch 480x320 TFT LCD display. The Arduino provides power, ground, and digital signals to control the display, including data lines for pixel information and control lines for reset, write, and command/data selection. The embedded code initializes the display and configures the Arduino's pins for communication, likely to create a user interface or visual output for a project.
Cirkit Designer LogoOpen Project in Cirkit Designer
Arduino Mega 2560 and ILI9341 TFT Display Interface for Custom Display Projects
Image of ekran: A project utilizing Adafruit 40-pin TFT Friend in a practical application
This circuit connects an Arduino Mega 2560 microcontroller to an ili9341 TFT display, enabling the microcontroller to control and display information on the screen. The connections include power, ground, and various data lines for communication and control signals between the Arduino and the display.
Cirkit Designer LogoOpen Project in Cirkit Designer
Arduino UNO and ILI9341 TFT Display Interactive Graphics Demo
Image of CE Test ili9341: A project utilizing Adafruit 40-pin TFT Friend in a practical application
This circuit interfaces an Arduino UNO with an ILI9341 TFT display using two bi-directional logic level converters to manage voltage differences. The Arduino runs a program to test various graphical functions on the TFT display, demonstrating its capabilities through a series of visual benchmarks.
Cirkit Designer LogoOpen Project in Cirkit Designer
Arduino Nano Controlled TFT Display with Multiple Pushbuttons
Image of rey: A project utilizing Adafruit 40-pin TFT Friend in a practical application
This circuit features an Arduino Nano microcontroller connected to a ST7735 128x128 1.44 TFT I2C Color display and multiple pushbuttons. The display is interfaced with the Arduino via digital pins for control signals and SPI pins for data transfer. The pushbuttons are connected to various digital and analog input pins on the Arduino, likely intended for user input to control the display or other functions within the code.
Cirkit Designer LogoOpen Project in Cirkit Designer

Explore Projects Built with Adafruit 40-pin TFT Friend

Use Cirkit Designer to design, explore, and prototype these projects online. Some projects support real-time simulation. Click "Open Project" to start designing instantly!
Image of Tablero Moto: A project utilizing Adafruit 40-pin TFT Friend in a practical application
Arduino Mega 2560 Controlled TFT Touchscreen Interface
This circuit connects an Arduino Mega 2560 microcontroller to a 3.5-inch 480x320 TFT LCD display. The Arduino provides power, ground, and digital signals to control the display, including data lines for pixel information and control lines for reset, write, and command/data selection. The embedded code initializes the display and configures the Arduino's pins for communication, likely to create a user interface or visual output for a project.
Cirkit Designer LogoOpen Project in Cirkit Designer
Image of ekran: A project utilizing Adafruit 40-pin TFT Friend in a practical application
Arduino Mega 2560 and ILI9341 TFT Display Interface for Custom Display Projects
This circuit connects an Arduino Mega 2560 microcontroller to an ili9341 TFT display, enabling the microcontroller to control and display information on the screen. The connections include power, ground, and various data lines for communication and control signals between the Arduino and the display.
Cirkit Designer LogoOpen Project in Cirkit Designer
Image of CE Test ili9341: A project utilizing Adafruit 40-pin TFT Friend in a practical application
Arduino UNO and ILI9341 TFT Display Interactive Graphics Demo
This circuit interfaces an Arduino UNO with an ILI9341 TFT display using two bi-directional logic level converters to manage voltage differences. The Arduino runs a program to test various graphical functions on the TFT display, demonstrating its capabilities through a series of visual benchmarks.
Cirkit Designer LogoOpen Project in Cirkit Designer
Image of rey: A project utilizing Adafruit 40-pin TFT Friend in a practical application
Arduino Nano Controlled TFT Display with Multiple Pushbuttons
This circuit features an Arduino Nano microcontroller connected to a ST7735 128x128 1.44 TFT I2C Color display and multiple pushbuttons. The display is interfaced with the Arduino via digital pins for control signals and SPI pins for data transfer. The pushbuttons are connected to various digital and analog input pins on the Arduino, likely intended for user input to control the display or other functions within the code.
Cirkit Designer LogoOpen Project in Cirkit Designer

Technical Specifications

Key Technical Details

  • Display Interface: 40-pin connector compatible with various TFT displays
  • Supported Resolutions: Varies depending on the connected TFT display
  • Logic Level: 3.3V (5V tolerant)
  • Onboard Level Shifter: Yes, for 5V to 3.3V logic level conversion
  • Dimensions: Varies with the attached display, but typically around 2" x 2.5" for the breakout board

Pin Configuration and Descriptions

Pin Number Name Description
1-20 Data These pins are used for parallel data transfer to the display.
21 CS Chip Select, used to activate the TFT display.
22 RESET Resets the display, active low.
23 D/C Data/Command control pin.
24 WR Write signal for writing data to the display.
25 RD Read signal for reading data from the display.
26-33 GND Ground pins.
34-40 VCC Power supply pins for the display (3.3V).

Usage Instructions

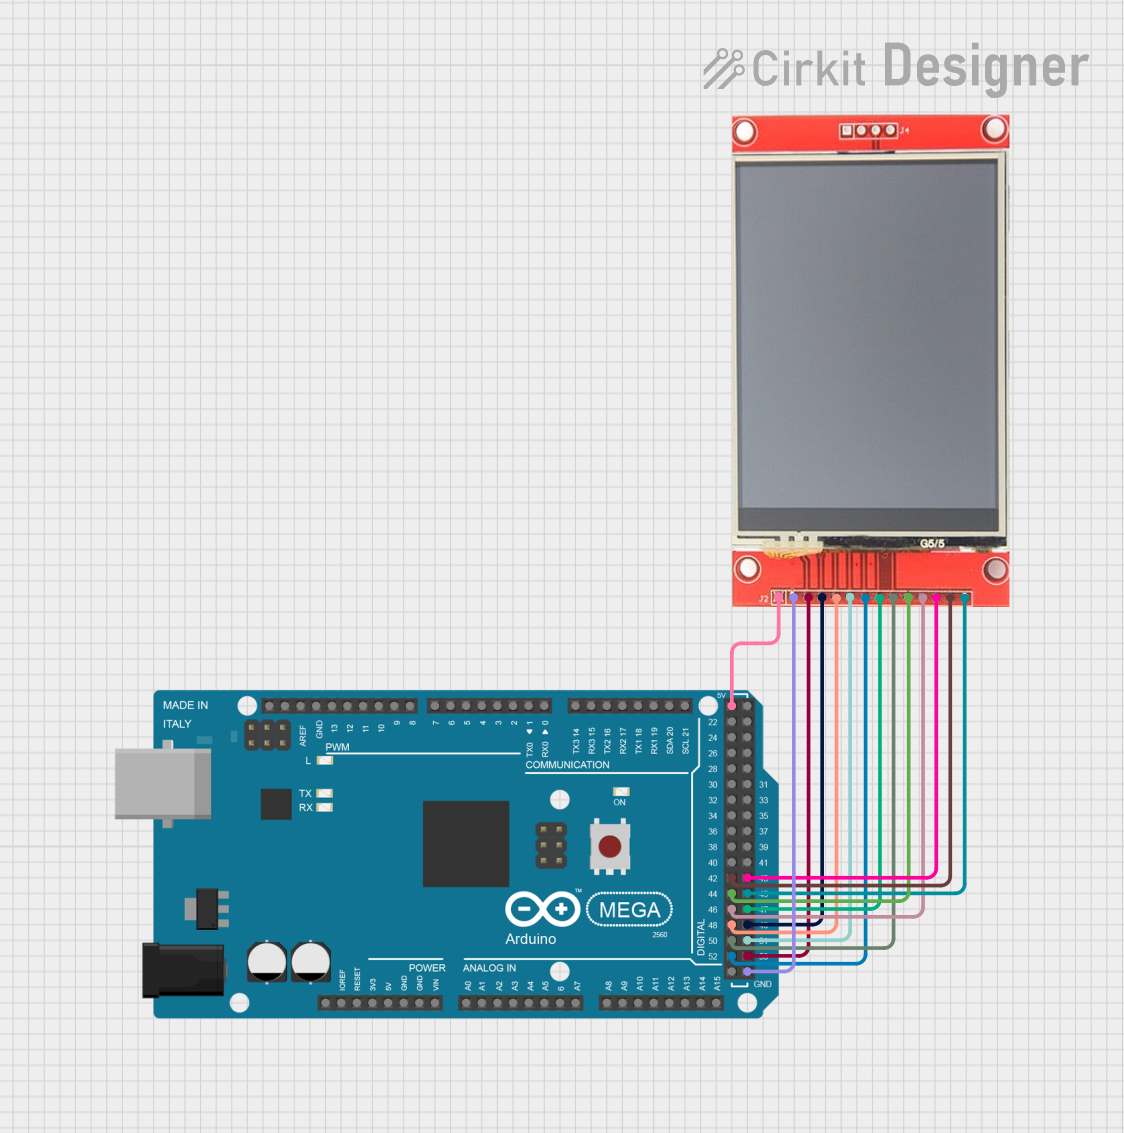
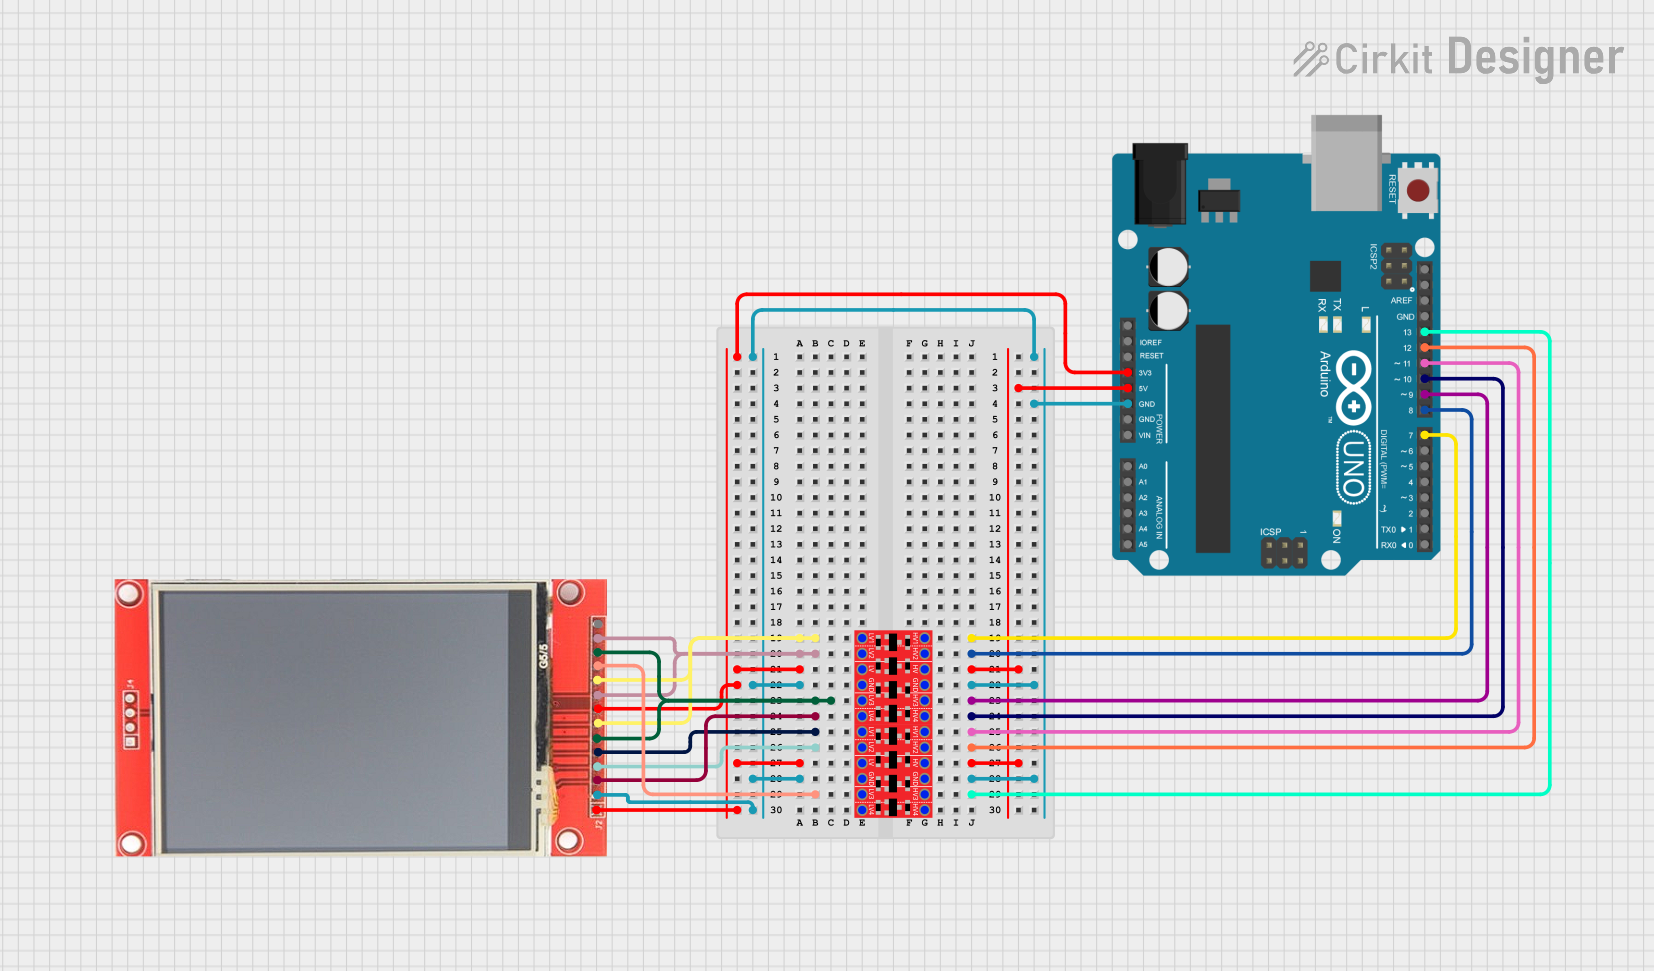
Connecting the Adafruit 40-pin TFT Friend to a Microcontroller

  1. Power Connections: Connect the VCC pins to a 3.3V power source and the GND pins to the ground.
  2. Data Connections: Connect the data pins (1-20) to the corresponding data pins on the microcontroller.
  3. Control Connections: Connect the CS, RESET, D/C, WR, and RD pins to available digital pins on the microcontroller.
  4. Level Shifting: If you are using a 5V microcontroller, ensure that the onboard level shifter is used to convert the logic levels to 3.3V to avoid damaging the TFT display.

Important Considerations and Best Practices

  • Power Supply: Ensure that the power supply is stable and within the specified voltage range to prevent damage.
  • Logic Levels: Always use level shifting when connecting to a 5V system.
  • Handling: Be cautious when handling the TFT display to avoid static discharge or physical damage to the screen.
  • Mounting: Secure the display and the breakout board to avoid stress on the connections.

Example Code for Arduino UNO

#include <Adafruit_GFX.h>    // Core graphics library
#include <Adafruit_TFTLCD.h> // Hardware-specific library

#define LCD_CS A3 // Chip Select goes to Analog 3
#define LCD_CD A2 // Command/Data goes to Analog 2
#define LCD_WR A1 // LCD Write goes to Analog 1
#define LCD_RD A0 // LCD Read goes to Analog 0
#define LCD_RESET A4 // Can alternately just connect to Arduino's reset pin

Adafruit_TFTLCD tft(LCD_CS, LCD_CD, LCD_WR, LCD_RD, LCD_RESET);

void setup() {
  Serial.begin(9600);
  tft.reset();
  uint16_t identifier = tft.readID();
  tft.begin(identifier);
  tft.fillScreen(BLACK);
  tft.setCursor(0, 0);
  tft.setTextColor(WHITE);  
  tft.setTextSize(1);
  tft.println("Hello, World!");
}

void loop() {
  // Main loop does nothing, you can add your own code here to update the display
}

Troubleshooting and FAQs

Common Issues

  • Display Not Turning On: Check the power connections and ensure that the voltage is within the specified range.
  • Garbled Output: Ensure that all data and control lines are properly connected and that there are no loose connections.
  • No Response to Commands: Verify that the RESET pin is connected and functioning correctly.

Solutions and Tips for Troubleshooting

  • Check Connections: Double-check all wiring against the pin configuration table.
  • Power Cycling: Sometimes simply turning the power off and on again can resolve issues.
  • Code Verification: Ensure that the example code provided is correctly uploaded to the microcontroller.

FAQs

Q: Can I use the Adafruit 40-pin TFT Friend with a 5V microcontroller? A: Yes, but you must ensure that the logic levels are shifted down to 3.3V to avoid damaging the TFT display.

Q: What size displays can I use with the Adafruit 40-pin TFT Friend? A: The breakout board is designed to be compatible with a variety of TFT displays that use a 40-pin connection. Check the display's datasheet for compatibility.

Q: How do I know if my display is compatible with the Adafruit 40-pin TFT Friend? A: Verify that the display has a 40-pin interface and matches the logic level and power requirements of the breakout board.