How to Use lamp holder: Examples, Pinouts, and Specs
Introduction
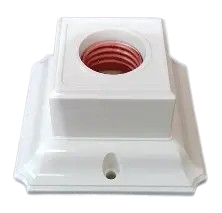
A lamp holder, also known as a light bulb socket, is a device designed to secure and connect a light bulb to an electrical circuit. It provides a stable base for the bulb while ensuring proper electrical contact for operation. The Generic E27 Socket is a widely used lamp holder compatible with E27 screw-type bulbs, commonly found in residential, commercial, and industrial lighting applications.
Explore Projects Built with lamp holder


Explore Projects Built with lamp holder
Common Applications and Use Cases
- Residential lighting fixtures (e.g., table lamps, ceiling lights)
- Commercial lighting systems
- DIY lighting projects
- Temporary lighting setups for construction or events
- Industrial machinery requiring illumination
Technical Specifications
Key Technical Details
| Parameter | Specification |
|---|---|
| Manufacturer | Generic |
| Part ID | E27 Socket |
| Compatible Bulb Type | E27 screw-type bulbs |
| Rated Voltage | 110V - 250V AC |
| Rated Current | Up to 4A |
| Material | Heat-resistant plastic or ceramic |
| Mounting Type | Screw or clip-on |
| Wire Connection Type | Screw terminals or solder points |
Pin Configuration and Descriptions
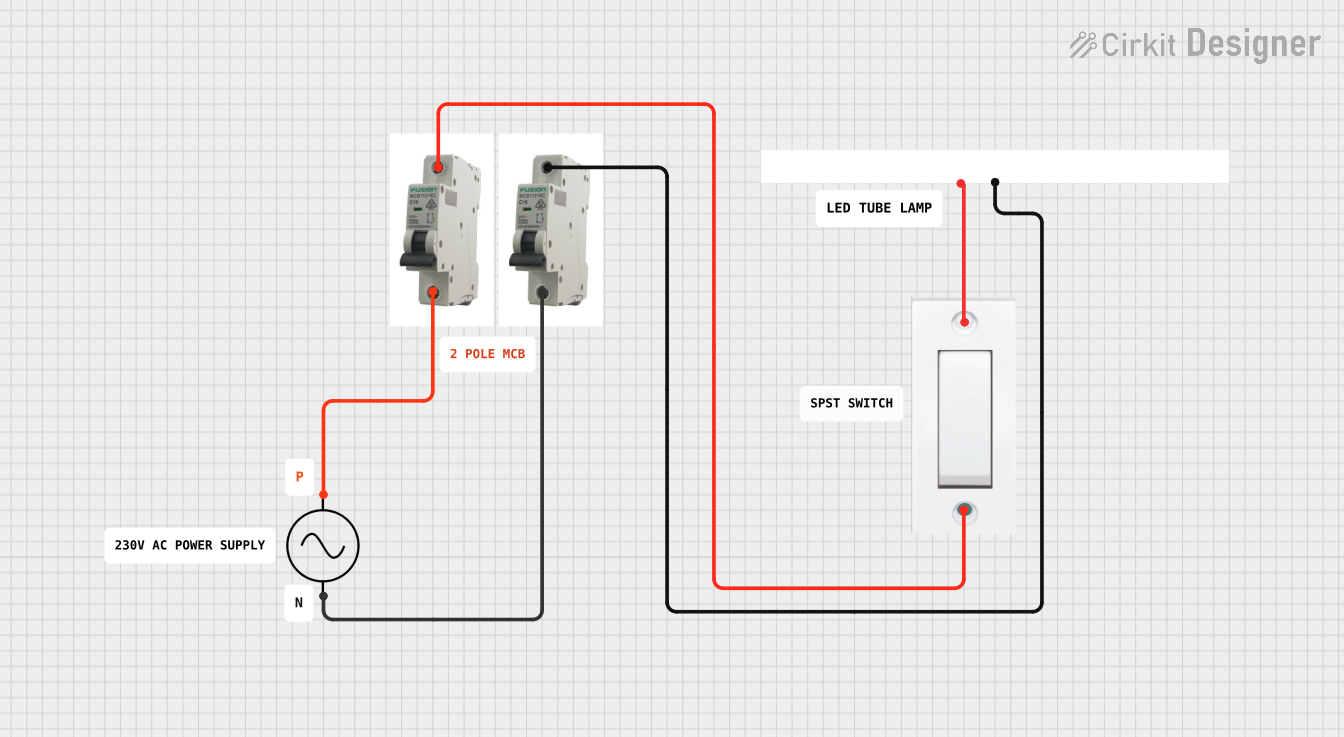
The E27 lamp holder typically has two connection points for wiring:
| Pin/Terminal | Description |
|---|---|
| Live (L) | Connects to the live wire of the circuit |
| Neutral (N) | Connects to the neutral wire of the circuit |
Note: Some models may include an additional grounding terminal for enhanced safety.
Usage Instructions
How to Use the Lamp Holder in a Circuit
Preparation:
- Ensure the power supply is turned off before handling the lamp holder.
- Verify that the lamp holder is compatible with the bulb and voltage of your circuit.
Wiring:
- Identify the live (L) and neutral (N) terminals on the lamp holder.
- Strip the insulation from the ends of the wires (approximately 5-7mm).
- Connect the live wire to the live terminal and the neutral wire to the neutral terminal.
- Tighten the screws securely to ensure a solid connection.
Mounting:
- Secure the lamp holder to the desired surface using screws or clips, depending on the mounting type.
- Ensure the holder is stable and positioned to avoid accidental contact with live parts.
Bulb Installation:
- Screw the E27 bulb into the holder until it is snug but not overtightened.
Power On:
- Turn on the power supply and test the bulb for proper operation.
Important Considerations and Best Practices
- Always use a bulb that matches the voltage and wattage rating of the lamp holder.
- Avoid overtightening the bulb to prevent damage to the holder or bulb threads.
- Use heat-resistant wiring if the lamp holder is exposed to high temperatures.
- For outdoor or damp environments, use a weatherproof lamp holder to prevent moisture ingress.
- If connecting to an Arduino or microcontroller, use a relay module to safely control the lamp holder.
Example: Controlling a Lamp Holder with Arduino UNO
Below is an example of using an Arduino UNO and a relay module to control an E27 lamp holder:
/*
  Example: Controlling an E27 Lamp Holder with Arduino UNO
  This code toggles the lamp holder ON and OFF every 2 seconds using a relay module.
  Ensure the relay module is properly connected to the lamp holder and power supply.
*/

const int relayPin = 7; // Pin connected to the relay module

void setup() {
  pinMode(relayPin, OUTPUT); // Set relay pin as output
  digitalWrite(relayPin, LOW); // Start with the relay OFF
}

void loop() {
  digitalWrite(relayPin, HIGH); // Turn the lamp ON
  delay(2000); // Wait for 2 seconds
  digitalWrite(relayPin, LOW); // Turn the lamp OFF
  delay(2000); // Wait for 2 seconds
}
Warning: Ensure proper isolation between the high-voltage lamp holder circuit and the low-voltage Arduino circuit. Use a relay module with optocoupler isolation for safety.
Troubleshooting and FAQs
Common Issues and Solutions
| Issue | Possible Cause | Solution |
|---|---|---|
| Bulb does not light up | Loose wiring or poor connections | Check and tighten all connections |
| Flickering light | Faulty bulb or unstable power supply | Replace the bulb or stabilize power |
| Overheating of lamp holder | Bulb wattage exceeds holder rating | Use a bulb within the rated wattage |
| Difficulty screwing in the bulb | Damaged or dirty threads | Clean threads or replace the holder |
| No power to the lamp holder | Faulty relay or power supply issue | Test and replace the relay or supply |
FAQs
Can I use an E27 lamp holder with LED bulbs?
- Yes, as long as the LED bulb has an E27 base and operates within the voltage range of the lamp holder.
Is the E27 socket safe for outdoor use?
- Standard E27 sockets are not weatherproof. Use a weatherproof version for outdoor applications.
What is the maximum wattage supported by the E27 socket?
- The maximum wattage depends on the material and design of the lamp holder. Check the product label or datasheet for specific details.
Can I connect the lamp holder directly to a microcontroller?
- No, microcontrollers cannot handle high voltages. Use a relay module to safely control the lamp holder.
By following this documentation, users can safely and effectively utilize the Generic E27 Socket lamp holder in various applications.