How to Use Lilypad: Examples, Pinouts, and Specs
Introduction
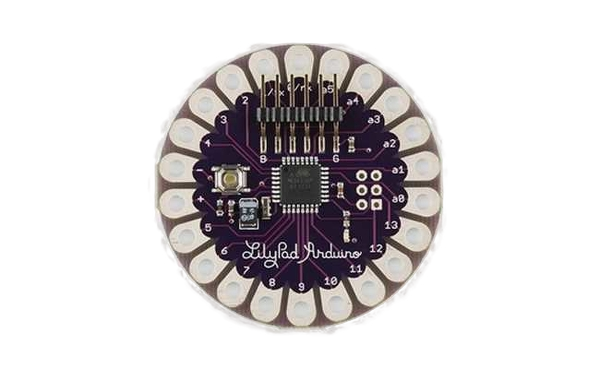
The Lilypad, manufactured by Arduino (Part ID: Lilypad), is a wearable microcontroller platform specifically designed for e-textiles and soft circuits. It is a versatile and compact board that integrates seamlessly into fabric-based projects, enabling the creation of interactive garments, accessories, and other wearable electronics. The Lilypad features a range of sensors, connectivity options, and sewable pads, making it ideal for embedding into textiles.
Explore Projects Built with Lilypad


Explore Projects Built with Lilypad
Common Applications and Use Cases
- Wearable technology, such as interactive clothing and accessories
- E-textiles for fashion and art projects
- Health monitoring devices
- Educational projects for learning about microcontrollers and circuits
- Prototyping soft circuits and fabric-based electronics
Technical Specifications
The Lilypad is designed to be lightweight and flexible, with technical specifications optimized for wearable applications.
Key Technical Details
- Microcontroller: ATmega328P
- Operating Voltage: 2.7V - 5.5V
- Input Voltage: 2.7V - 5.5V
- Digital I/O Pins: 14 (6 PWM outputs)
- Analog Input Pins: 6
- Flash Memory: 32 KB (2 KB used by bootloader)
- SRAM: 2 KB
- EEPROM: 1 KB
- Clock Speed: 8 MHz
- Dimensions: 50 mm diameter
- Weight: ~8 grams
Pin Configuration and Descriptions
The Lilypad features sewable pads for easy integration into fabric-based circuits. Below is the pin configuration:
| Pin | Name | Description |
|---|---|---|
| 1 | GND | Ground connection for the circuit. |
| 2 | VCC | Power supply input (2.7V - 5.5V). |
| 3 | TX (D1) | Transmit pin for serial communication. |
| 4 | RX (D0) | Receive pin for serial communication. |
| 5 | D2 - D13 | Digital I/O pins (D3, D5, D6, D9, D10, D11 support PWM). |
| 6 | A0 - A5 | Analog input pins for reading sensor data. |
| 7 | RST | Reset pin to restart the microcontroller. |
| 8 | + and - Pads | Additional sewable power pads for connecting external components or sensors. |
Usage Instructions
The Lilypad is designed to be sewn into fabric using conductive thread, allowing for the creation of flexible and wearable circuits. Below are the steps and best practices for using the Lilypad in your projects.
How to Use the Lilypad in a Circuit
Powering the Lilypad:
- Connect a power source (e.g., a coin cell battery or LiPo battery) to the VCC and GND pads.
- Ensure the voltage is within the operating range (2.7V - 5.5V).
Connecting Components:
- Use conductive thread to sew components (e.g., LEDs, sensors, or buttons) to the sewable pads on the Lilypad.
- Ensure tight and secure stitching to maintain good electrical connections.
Programming the Lilypad:
- Connect the Lilypad to your computer using an FTDI adapter or USB-to-serial converter.
- Open the Arduino IDE, select "Lilypad Arduino" as the board, and upload your code.
Testing the Circuit:
- After uploading the code, test the circuit to ensure all components are functioning as expected.
- Check for loose connections or short circuits caused by overlapping conductive threads.
Important Considerations and Best Practices
- Use insulated conductive thread to prevent accidental short circuits.
- Avoid overlapping conductive threads when sewing multiple connections.
- Secure the Lilypad and components to the fabric using non-conductive thread or adhesive to prevent movement.
- When using sensors or actuators, ensure they are compatible with the Lilypad's voltage and current ratings.
Example Code for Arduino UNO-Compatible Projects
The following example demonstrates how to blink an LED connected to pin D9 of the Lilypad:
// Example: Blink an LED connected to pin D9 on the Lilypad
// Ensure the LED is properly sewn to the D9 and GND pads.

void setup() {
  pinMode(9, OUTPUT); // Set pin D9 as an output
}

void loop() {
  digitalWrite(9, HIGH); // Turn the LED on
  delay(1000);           // Wait for 1 second
  digitalWrite(9, LOW);  // Turn the LED off
  delay(1000);           // Wait for 1 second
}
Troubleshooting and FAQs
Common Issues and Solutions
The Lilypad is not powering on:
- Check the power source and ensure it is properly connected to the VCC and GND pads.
- Verify that the battery voltage is within the operating range (2.7V - 5.5V).
Components are not functioning:
- Inspect the conductive thread connections for loose or broken stitches.
- Ensure there are no short circuits caused by overlapping threads.
Unable to upload code to the Lilypad:
- Confirm that the FTDI adapter or USB-to-serial converter is properly connected.
- Ensure the correct board ("Lilypad Arduino") and port are selected in the Arduino IDE.
- Press the reset button on the Lilypad before uploading the code.
The circuit behaves erratically:
- Check for interference caused by movement or stretching of the fabric.
- Use non-conductive thread or adhesive to secure the Lilypad and components in place.
FAQs
Q: Can I wash garments with the Lilypad attached?
A: Yes, but you must remove the power source and ensure all components are securely attached. Hand washing is recommended to avoid damaging the circuit.
Q: What type of sensors can I use with the Lilypad?
A: The Lilypad is compatible with a wide range of sensors, including temperature, light, and motion sensors. Ensure the sensors operate within the Lilypad's voltage range.
Q: How do I prevent short circuits in my project?
A: Use insulated conductive thread and avoid overlapping connections. Test the circuit thoroughly before use.
Q: Can I use the Lilypad with other Arduino boards?
A: Yes, the Lilypad can communicate with other Arduino boards via serial communication or I2C, depending on your project requirements.