Cirkit Designer Logo
Cirkit Designer
Your all-in-one circuit design IDE
Home / 
Component Documentation

How to Use BMP 180 Sensor: Examples, Pinouts, and Specs

Image of BMP 180 Sensor
Cirkit Designer LogoDesign with BMP 180 Sensor in Cirkit Designer

Introduction

The BMP180 is a high-precision barometric pressure sensor capable of measuring atmospheric pressure and temperature. It is widely used in applications such as weather stations, altimeters, GPS navigation systems, and other projects requiring accurate altitude and pressure data. The sensor communicates using the I2C protocol, making it easy to interface with microcontrollers like the Arduino.

Explore Projects Built with BMP 180 Sensor

Use Cirkit Designer to design, explore, and prototype these projects online. Some projects support real-time simulation. Click "Open Project" to start designing instantly!
ESP-8266 Based Environmental Monitoring System
Image of PHD: A project utilizing BMP 180 Sensor in a practical application
This circuit features an ESP-8266 microcontroller connected to a BMP180 barometric pressure sensor, a BH1750 light intensity sensor, and a DHT22 temperature and humidity sensor. The ESP-8266 uses its I2C interface, with pins D1 and D2 connected to the SCL and SDA lines of both the BMP180 and BH1750, to communicate with the sensors. The DHT22 sensor is connected to a digital pin (D4) for direct signal reading, and all sensors share common power (3V3) and ground (GND) connections with the microcontroller.
Cirkit Designer LogoOpen Project in Cirkit Designer
Arduino Nano Weather Station with BMP180 Sensor and MicroSD Data Logging
Image of circuito: A project utilizing BMP 180 Sensor in a practical application
This circuit features an Arduino Nano microcontroller interfaced with an Adafruit BMP180 sensor for measuring atmospheric pressure and a MicroSD card socket for data storage. The BMP180 communicates with the Arduino via I2C, while the MicroSD card uses SPI for data transfer.
Cirkit Designer LogoOpen Project in Cirkit Designer
ESP8266-Based Environmental Monitoring System
Image of Stacja_Pogodowa1: A project utilizing BMP 180 Sensor in a practical application
This circuit is designed to collect environmental data using an ESP-8266 microcontroller connected to a BMP180 barometric pressure sensor, a GY-30 BH1750FVI digital light intensity sensor, and a DHT11 temperature and humidity sensor. The sensors are interfaced with the ESP-8266 via I2C (SCL and SDA lines) and digital IO pins, and they share a common power supply (3.3V) and ground. The circuit is likely intended for weather monitoring or home automation applications, with capabilities to measure temperature, humidity, barometric pressure, and light intensity.
Cirkit Designer LogoOpen Project in Cirkit Designer
Arduino Nano-Based Sensor Data Logger with Alert System
Image of model rocket flight computer: A project utilizing BMP 180 Sensor in a practical application
This circuit features an Arduino Nano microcontroller interfaced with BMP180 and MPU-6050 sensors via I2C communication for environmental and motion sensing. It includes a piezo buzzer and three LEDs (red, yellow, blue) for audio-visual feedback, controlled by digital pins on the Arduino. A pushbutton with a pull-up resistor, a micro SD card module for data logging, and a 9V battery for power supply are also part of the circuit.
Cirkit Designer LogoOpen Project in Cirkit Designer

Explore Projects Built with BMP 180 Sensor

Use Cirkit Designer to design, explore, and prototype these projects online. Some projects support real-time simulation. Click "Open Project" to start designing instantly!
Image of PHD: A project utilizing BMP 180 Sensor in a practical application
ESP-8266 Based Environmental Monitoring System
This circuit features an ESP-8266 microcontroller connected to a BMP180 barometric pressure sensor, a BH1750 light intensity sensor, and a DHT22 temperature and humidity sensor. The ESP-8266 uses its I2C interface, with pins D1 and D2 connected to the SCL and SDA lines of both the BMP180 and BH1750, to communicate with the sensors. The DHT22 sensor is connected to a digital pin (D4) for direct signal reading, and all sensors share common power (3V3) and ground (GND) connections with the microcontroller.
Cirkit Designer LogoOpen Project in Cirkit Designer
Image of circuito: A project utilizing BMP 180 Sensor in a practical application
Arduino Nano Weather Station with BMP180 Sensor and MicroSD Data Logging
This circuit features an Arduino Nano microcontroller interfaced with an Adafruit BMP180 sensor for measuring atmospheric pressure and a MicroSD card socket for data storage. The BMP180 communicates with the Arduino via I2C, while the MicroSD card uses SPI for data transfer.
Cirkit Designer LogoOpen Project in Cirkit Designer
Image of Stacja_Pogodowa1: A project utilizing BMP 180 Sensor in a practical application
ESP8266-Based Environmental Monitoring System
This circuit is designed to collect environmental data using an ESP-8266 microcontroller connected to a BMP180 barometric pressure sensor, a GY-30 BH1750FVI digital light intensity sensor, and a DHT11 temperature and humidity sensor. The sensors are interfaced with the ESP-8266 via I2C (SCL and SDA lines) and digital IO pins, and they share a common power supply (3.3V) and ground. The circuit is likely intended for weather monitoring or home automation applications, with capabilities to measure temperature, humidity, barometric pressure, and light intensity.
Cirkit Designer LogoOpen Project in Cirkit Designer
Image of model rocket flight computer: A project utilizing BMP 180 Sensor in a practical application
Arduino Nano-Based Sensor Data Logger with Alert System
This circuit features an Arduino Nano microcontroller interfaced with BMP180 and MPU-6050 sensors via I2C communication for environmental and motion sensing. It includes a piezo buzzer and three LEDs (red, yellow, blue) for audio-visual feedback, controlled by digital pins on the Arduino. A pushbutton with a pull-up resistor, a micro SD card module for data logging, and a 9V battery for power supply are also part of the circuit.
Cirkit Designer LogoOpen Project in Cirkit Designer

Technical Specifications

  • Operating Voltage: 1.8V to 3.6V (typically powered at 3.3V)
  • Pressure Range: 300 hPa to 1100 hPa (equivalent to altitudes of -500m to 9000m)
  • Temperature Range: -40°C to +85°C
  • Pressure Accuracy: ±1 hPa
  • Temperature Accuracy: ±0.5°C
  • Communication Protocol: I2C (7-bit address: 0x77)
  • Power Consumption: Ultra-low power (3 µA in standard mode)
  • Dimensions: 3.6mm x 3.8mm x 0.93mm

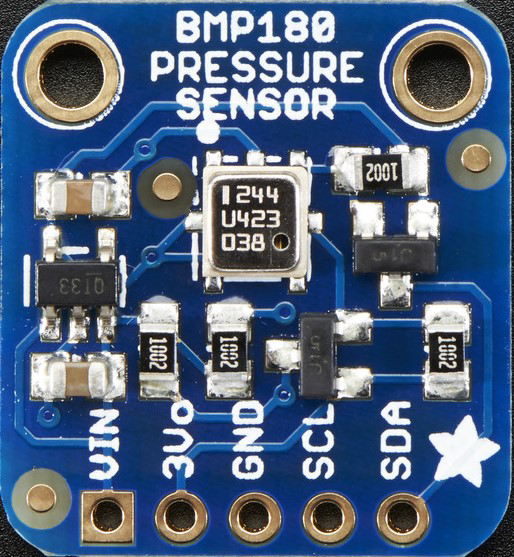
Pin Configuration and Descriptions

The BMP180 sensor typically comes in a breakout board format. Below is the pinout:

Pin Name Description
VCC Power supply (1.8V to 3.6V, typically 3.3V)
GND Ground
SDA I2C data line (connect to microcontroller's SDA pin)
SCL I2C clock line (connect to microcontroller's SCL pin)

Usage Instructions

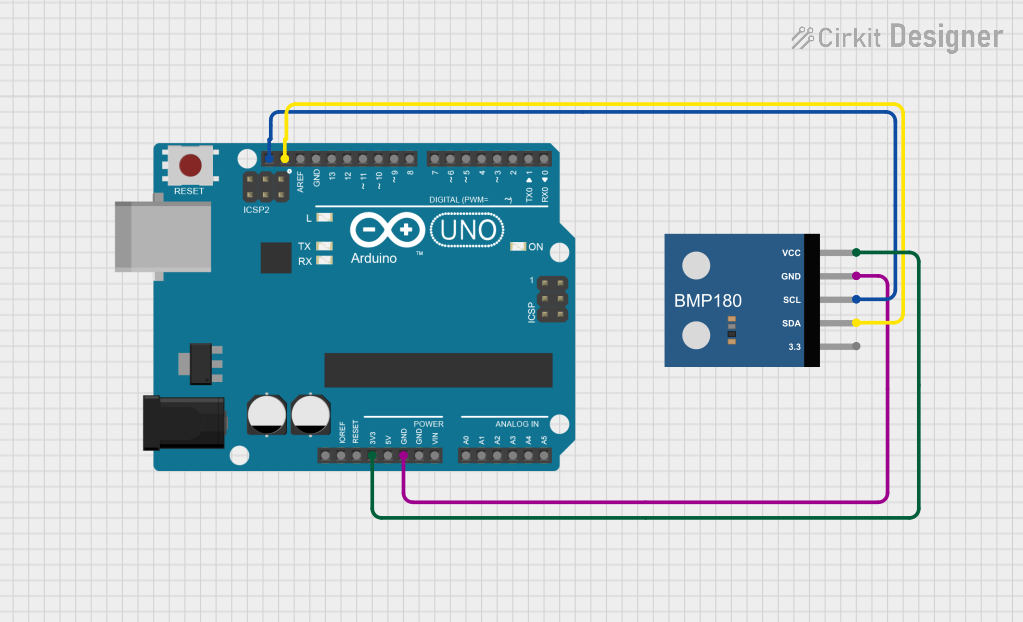
Connecting the BMP180 to an Arduino UNO

To use the BMP180 sensor with an Arduino UNO, follow these steps:

  1. Wiring:

    • Connect the VCC pin of the BMP180 to the 3.3V pin on the Arduino.
    • Connect the GND pin of the BMP180 to the GND pin on the Arduino.
    • Connect the SDA pin of the BMP180 to the A4 pin on the Arduino (I2C data line).
    • Connect the SCL pin of the BMP180 to the A5 pin on the Arduino (I2C clock line).
  2. Install Required Libraries:

    • Open the Arduino IDE.
    • Go to Sketch > Include Library > Manage Libraries.
    • Search for "Adafruit BMP085 Unified" (compatible with BMP180) and install it.
  3. Example Code: Use the following code to read pressure and temperature data from the BMP180:

    // Include necessary libraries
    #include <Wire.h>
    #include <Adafruit_Sensor.h>
    #include <Adafruit_BMP085_U.h>
    
    // Create an instance of the BMP180 sensor
    Adafruit_BMP085_Unified bmp = Adafruit_BMP085_Unified(10085);
    
    void setup() {
      // Initialize serial communication for debugging
      Serial.begin(9600);
      Serial.println("BMP180 Sensor Test");
    
      // Initialize the BMP180 sensor
      if (!bmp.begin()) {
        Serial.print("Could not find a valid BMP180 sensor, check wiring!");
        while (1); // Halt the program if the sensor is not detected
      }
    }
    
    void loop() {
      // Create a sensor event to store data
      sensors_event_t event;
      bmp.getEvent(&event);
    
      // Check if pressure data is available
      if (event.pressure) {
        // Display pressure in hPa
        Serial.print("Pressure: ");
        Serial.print(event.pressure);
        Serial.println(" hPa");
    
        // Calculate and display altitude (assuming sea level pressure = 1013.25 hPa)
        float seaLevelPressure = 1013.25;
        Serial.print("Altitude: ");
        Serial.print(bmp.pressureToAltitude(seaLevelPressure, event.pressure));
        Serial.println(" m");
      }
    
      // Read and display temperature
      float temperature;
      bmp.getTemperature(&temperature);
      Serial.print("Temperature: ");
      Serial.print(temperature);
      Serial.println(" °C");
    
      // Wait 2 seconds before the next reading
      delay(2000);
    }
    

Important Considerations and Best Practices

  • Power Supply: Ensure the sensor is powered with 3.3V. If using a 5V microcontroller, use a logic level shifter for the I2C lines.
  • Pull-Up Resistors: The I2C lines (SDA and SCL) require pull-up resistors (typically 4.7kΩ). Many breakout boards already include these resistors.
  • Altitude Calculation: The altitude calculation assumes a standard sea-level pressure of 1013.25 hPa. Adjust this value for more accurate results in your location.
  • Avoid Noise: Keep the I2C lines short to minimize noise and ensure reliable communication.

Troubleshooting and FAQs

Common Issues

  1. Sensor Not Detected:

    • Cause: Incorrect wiring or I2C address mismatch.
    • Solution: Double-check the connections and ensure the I2C address is set to 0x77 in the code.
  2. Incorrect Readings:

    • Cause: Environmental factors or incorrect sea-level pressure value.
    • Solution: Ensure the sensor is in a stable environment and adjust the sea-level pressure value in the code.
  3. No Data Output:

    • Cause: Missing or incorrect library installation.
    • Solution: Verify that the "Adafruit BMP085 Unified" library is installed and included in the code.

FAQs

  • Can the BMP180 be used with a 5V microcontroller?

    • Yes, but you must use a logic level shifter for the I2C lines to avoid damaging the sensor.
  • What is the maximum altitude the BMP180 can measure?

    • The sensor can measure altitudes up to approximately 9000 meters above sea level.
  • How accurate is the temperature reading?

    • The temperature accuracy is ±0.5°C, making it suitable for most applications.
  • Can I use the BMP180 for weather forecasting?

    • Yes, the BMP180 is commonly used in weather stations to monitor atmospheric pressure changes, which are useful for forecasting.

By following this documentation, you can successfully integrate the BMP180 sensor into your projects and achieve accurate pressure and temperature measurements.