How to Use MPXV4006DP: Examples, Pinouts, and Specs
Introduction
The MPXV4006DP is a differential pressure sensor that provides a voltage output proportional to the pressure difference between its two ports. It is designed for applications requiring precise pressure measurements, such as in HVAC systems, medical devices, and industrial automation. This sensor is part of the Freescale (now NXP) family of pressure sensors and is known for its high accuracy, reliability, and ease of integration into electronic systems.
Explore Projects Built with MPXV4006DP


Explore Projects Built with MPXV4006DP
Common Applications
- HVAC (Heating, Ventilation, and Air Conditioning) systems for airflow monitoring
- Medical devices such as ventilators and CPAP machines
- Industrial automation for pressure monitoring and control
- Liquid level sensing in tanks
- Leak detection systems
Technical Specifications
The MPXV4006DP is a highly sensitive and accurate sensor. Below are its key technical specifications:
| Parameter | Value |
|---|---|
| Pressure Range | ±6 kPa (±0.87 psi) |
| Output Voltage Range | 0.2 V to 4.7 V |
| Supply Voltage (VCC) | 5 V ± 0.25 V |
| Sensitivity | 0.6 mV/Pa |
| Accuracy | ±1.5% of full-scale span |
| Operating Temperature Range | -40°C to +125°C |
| Response Time | 1 ms |
| Port Style | Dual port (differential) |
| Package Type | Small Outline Package (SOP) |
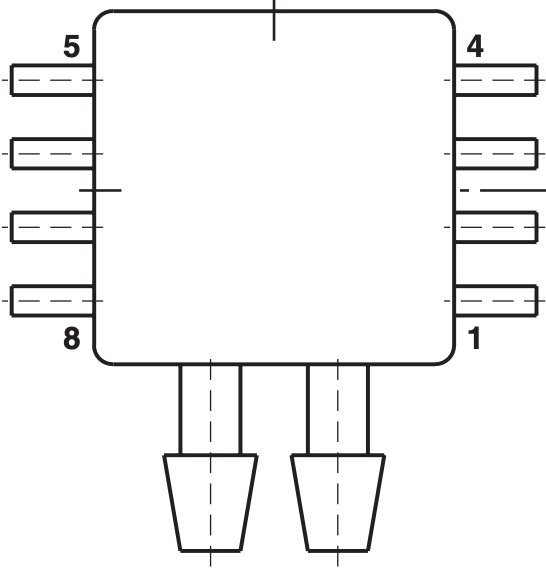
Pin Configuration and Descriptions
The MPXV4006DP has a standard 6-pin configuration. Below is the pinout and description:
| Pin Number | Pin Name | Description |
|---|---|---|
| 1 | VOUT | Analog output voltage proportional to pressure |
| 2 | GND | Ground connection |
| 3 | VCC | Supply voltage (5 V) |
| 4 | NC | Not connected (leave unconnected) |
| 5 | NC | Not connected (leave unconnected) |
| 6 | NC | Not connected (leave unconnected) |
Usage Instructions
How to Use the MPXV4006DP in a Circuit
- Power Supply: Connect the VCC pin to a stable 5 V power source and the GND pin to the ground of your circuit.
- Output Signal: The VOUT pin provides an analog voltage proportional to the pressure difference between the two ports. This output can be read using an ADC (Analog-to-Digital Converter) on a microcontroller.
- Pressure Ports: The sensor has two ports:
- P1 (High Pressure Port): Connect this port to the higher pressure source.
- P2 (Low Pressure Port): Connect this port to the lower pressure source.
- Signal Conditioning: If needed, use an operational amplifier to amplify or filter the output signal for better resolution.
Important Considerations
- Ensure the supply voltage is within the specified range (5 V ± 0.25 V) to avoid damaging the sensor.
- Avoid exposing the sensor to pressures beyond its rated range (±6 kPa) to prevent permanent damage.
- Use proper tubing and fittings to connect the pressure ports securely and avoid leaks.
- The sensor is sensitive to temperature changes; consider compensating for temperature variations in your application.
Example: Connecting MPXV4006DP to an Arduino UNO
Below is an example of how to connect the MPXV4006DP to an Arduino UNO and read the pressure data:
Circuit Connections
- Connect the VCC pin of the sensor to the 5 V pin on the Arduino.
- Connect the GND pin of the sensor to the GND pin on the Arduino.
- Connect the VOUT pin of the sensor to the A0 analog input pin on the Arduino.
Arduino Code
// Define the analog pin connected to the sensor's VOUT pin
const int sensorPin = A0;

// Define the supply voltage and sensor sensitivity
const float supplyVoltage = 5.0; // Arduino's supply voltage (5V)
const float sensitivity = 0.6;  // Sensor sensitivity in mV/Pa

void setup() {
  Serial.begin(9600); // Initialize serial communication
}

void loop() {
  // Read the analog value from the sensor
  int sensorValue = analogRead(sensorPin);

  // Convert the analog value to voltage
  float sensorVoltage = (sensorValue / 1023.0) * supplyVoltage;

  // Calculate the pressure in Pascals (Pa)
  // Offset voltage is 0.2V, so subtract it before dividing by sensitivity
  float pressure = (sensorVoltage - 0.2) / (sensitivity / 1000.0);

  // Print the pressure value to the Serial Monitor
  Serial.print("Pressure (Pa): ");
  Serial.println(pressure);

  delay(1000); // Wait for 1 second before the next reading
}
Notes on the Code
- The sensor's output voltage includes an offset of 0.2 V at 0 Pa. This is accounted for in the calculation.
- The sensitivity is given in mV/Pa, so it is converted to V/Pa by dividing by 1000.
Troubleshooting and FAQs
Common Issues
No Output Voltage or Incorrect Readings
- Cause: Incorrect wiring or insufficient power supply.
- Solution: Double-check the connections and ensure the supply voltage is 5 V ± 0.25 V.
Fluctuating or Noisy Output
- Cause: Electrical noise or unstable power supply.
- Solution: Use decoupling capacitors (e.g., 0.1 µF) near the sensor's power pins to stabilize the supply voltage.
Output Voltage Stuck at 0.2 V
- Cause: No pressure difference between the two ports.
- Solution: Verify that there is a measurable pressure difference between P1 and P2.
Sensor Damage
- Cause: Exceeding the pressure range or incorrect handling.
- Solution: Ensure the pressure applied to the ports is within the ±6 kPa range and handle the sensor carefully.
FAQs
Q1: Can the MPXV4006DP measure absolute pressure?
No, the MPXV4006DP is a differential pressure sensor and measures the pressure difference between its two ports (P1 and P2). For absolute pressure measurements, use an absolute pressure sensor.
Q2: Can I use the MPXV4006DP with a 3.3 V microcontroller?
The MPXV4006DP requires a 5 V supply for proper operation. However, you can use a voltage divider or level shifter to interface its output with a 3.3 V microcontroller.
Q3: How do I compensate for temperature variations?
The sensor's output may vary slightly with temperature. Use a temperature sensor in your system and apply software compensation to correct for temperature-induced errors.
Q4: What type of tubing should I use for the pressure ports?
Use flexible, airtight tubing that fits securely onto the sensor's ports. Silicone or PVC tubing is commonly used for this purpose.